Unknown's avatar

About oliver's fancy

I am wife to a patient husband named Ian and stay-at-home mom to a busy little boy named Oliver. When not running around after him, I enjoy dabbling in all sorts of craftiness. I am a self-proclaimed fabric-aholic and proud of it! I have started this blog to document my journey of bettering my sewing/ crafting skills and show off occasional pictures of my little man and superb culinary creations:).

Stacked Coins Table Runner

Stacked Coins Runner

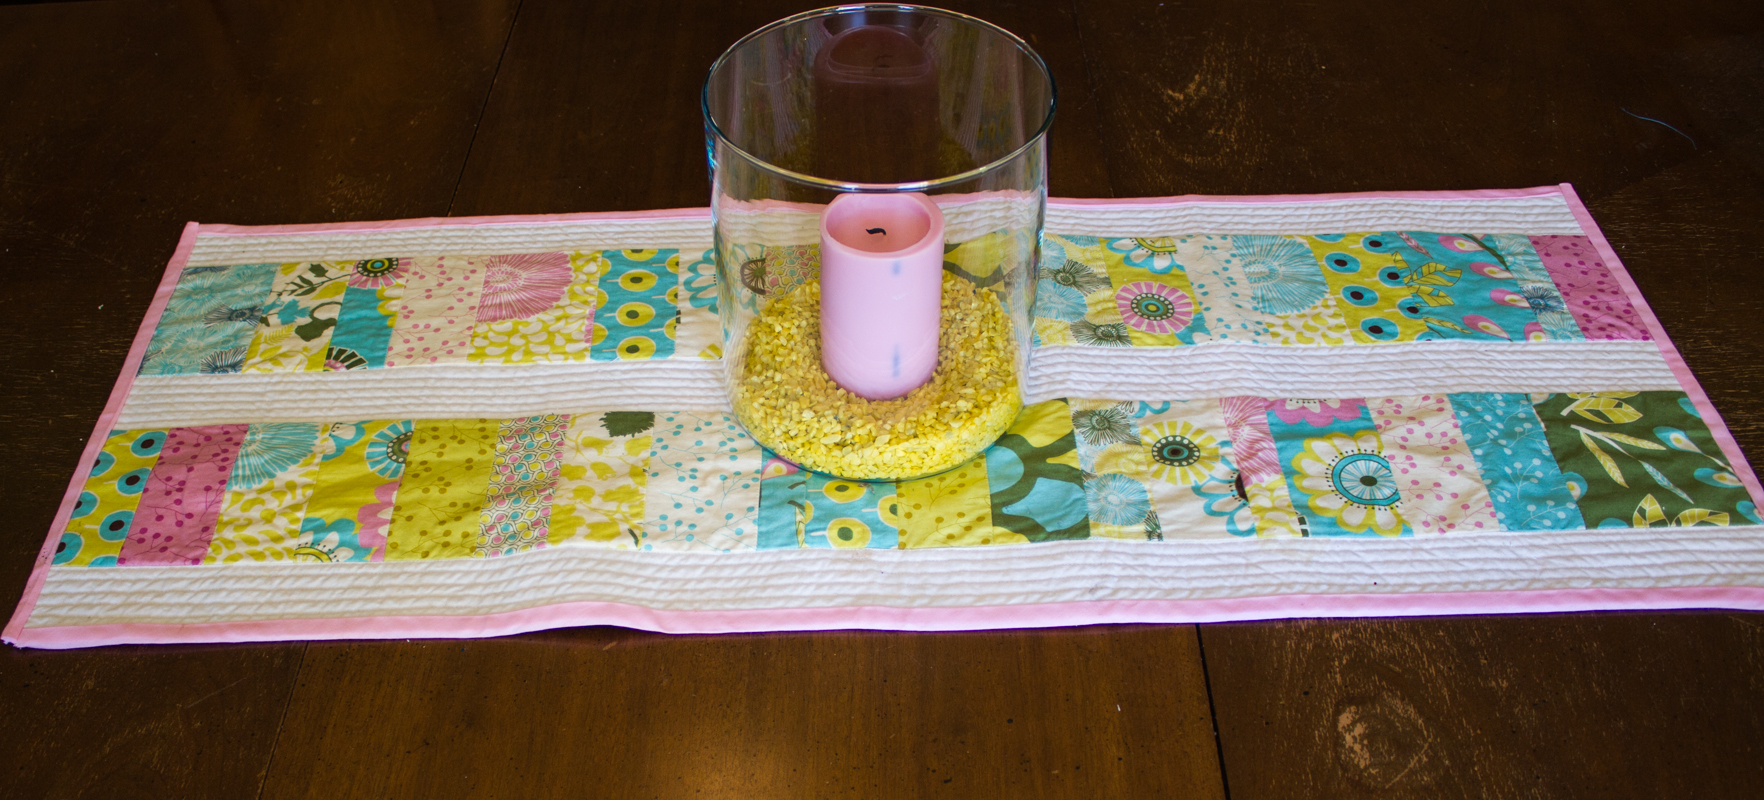
Last spring I wanted to make something to cover my coffee table and decided to try out a bit of a variation of the stacked coins pattern. I took a charm pack, cut the squares in random widths, then sewed them together in 2 long rows. I used some white Kona cotton in between the long rows and backed the whole thing with a home dec. fabric from Ikea. I wanted the coins to stand out so I quilted the white area fairly densely with straight lines and then left the coins unquilted. I just happened to have this pink bias tape in my stash to coordinate so nicely with everything. The end result is a bit girly, but fun for spring. The best part is that I had everything I needed on hand and didn’t need to make a trip to the store for supplies. I love it when that happens, and it feels like I am making something for free. 🙂

Stacked Coins Runner

Stacked Coins Runner

When I pulled it out again for this season, I decided to use it on my dining room table along with a new container and colored rocks that I picked up during a recent Ikea trip. I like it even better on my table and think it dresses up the room nicely. Oops, I didn’t notice until editing my pictures that I really should wash the runner because it’s got some major spots going on…Hence some creative photo editing because I’m too lazy to wash it and retake my pics. Or maybe I should have just shown you all the spots and chalked it up to being real, huh? Also pay no attention to the “distressed” table… that’s one of those projects we will get to, eventually, haha. When does eventually ever happen? 🙂 At least now I have a nice runner to cover up some of the worst spots on it!

Stacked Coins Runner

My New Baby

And here she is…

Bernina 350-SPECIAL EDITION---Flower design

Oh wait, hope you weren’t expecting pictures of a real baby. 🙂 That’s another 12 weeks in the making- though I’m ready for that baby to be here as well! Here’s my special present from a very sweet hubby. I was surprised on Valentine’s Day with the offer to go pick out one of two options at the Bernina store. This little scenario came about with my frustration at the inability of my Singer machine to keep up with the demands of constant sewing- leading to my trying a friend’s Bernina and becoming hooked on how amazing it was!

However I had figured this was something I would have to work and wait for another several years. The hubs was so impressed at the quality of the Berninas and how well they keep their resale value that he decided I should go ahead and get one now since I could put it to immediate good use. Just so happened that the local Bernina store was having a great sale and had ordered the special edition which came with an extra free-motion quilting foot at a cute skin. For those inquiring minds, this is a Bernina 350 PE.

My actual machine… Isn’t is so pretty?

I am loving my new baby…might be neglecting the other baby in the house to play on this thing. 😉 Free motion quilting is a dream on this thing! It’s amazing how smooth sewing can be… the Bernina brand definitely lives up to it’s hype. I was waiting a few weeks to write my blog review on this machine because I wanted to try it out for a bit, and I am here to tell you that I am still super happy with it. I don’t know all the ins and out of my machine yet, but my mastery classes begin in April, and I can’t wait to find out all the special things that it can do. Meanwhile I’m having fun learning on my own. I’ve got two quilts to be quilted on the list for next week and can’t wait to see how this baby does with them! And now I have my present for Valentine’s Day, birthday, anniversary, and most likely Christmas. 🙂 One stop shopping for the hubby!

Celebrate the Boy: Raglan Tee

I had so many other projects to get to last week that I didn’t get to do any more boy projects…Boo! But the celebration doesn’t end until tonight so this last project is coming in right on time.

Raw Edged Raglan

Somehow, I blinked and all of Oliver’s tees are too short! Guess he had a growth spurt overnight. Thankfully, I have quite a few old tees of mine and the hubs set aside to reinvent as Little Man tees. I really wanted to get a couple made today but it took longer than I anticipated to make the first one since I had to trace a new pattern size. I made the Raw-Edged Raglan tee from Sewing for Boys. (Same as this previous tee.) This time I made the size 2/3. The shirt is a teensy bit big but that gives him some room to grow. I had some problems with the collar being too small last time I made this tee, and while this one fits fine, it turned out just a bit wonky. Not bad enough to make me redo it, but a little off. However for a knit-sewing novice, I am fairly proud of how well I did overall. 🙂

Raw Edged Raglan Raw Edged Raglan

Fabric used: The Blue and White stripe is from one of my old tees and the yellow cuffs and collar are from one of Ian’s. I was inspired to add the yellow accents after I saw some of the cool color pops in the Flickr group. Hopefully, I pulled it off ok. Hubs isn’t too sold on it, but I like it. Plus doesn’t this look great with his new skinny pants? (thank you Old Navy clearance!) And check out the other cool color pop- his orange diaper…hey cloth CAN be cool. 🙂

Raw Edged Raglan

Originally, I had a yellow cuff at the bottom of the shirt as well, but it made the shirt too long and baggy (t-shirt dress, anyone?). I cut off the border and took the sides of the shirt in about 1/4 inch each to make the tee more slim-fit while still giving some ease for growing room. It’s starting to warm up down here but the days still have a chill so these lightweight long sleeve tees are perfect for this weather! Hopefully I will have time to make a few more soon!

Raw Edged Raglan

By the way, the wagon was a gift from a friend and he absolutely loves it! I had a hard time getting any shots in focus because he was pushing it (running at high speed) all over the yard. He thought it was funny to chase after me and “get” me with his wagon…Glad for some sun and a chance to work off some energy outdoors!

Raw Edged Raglan Raw Edged Raglan

Custom Quilt Top

Ian’s cousin approached me a while back and asked if I would be willing to make them a custom twin-sized quilt to be used for their little girl’s bed. Although I don’t normally do quilt commissions, I thought this one would be fun to do because she was giving me free reign with the fabrics. We agreed on a color scheme of apple green, purple and white in a simple patchwork pattern. I decided to make the squares 5.5″ to mimic the look of charm squares. The finished quilt top measures around 70×90.

Beth's Quilt

Purple is my favorite color so I enjoyed pulling fabrics together for this quilt!  This is the first time I have used my design wall for a large scale quilting project and it was so nice to be able to use it to hold my pieces and not have to crawl around on the floor!  Thankfully, they have also given me plenty of time to finish this quilt- knowing that I have lots of projects running concurrently. I finished the quilt top last week and have been waiting for a nice day to photograph it. I thought today would finally be the day, but when I went outside, the wind was blowing quite hard and kept throwing my quilt around! Oh well, I ended up with a few fairly decent pictures and have no patience to wait for a less-windy day. 🙂

IMG_8849 IMG_8853

I need to go out and get some more fabric for the backing, and then I will begin quilting. Hopefully it will get finished in the next few weeks!

Shoppes on Trade

This weekend was the big day and we moved into our booth on Saturday morning! Now to wait and see what happens. 🙂 I wanted to share some pictures of the booth with you. The onesies, hoops, washcloths, and basket are mine…everything else is my friend, Christa, from Brio Trio. Don’t you just love her animal softies? I love how well our styles mesh together.

Shoppes on Trade St

Shoppes on Trade St Shoppes on Trade St Shoppes on Trade St

As you can see, we have the use of the entire cupboard space plus a little wall space on either side of the unit- which works great for my hoops! We are still working on filling up the space a little more and adding some fun decorations. Hopefully, this space will look even better over the next few weeks, but I am happy to have made a start. If you are local and get a chance, there are some really cool new artists in this building now! I had so much fun browsing the other spaces after setting up ours. In fact, I already have some jewelry and scarves on my want list. 🙂

Shoppes on Trade St Shoppes on Trade St

On a side note, check out the new banner!! I am so happy to have my new logo finished and ready to go! My good friend, Mary, came up with the original design and I commissioned another good friend and graphic designer to complete the project. I am sooo happy with how it all looks! I have already ordered my new mini-Moo business cards and cannot wait for them to come in the mail…making me feel so official and professional 🙂

Diaper Caddy Take 2

In my wrap up post a few weeks back, I briefly mentioned that I made a divided basket using Anna from Noodlehead’s new pattern. I liked the main idea but wasn’t super happy with my results so I wanted to try a few more out to see if I could tweak some things and end up with a better result- hopefully to offer for sale in my new booth (Squee!)

Diaper Caddy

Set up for the new space was this morning, and I stayed up way too late last night finishing this basket and accessories for it so that I would have it ready for today. So glad I did though because I love this! Aren’t the owls just adorable?!

Changes from last time:

  • Did not pre-wash fabric
  • Only used one layer of interfacing- Craft Fuse 808 instead of SF 101 and Fusible Fleece

Diaper Caddy

Only a few changes, but they made a huge difference. You see, I am not super comfortable using interfacing because I don’t have much experience with it, and the type where you have to wet the rag, press until dry, and then continually re-wet rag and repeat the process to adhere all interfacing to fabric is somewhat tedious in my book! Doing it for two layers of interfacing took me way too long. Then last time, I was too impatient to let the fabric dry after this process and sewed it together while wet- stretching out my outer fabric to be bigger than the lining. In contrast, the craft fuse 808 just needs a quick iron-on to adhere to your fabric…soo much faster and easier! I am also quite happy with the stability it gave to my basket. Not pre-washing the fabric kept it stiffer as well. FYI the outer fabric is duck cloth and the inner fabric is Kona cotton.

I love this pattern even more the second time around. Anna does a great job with making her instructions clear and easy to understand. My problems the first time were all user-error not pattern error. 🙂

Diaper Caddy

I wanted to make this diaper caddy part of a gift set so that someone can buy it for a baby gift and not need anything else to complete it, so I also whipped up some handmade burp cloths for the inside. I matched up some terry cloth with cute cotton prints from my stash. The burp cloths ended up around 8×13 in size… I love this result and made up a few bundles of burp and wash cloths to sell separately in the shop as well. This is a great project to do assembly line style! Not pictured is the newborn diapers and wipes I picked up on my way to the shop this morning to complete the caddy. I already have boy fabric picked out to make more of these and can’t wait to get on it! Hopefully others like these as much as I do! Oh and for those of you non-locals, I will be updating the etsy shop with some baskets and burp/wash cloth sets very shortly!

Burp Cloths


Shop booth set up went quite well this morning and we are headed back after Little Man wakes up from his afternoon nap to show the family my new space and take some pictures for the blog. 🙂 Now to keep myself from running down there every other day to see if I’ve sold anything. 😉

Celebrate the Boy 2013: Update #1

In the midst of all the crazy activity going on over here getting ready to move in to my shop booth on Saturday, I decided to take a little break yesterday to do some sewing for my boys. It is Celebrate the Boy week after all, and I needed a creative break.

First off, a super quick and easy project- some fabric belts. Oliver has been given quite a few pair of pants and most of them fall right off his skinny little waist- even wearing his cloth diapers! Looks like I have a tall and skinny kid…. just like his daddy. 🙂 I have been meaning to try this pattern for a while and just never got around to it. The belt pattern is the Hold ‘Em Up Belt from Sewing for Boys. I modified it a bit to make the belts 3/4″ wide instead of 1″ since 1″ is too big for his pant loops. I used some old D-rings I had saved from some discarded purses of mine. The blue one is my favorite. I just love the pop of color it gives. Fabric is from a Pink Castle order back when she had her moving sale: (FYI if you need a good online shop, I highly recommend Pink Castle Fabrics!) Metro Circles in Turquoise and Sketch in Coffee. Don’t know why I didn’t make these sooner- they came together so quickly and work really well on his pants. I used some Craft Fuse 808 as interfacing to make them a bit stiffer and they turned out a perfect weight.

fabric beltsFabric belts

Next up, we have my first handmades for little brother- some Quick Change Trousers. Pattern is from Anna Maria Horner’s book Handmade Beginnings. I made a few of these for Oliver and really enjoyed the pattern so I decided little bro needed his own pair. Size is 0-3 months. On Oliver, these tended to run big so not sure how soon the pants will fit the little man, but I can’t wait to try them out….Oh only about 14 more weeks till we get to meet this little fella! 🙂 I love the fabrics together on these pants. I used more of my Pink Castle order- the Metro Circles in Gray and some of the Summersville Alphabetty In Seafoam print I’ve been hoarding. Kona cotton blue is the coordinating reverse fabric. I love these metro circles and wish I had bought more! That’s all my extra fun I can have for now- back to shop sewing. Hopefully the move goes well this week and I can tackle some fun boy projects next week. Glad Celebrate the Boy is 2 weeks long!

Quick Change Trousers Quick Change Trousers Quick Change Trousers Quick Change Trousers


Celebrate the Boy 2013!!

Celebrate the boy

I am soooo excited that Dana and Rae are doing another celebrate the boy series this year! This is their third time doing this series, and each time it gets better and better. Having boy number 2 on the way in our household makes this extra pertinent for me. I love sewing for Oliver, but I do get discouraged looking at all the cute girl patterns and knowing I can’t use them. This series is coming at a great time for me to get motivated to make baby boy #2 some cool stuff. Check out how cool Elliot and Owen are- definitely sporting cool handmades! I get such a kick out of Elliot’s facial expressions… what a cute kid!

The series begins on Monday and will run for 2 weeks. They have a great Flickr pool going as well as an Instagram hashtag (#celebratetheBOY) for all you IG junkies (myself included in that list:) ). Next week is a busy week for me, but I’m definitely gonna squeeze in some time for boy-related sewing! Hope you will all follow along with everyone and join in the fun! Cannot wait to see what everyone comes up with!

celebrate the boy

Oliver’s Fancy…coming to a shop near you!

I hinted last weekend on Instagram that I would be making a big announcement this week and here it goes! This may not be that big to you, but it is a big step for me. I have been given the opportunity to share a booth rental space at a shop in town! For you locals, it is the Shoppes on Trade Street in downtown Greer. This is a very exciting opportunity because the shop recently came under new management, and they are restructuring to include 14 new artisans in various fields- sewing, crafting, jewelry. They are really working to bring in a more modern vibe to the store. I will be sharing my space with Brio Trio. (Check out her super cute fox and wolf softies!) We open our booth the first weekend of March.

mustache onesies

As you can imagine, that means I have been a busy little bee cranking out lots of new onesies and hoops for my space. It’s a lot to do in a short amount of time, but I am feeling pretty confident with what I’ve gotten done so far. I’m hoping to get finished with all the things that I have on my list so I can branch out and try some new items…we shall see how that goes. Anywho, I have committed to try this out for 3 months at least. Here’s hoping to a great, new venture! I am a bit nervous about this, because I have done some re-evaluating of my prices and such and have made the leap to adjust my items how they really should be priced. Part of me is worried that means that no one will buy anything, but one of the things I learned at the Maker’s Summit was not to undervalue myself because I am crippling my future options.South Carolina Onesies

I thought I would share some pictures of some things I have been working on so far…really loving it! Spoiler alert… I am now branching out to include some girly items. I also updated the etsy shop for any of you who like what you see, but live out of town. Whew! I didn’t realize how long it had been since I did a proper update on etsy…it majorly needed it!

Boy Onesies

Boy Hoop Art hoop art State hoops girl hoop art

Another fun thing is that my logo has been completed (yay)! I am working on a new blog and etsy header, but  I was able to go ahead and order my custom stamp so that I can stamp my logo on my onesies and hoops. Feels so good to be official. Now to go make some money to reimburse all my supply costs!

Current Projects

I have been very busy doing a little of this and a little of that…not enough to share an entire post about each thing so I thought I’d give a bit of a collage of all my random projects.

First off, I have ventured into girly world with my hoops and onesies. After completing a custom Etsy order for a special little girl’s room, I used some of the scraps to make some onesies for a friend’s baby shower. I am loving this look and I think you might see some more girly stuff in my Etsy shop from here on out…not changing who I am but expanding a bit so I don’t lose out on an audience I am not currently reaching.

Hoop Art

I also completed another figure 8 scarf as a birthday present for my aunt. I have tweaked this pattern so that it is now super easy and such a fun little present! Really must make one of these for myself soon! This one was made in a cotton/linen blend fabric and I really love the weight and feel of it.

Figure 8 Scarf

I tried out Anna’s new pattern– the divided basket- to see if I want to sell these in the future… It ended up being the perfect container for the balls and books we purchased for a friend’s little man’s first birthday party. I need a few more practice rounds with this pattern to work out some kinks, but I’m thinking it’s a go. I’ll keep you posted on my progress.

Diaper Caddy

A custom quilt order has begun taking shape. The client gave me a color range of whites, dark purples, and apple greens and allowed me free range in fabric choices. I love projects like this because I don’t have to stress about what the client wants and can just have fun putting things together.


twin quilt-001

Last, but not least, I have completed the quilt back for the guestbook quilt! Woo Hoo! This is a huge weight on my mind right now and I am so happy that I have made progress on it. Next step, get some 505 spray and attempt quilting… you will definitely be updated on how that monumental step goes!