spring kcw: red geometric raglan and khaki shorts

raglan tee, khaki shorts6

Whew, I just barely got in my hour today. With us having church on Sunday, it tends to be a crazy day, and in the past I don’t think I’ve ever gotten my KCW hour in. But I was determined to do it this spring because I had one more outfit I wanted to get done! In taking the photo shoots this past week, I realized that Oliver needed a pair of plain khaki shorts that would match with all his colorful tees. I got this finished right as the sun was going down, and we ran outside to snap a few pics before we lost all our light.

raglan tee, khaki shorts

For the shorts, I (yet again) used Dana’s kid shorts pattern with the flat front and patch pockets. I really wanted to do something fun with the pockets and add some piping or bias tape like I did with the numbers one, but then I realized that would defeat my purpose of making shorts to match with every outfit. So they’re kinda a bit boring but practical. At least they have some pockets for treasure-keeping. I may go back and add some patch pockets to the back to give some more interest. The material is from an old pair of Ian’s pants that were in the upcycle bin. We really got some use out of that upcycle bin this week! Glad that I can now justify keeping all those old clothes around “just in case!”raglan tee, khaki shorts3

The shirt is one of my faves from this week. (do I say that about every one? lol) I got the abstract geo print from the Fabric Fairy using a gift card (incidentally at the same time I got the stripes for this tee). The fabric is a cotton lycra blend and I really like the weight and feel of it. I have been collecting different types of knits over the last few months and getting a feel for the type I like and the type I am not as fond of (basically not a fan of poly blends even if they are cute).

raglan tee, khaki shorts2

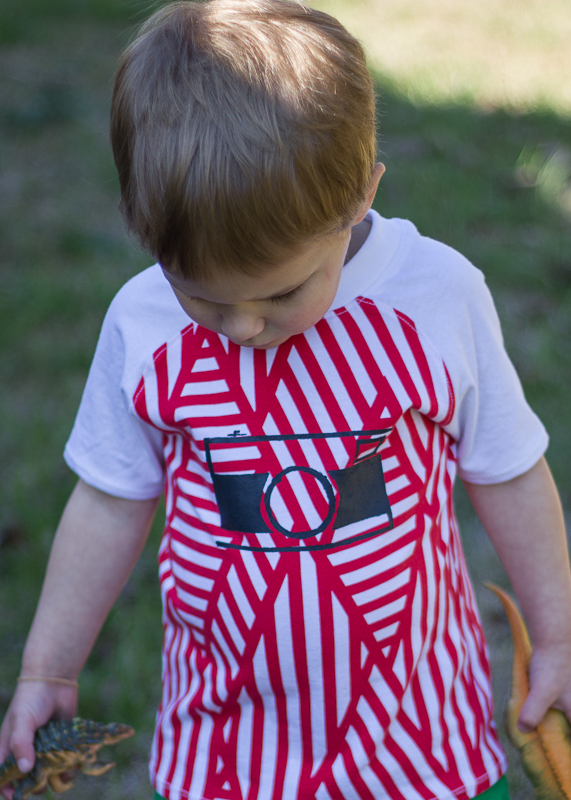
I used the raw-edged raglan pattern from Sewing for Boys for the tee but made it without the raw edges. I added the white raglan sleeves to break up the abstract print a bit and then freezer paper stenciled the camera. I knew I needed to add the stencil so that my husband would be ok with the tee since he wasn’t a huge fan of the red print. I just knew it would look good though if I used it the right way! Glad my intuition was right this time. And he agreed that it looked cool once it was all finished.

raglan tee, khaki shorts4

And that’s a wrap for kcw y’all. It was a fun week and I made a lot of cute clothes. I think O’s wardrobe is looking pretty good for this spring/summer. I am surprisingly not burned out from sewing like a mad women, but I am looking forward to not having the photo-shoots/picture editing/blog writing every evening! I’ll be back in a few days with my final thoughts on this kcw and a roundup of all my clothes! Hope you had an enjoyable week, and even if you didn’t get done all you wanted that you learned some things and enjoyed the kids clothes sewing community! Make sure you check out the community website and browse all the fun clothes made this week!
kid's clothes week

Advertisement

Celebrate the Boy: Raglan Tee

I had so many other projects to get to last week that I didn’t get to do any more boy projects…Boo! But the celebration doesn’t end until tonight so this last project is coming in right on time.

Raw Edged Raglan

Somehow, I blinked and all of Oliver’s tees are too short! Guess he had a growth spurt overnight. Thankfully, I have quite a few old tees of mine and the hubs set aside to reinvent as Little Man tees. I really wanted to get a couple made today but it took longer than I anticipated to make the first one since I had to trace a new pattern size. I made the Raw-Edged Raglan tee from Sewing for Boys. (Same as this previous tee.) This time I made the size 2/3. The shirt is a teensy bit big but that gives him some room to grow. I had some problems with the collar being too small last time I made this tee, and while this one fits fine, it turned out just a bit wonky. Not bad enough to make me redo it, but a little off. However for a knit-sewing novice, I am fairly proud of how well I did overall. 🙂

Raw Edged Raglan Raw Edged Raglan

Fabric used: The Blue and White stripe is from one of my old tees and the yellow cuffs and collar are from one of Ian’s. I was inspired to add the yellow accents after I saw some of the cool color pops in the Flickr group. Hopefully, I pulled it off ok. Hubs isn’t too sold on it, but I like it. Plus doesn’t this look great with his new skinny pants? (thank you Old Navy clearance!) And check out the other cool color pop- his orange diaper…hey cloth CAN be cool. 🙂

Raw Edged Raglan

Originally, I had a yellow cuff at the bottom of the shirt as well, but it made the shirt too long and baggy (t-shirt dress, anyone?). I cut off the border and took the sides of the shirt in about 1/4 inch each to make the tee more slim-fit while still giving some ease for growing room. It’s starting to warm up down here but the days still have a chill so these lightweight long sleeve tees are perfect for this weather! Hopefully I will have time to make a few more soon!

Raw Edged Raglan

By the way, the wagon was a gift from a friend and he absolutely loves it! I had a hard time getting any shots in focus because he was pushing it (running at high speed) all over the yard. He thought it was funny to chase after me and “get” me with his wagon…Glad for some sun and a chance to work off some energy outdoors!

Raw Edged Raglan Raw Edged Raglan

Project Run and Play Week 5- Fall Holiday

Well I totally got my wires crossed for this week’s challenge. Up until Monday afternoon, I thought this week’s challenge was your signature look. Oops. I thought about sitting this one out, but after reading Deborah’s post on Tuesday night, I was inspired with some great ideas for Thanksgiving. I designed an outfit that Oliver can wear to the Thanksgiving dinner table. I love the idea of having a special outfit he can wear for this often-overlooked holiday! And yet it’s still super comfy for him to run around in after dinner.

First off, the cardigan!! 🙂 I got this idea after seeing several Greenpoint cardigans in the KCWC flickr group. I am sure that is a great pattern, but I decided to take a stab at drafting my own pattern. I used several old tees from Goodwill as my fabric. I took the raglan tee as my base and then completely dissasembled and rearranged it. I moved the fold line over several inches in the front, back and sleeve pieces so it would fit more like a sweater than a skinny tee. Then I cut the front piece straight down the middle and created a curve down the front. I sewed the base cardi together- enclosing all raw edges and made all the binding- for the sleeves, bottom, and neck/buttonhole facings. This I sewed on in similar fashion to adding cuffs. The only thing I didn’t do quite right was to take enough off the neck to account for the binding so it was a little big/high in the back. To fix this, I made something similar to a dart down the middle of the back of cardigan. It’s still a bit big, but it is supposed to be a sweater and it will give him time to grow into it. I am already thinking about how I will make the next one!

The pants- self-drafted pattern using what I learned from the green cords. (made these a little smaller and shorter.) They have a faux fly, lined pockets, flat fell seams, flat front with elastic back, and hand embroidery on the back pockets.

The tee- I knew I wanted to make a tee to coordinate with the cardigan and wanted it to have some sort of applique or embroidery on it. My hubby suggested the word THANKS. I embroidered it with Perle Cotton. The pattern is the Raw-Edged Raglan, but I enclosed all the seams on mine instead of leaving them raw. I used a ribbed knit for the neckband (and enlarged the neckband by 2 inches:) ) and it fits great! No problem fitting over head.

the photoshoot came to a sad and abrupt end after a fast trip down the slide ended in a face full of mulch and a scratched and bloody face 😦

This is also my update for KCWC days 3-4. Whew! I have enjoyed both PRP and KCWC but I am looking forward to a break in order to get to all my other sewing lists piling up around me! I think Oliver will be well-stocked with handmade clothing once this week and next are over!

Project Run and Play: Week 4- Boy Challenge

This week’s challenge was boy week. Because I always sew for a boy, I wanted to do something a little special for this challenge. I wanted to stretch my skills and make something cool and fun. Well it was a crazy amount of work, but I’m very happy with how it all turned out.

I made a 3 piece outfit: skinny jeans, t-shirt, and a flannel jacket.

For Oliver’s David Beckham outfit, I drafted the skinny pants based on a pair of his pants. I was going to use that pattern again, but then I saw that Jessica had created a pattern for a pair of skinny cords that just happened to be in Oliver’s size. I loved the pockets and yoke detail on her pants, so I decided to try out her pattern. Note to self: little boys are bigger than little girls! We ended up with super skinny hipster pants. He has to wear his disposable diapers with these pants because there’s not enough room for the cloth diaper bum. Also with the super skinny bottom, they continually ride up so they look a little short, even though they are not. However, I can’t help but think the little hipster look is too cute on him. 🙂 I used a blue stretch denim that I picked up at JoAnn’s this weekend for the pants fabric.

The t-shirt is the Raw-Edged Raglan pattern from Sewing for Boys. This was my first foray into sewing with knits, and I am now hooked. Seriously, no hemming! I used an old t-shirt of Ian’s for the fabric, and it is just so fun to see the Little Man in a loved shirt of his Daddy’s. I had to adjust the pattern a little because even though it says that it starts at 18 months, my pattern sheet begins at 2/3. I took about 1/4 inch of all the sides of the 2/3, and it turned out great. I love the skinny fit and super long sleeves. The only problem we ran into was that my child must have a big head because I had to stretch out the neckline quite a bit to fit it over his head. Thankfully, I was able to stretch it enough to fit without having to re-cut and sew a new neckband. FYI using freezer paper as your pattern piece makes cutting out the knit fabric so easy because you iron on the freezer paper to the knit and then pull it off to reuse after you cut the fabric.

The jacket is also based on a pattern from Sewing for Boys. It is based on the Out on the Town Jacket with modifications. I wanted to have a straight-across neckline, not a sloping one like the pattern shows, so I just decided to wing it and cut out the neckline how I had pictured in my head. Guess what- turned out perfectly! Love it when that happens. I used a flannel from JoAnn for the outer and the same stretch denim for the lining. I was going for a look that was kinda in-between a button-down shirt and a jacket. If I do say so myself, I think I nailed it. This is the perfect jacket for a casual fall outing- especially around here where we are starting to get a bit of a chill at night but still have 80 degree days. This jacket came together so quickly- quite an easy sew- up until the buttons! The buttonhole foot on my machine is such a pain in the neck! I had to re-do several of the buttonholes because they were all uneven- and then the thread on the bottom was a nasty mess. I think it’s because of the thickness of the jacket that the machine didn’t feed well. If anyone has any advice for good buttonholes, I’d be glad to hear it!

So that’s my outfit for this week- if you are still reading after a super long post. I really enjoyed learning even more new skills and having fun with an outfit along the way! I have now added more raw-edged raglans to my list for KCWC next week! FYI there was a great post on Project Run and Play this week on sewing boy clothing, She echoed some of the same thoughts that I’ve had. Oh, and I have to give props to the hubby for the photography. He took all the pictures (for this shoot and the Beckham shoot), and I followed along as photographer assistant. He has a much better gift at photography than I do!