Tooth Fairy Pillow DIY

tooth fairy pillow (6 of 8)We had our first loose tooth experience this weekend! I can’t believe that this season is upon us already… he’s only 5! But apparently 5 is not too young so there you have it.

We were out shopping this weekend and saw a tooth fairy pillow, and Oliver asked if I could make him one. What can I say to a request like that? We made one together the very next day!

tooth fairy pillow (1 of 8)

After looking up lots of tooth fairy pillow ideas online, we settled on a teepee version. Oliver picked out the all the fabrics… I think he did a great job matching them up! The background is a print from the Lorax Dr. Seuss line (Truffula Tree Tufts- sold out now) and the pockets are fussy cut from the Celebrate Seuss Tossed Characters print (still available here).

tooth fairy pillow (4 of 8)

I thought I’d explain how I made the pillow in case anyone else would like to make one too.  I made an equilateral triangle template- 10″ wide at the base and 10″ tall- and used that to cut out two triangle pieces from my fabric. Before I sewed the triangles together I made two little pockets and sewed one to each triangle piece…about 1.25″ from the bottom.

tooth fairy pillow (8 of 8)

After I had the pockets sewn on, I sewed the triangle pieces right sides together- leaving a 2″ unsewn section at the bottom. I clipped all the corners and flipped the pillow right side out through the unsewn bottom section. Then Oliver helped me stuff the pillow with polyfill, and he even helped me handsew the bottom section closed!

tooth fairy pillow (3 of 8)

Easy, peasy! Finished pillow size is 9″ high x 9″ base. The whole operation took less than an hour from start to finish! And when we were finished, Oliver told me that it turned out exactly how he had wanted it…fist pumps all around. 🙂 Nothing better than a satisfied customer and it was fun to have him so involved in the whole process.

tooth fairy pillow (5 of 8)

Notice there are two pockets-  we decided that one side was for the tooth lost and the other for the forthcoming money to be left by the tooth fairy. 😉 He hasn’t lost that first tooth yet, but it’s getting looser by the day so I anticipate this pillow getting used very soon!

tooth fairy pillow (2 of 8)

Advertisement

A Winged 241 Tote

Today I get to be part of the Winged blog tour. I met Bonnie Christine from Going Home to Roost this past spring at the Maker’s Summit here in town. I was so excited to discover that an Art Gallery Fabric designer lives so close to me! I made sure to pick her brain for all kinds of fabric and blog ideas during the after party at the conference. She is such a sweet person, and I love her fabric aesthetic so I am pretty pumped to be part of the tour for her recent fabric line.

winged 241-6 (1 of 1)

I decided to use this tour as a chance to make a pattern that’s been sitting on my shelf for exactly a year now- the 241 Tote! I bought this pattern last year during Anna’s black Friday sale and have just never got around to making it. I figured this tour would be the perfect push to get me to finally try out this pattern. Note: I am finding bag photography requires skills that I am still developing so bear with my photos!

winged 241 (3 of 4)I have loved all of Anna’s patterns that I have tried so far and this one is true to form. Great instructions and great finished result. My only complaint with bag patterns is so. much. interfacing. That’s par for the course with bag-making, but since I don’t make bags very often, I’m just not used to it. I should have put on a Christmas movie during the cutting and interfacing part! Woulda made it more enjoyable. The good news is once you get that part over with, the bag construction is very easy and sews together quickly.

winged 241 (4 of 4)I didn’t have any magnetic snaps on hand and didn’t have time to go to the store and pick up one so I’m going to add a small strip of velcro for my closure. Not quite as nice as a snap but it’ll do. I love the inside pocket- perfect to slip my cell phone into so it doesn’t get lost in the bag.

winged 241 (2 of 4)I loved both the butterfly and the birds prints from Bonnie’s fabric line so I found a way to use both of them in my bag! Love how well they mesh together. The purse side and handle fabric is a lightweight denim that I had in my stash. Very happy with how this bag turned out and can’t wait to put it to good use! My current purse is in a sad state of disrepair so this was a sorely needed addition to my wardrobe!winged 241 (1 of 4)

That’s my stop on the Winged blog tour. Be sure to go to the main tour page to check out all the other stops along the way. Yesterday’s post was Kelley MacDonald of The City and Us with some pretty awesome fabric-covered terra cotta pots! Monday’s post will be Rachael McKeeman of The Floral Suitcasewinged-blog-tour

Denim + Leather Messenger Bag

I’m back with another Pattern Parcel…. #7. This time, it’s the handbag edition. There’s a great roundup of handbags for you in this parcel. I’ve been eyeing that Betty Bowler for a while and can’t wait to try it out! I really wanted to try it for this post but I didn’t have the necessary hardware and have not had time to get to the store to get it.

Pattern Parcel #7: Choose your own price and support DonorsChoose. Win/win!

Parcel #7 includes:

Barcelona Bag and Wallet by Pat Bravo
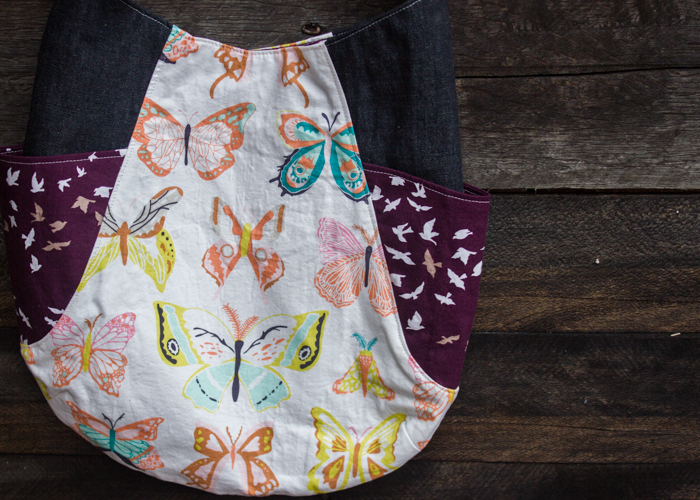
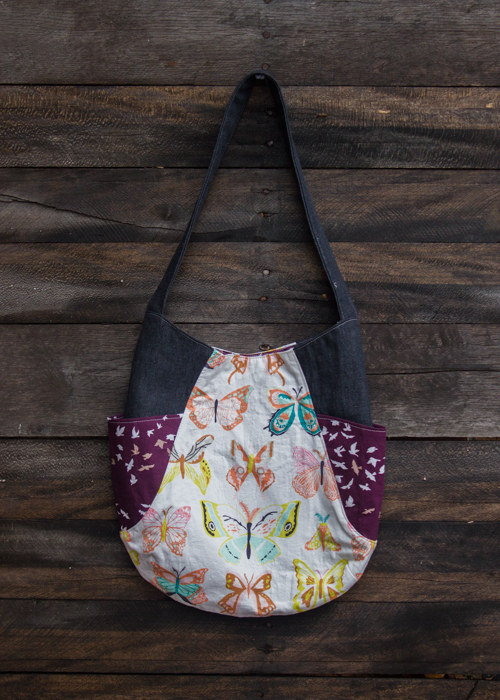
Butterfly Sling Purse by Emmaline Patterns
Evelyn Hangbag by ChrisW Designs
Midtown Messenger Bag by Betz White
Betty Bowler by Swoon Sewing Patterns
BONUS PATTERN: Daphne Bag by Clover & Violet

A reminder about Pattern Parcel– You name your own price for the parcel and if you choose $32 or more you get to unlock the bonus pattern. I love the mission behind this parcel- a percentage of your payment goes straight to Donor’s Choice and helps provide educational tools and supplies to needy classrooms. It’s so cool to be able to support indie designers while also giving to those in need.

denim messenger (1 of 6)

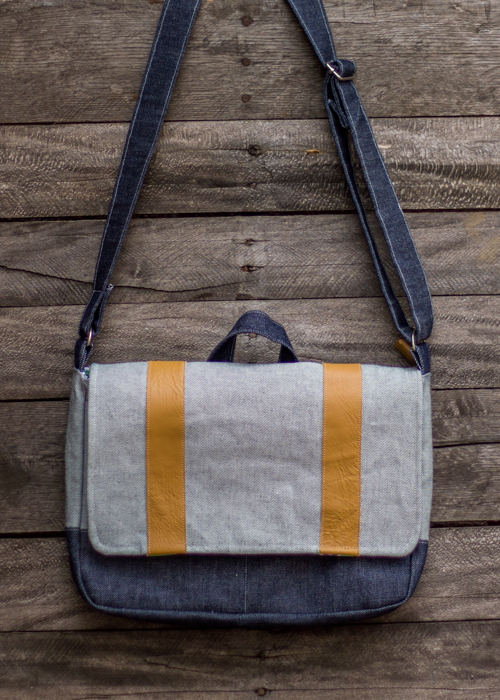
I chose the Midtown Messenger Bag by Betz White for my pattern. I took the opportunity to make something for my husband. It’s fairly rare that I sew for him so I try to make up for it when I can! He’s very supportive of all my sewing craziness so he deserves something in return.

denim messenger (5 of 6)
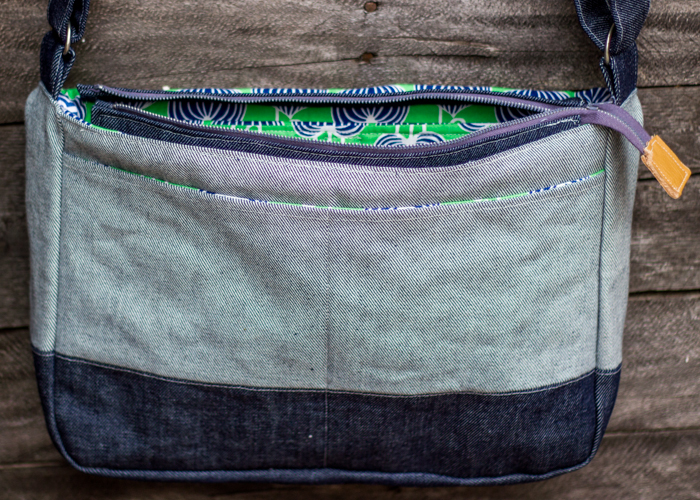
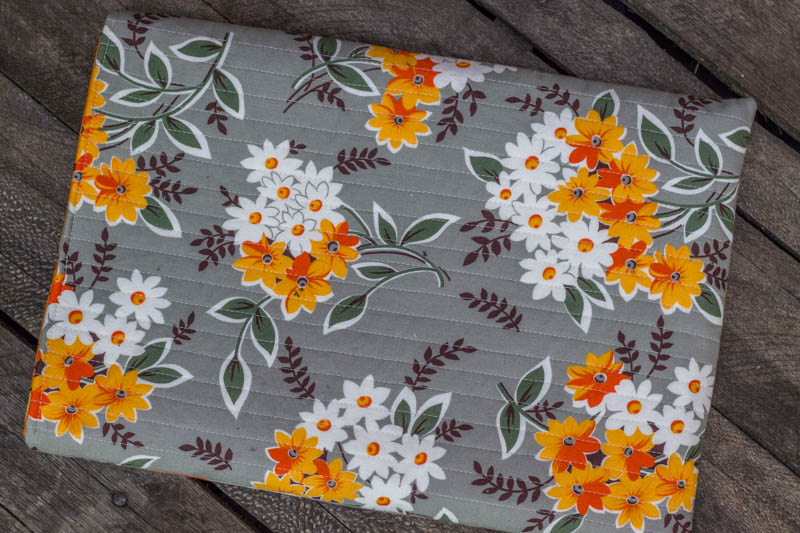
I knew he would like this messenger bag and could use it for work, but I would need to re-think it in more manly terms. I decided to use this heavy weight denim as the accent fabric and had a lightbulb moment when I realized I could use the wrong side of the denim for the main fabric. I wasn’t sure exactly how it would turn out but as soon as I got the flap sewn together, I knew this was going to be a winner! I just love the end result and it’s exactly my husband’s style.denim messenger (4 of 6)

A few modifications:

  • I used real leather for the flap accent. (from some assorted scraps sent to me by my good friend, April. Thanks April! So sweet of her to share.) The pattern calls for the front flap to be pieced together, but I chose to cut out the flap in one piece from the denim and then just sew the leather on top. I wanted that look anyway, and I was afraid piecing the leather would end up with some wonky sewing.
  • I did not interface the outer pieces because the denim is such a heavy weight that I didn’t think it would need it.
  • I didn’t use the tuck catches for the front closure. Mainly because I didn’t have any on hand. It’s not essential that this bag has a front closure because of the inner zipper, but I would eventually like to add some sort of closure.

This was my first experience sewing with leather and it went fairly smoothly. Because so many of the pieces used batting and there were bulky seams, I used my walking foot for the entire construction (sans the zipper install) and I think that helped a ton. I just sewed very slowly and carefully and did not end up with any huge issues.denim messenger (3 of 6)

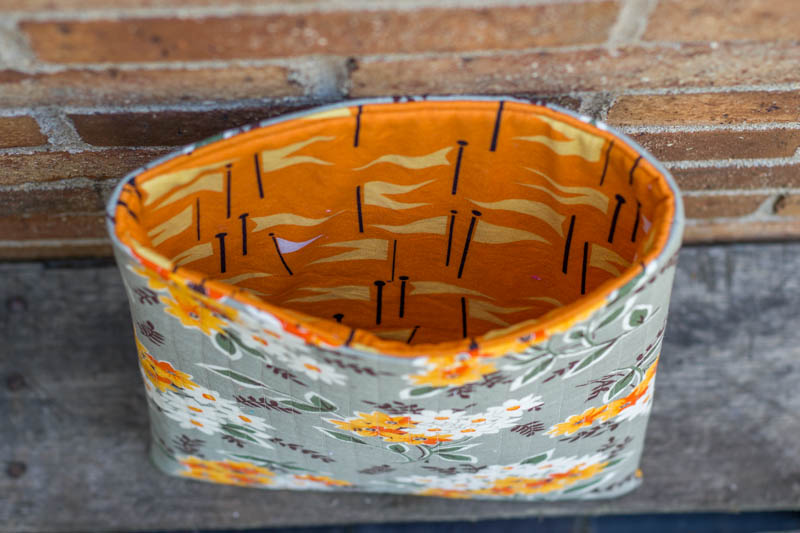
The lining fabric is an Amy Butler print I had on hand that I actually had set aside for something for the boys but it went so well with the denim that I sacrificed it for the cause. This bag is the perfect size for my husband’s laptop. (mine is shown because he was at work when I took pictures) It also has a padded inner pocket that’s a great size for a tablet. I really like all the pockets included in this bag pattern. You can never have too many pockets in my opinion!denim messenger (6 of 6)

A note about this pattern: It ends up with a really professional finished product, but you definitely put the time into it! This is not a quick sew. Before you even get to the sewing there’s a bajillion pattern pieces to cut out- it might rival the cargo duffle for most pattern pieces! However, if you are willing to put the time into it, you can end up with such a fun bag at the end that I totally think it is worth it. The instructions and diagrams are very helpful and made the process as pain-free as possible. Just queue up a good movie or tv series of choice and have a cutting and sewing marathon! (FYI If you like BBC shows, I just discovered Lark Rise to Candleford on Amazon Prime and am loving it! Made the cutting time fly by.)

denim messenger (2 of 6)I think this parcel is a great idea for any who are thinking of doing handmade gifts for Christmas. There’s options for both the guys and girls on your list! I think both the Betty Bowler and this Messenger Bag are good guy patterns.  Remember this is available as a bundle for 2 weeks and then it’s gone.

Pattern Parcel #7: Choose your own price and support DonorsChoose. Win/win

Fabric Camera Strap Mini Tutorial

This is one of those projects that I finished earlier this summer but never got a chance to blog about. I made it as a prototype for a shop but ended up keeping it for myself because I liked it so much. I searched the internet for a good tutorial on how to make these but couldn’t come up with exactly what I wanted so I combined a few ideas to make my own.

samples (9 of 13)I didn’t take any pictures of my process- sorry! But I thought I would offer a little mini tutorial for anyone who was interested in making one for themselves.

Here’s what I did in a nutshell:

  • Used my existing camera strap as a size guide and cut my strap 3x the width. (I cut mine 6″ wide) and then measured the length and added an inch on each side for seam allowance (mine was 23″ long). So total size was 6×23″.
  • Fused the entire strap with SF 101.
  • Ironed each side over 1″ lengthwise, then folded the entire length in half to make the final width about 2″ wide (basically like making double fold binding). I then opened it back up and fused a 2″ piece of fusible fleece along the fold line.
  • Quilted the strap with straight line quilting rows about 1/4″ apart. (this first section is adapted from one shabby chick’s tutorial on guitar straps.)
  • Followed the instructions here for using pet collars as the nylon strap and also for making and connecting the vinyl ends of the strap to the fabric and nylon straps. I bought the small dog collars at Walmart for about $1 each (you need 2 for each camera strap) and I cut up and old fake leather backpack for the vinyl end section.
  • Below you can see the camera strap hanging out along with a guitar strap and some other fun stuff I made for a shop this summer.

camera strap2 (1 of 1)

I really like how sturdy the camera strap turned out. And It’s a fun change of pace from the boring black strap that came with the camera. Here’s an picture of the camera strap in action during our trip to Seattle this summer!

camera strap (1 of 1)

Modified Cargo Duffle (with a mini tutorial on adding a long strap)

cargo duffle (10 of 11)

Tuesday we leave for 3 weeks on the west coast! Yeah, I know we might be partly crazy to be attempting this long of a trip with two young children, but there’s no time like the present, right? Well actually my brother gets married on Friday in California so we figured if we were going to have to make the trip out there we might as well make a big trip out of it and go all out. I’ve been to California before but it’s my first time to visit the Pacific Northwest and I am so excited. My luggage is pretty old and falling apart, so I decided that I most definitely needed a new bag for this trip. Also we are trying to pack very minimally (carry-on only) and a cute new bag to fill would help me stay motivated to bring only the essentials! Don’t worry I’ve got an extra bag stashed to help me bring back all the fabric I may or may not be planning to pick up along the way at the amazing west coast fabric stores I cannot wait to visit! 😉

cargo duffle (1 of 11)

I have been wanting to try out the cargo duffle pattern from Anna of Noodlehead ever since she released it. Bonus being that it’s a FREE pattern! How cool is that? I did some extensive research into this pattern before I made mine because I wanted this duffle to actually be big enough to fit my needs, but not too huge to disqualify it as a carry on. I think this is one of the first times that I have felt confident enough in my skills to make some extensive modifications to an existing pattern in order to make it fit my specifications exactly. It was a pretty liberating feeling and made the construction so fun! Totally worth the effort that went into it.

cargo duffle (4 of 11)

Main fabric used is from the Arizona line by April Rhodes for Art Gallery Fabrics. I got the main print at Five Eighth Seams during a weekend trip to Charleston several weeks ago and accent Arizona prints are from a 1/2 bundle I bought of the entire line (I just couldn’t resist this line) at Fabricworm. Bottom accent and strap fabric is essex yarn dyed linen in black that I think I picked up at Pink Castle Fabrics (sold out there now but a google search shows some available at Fabric.com)  a long time ago.

Modifications:

The original cargo duffle pattern includes sides that finish at 6″ wide. I wanted my sides to be 10″ wide so I cut the bottom gusset 10.5″x30.5″ and the zipper gussets 5.25″x27.5″.

I added a lining to the interior and used Kristin’s mini tutorial as a starting point. Because I added so much width to the duffle, the lining sagged pretty badly so I couldn’t just tack it into place, and it look good. I ended up sewing the lining to the duffle right above the pockets following the outer quilting lines and that worked pretty well to make the lining a bit sturdier and hold everything in place.

cargo duffle (7 of 11)


I wanted lots of pockets in the inside of the duffle to help with organization. I added two welt pockets to the front side and a long pocket that spanned with width of the back side. I ended up stitching this long pocket down about 1/3 of the way down the length of it because it was flapping open pretty badly. I used Delia’s tutorial to figure out the welt pockets. This was my first time making welt pockets and they went pretty well but turned out a bit wonky in between the pockets. I’m thinking that was partly due to the fact that I made two right next to each other and that I need some more practice on them.cargo duffle (6 of 11)


I also knew that I wanted to add a long strap to the duffle. I cut off the hardware from an old backpack strap and used another duffle of my husband’s as a guide for how to construct the strap. I got a lot of questions about the long strap when I posted the pictures on Instagram so I made a mini tutorial for all of you. Hopefully I will make sense and you can follow my thought process. Please feel free to ask questions in the comment section if something doesn’t make sense. I took some closeup pictures to try to help clarify things.

cargo duffle (3 of 11)

  • I made a short strap (about 5″ long) for the side rectangle rings, threaded the strap through the ring, folded one end under, and stitched it down to secure the ring. Then I attached the other end of the short strap to the bottom gusset before I sewed the bottom gusset to the zipper gusset. I wanted this seam to be really strong because of all the weight it would need to carry so I sewed the seam about 5 times and then zigzagged the edges to prevent any fraying. Repeat for both sides.cargo duffle (8 of 11)
  • I made the long strap the same width dimensions of the top straps but changed the length to 65″.
  • I interfaced the strap pieces with SF 101 and then a 1.25″ width of fusible fleece and added the canvas strip as suggested in the directions for the top straps.
  • For one end of the long strap, I looped it through the rectangle ring, folded the end under and stitched it down. The other end I threaded through the strap adjuster, looped it through the rectangle ring, threaded it back through the strap adjuster, folded the end under, and stitched it down right below the strap adjuster. It really helps if you have another adjustable strap in your house that you can look at while you do this part!

cargo duffle (9 of 11)

In my cargo duffle research I read another blogger who added Peltex 72F to  the bottom gusset and decided to do that also (she gave me the idea of expanding the width of the duffle too). I highly suggest that you add this interfacing if you want more stability to your bag. I’m very happy with how sturdy it made my bag and it really wasn’t horribly hard to sew the extra bulk- as long as you use the size 16 needles that Anna recommends!

cargo duffle (2 of 11)

And now the longest blog post ever is over! If you stuck around this long- good for you! I cannot wait to put my new duffle bag to the test as we head out on our trip tomorrow and I’ll be sure to keep you updated as to how it holds up as a real luggage piece.

cargo duffle (11 of 11)


Quilted Laptop Sleeve

samples (13 of 13)

There’s been lots of behind-the-scene sewing happening here this week that I am hoping to get to share with you soon! Husband is out of town for the week on a mission’s trip and while single parenting is hard stuff, there is a plus side in that I have nothing else to do all evening after the boys go to bed but sew. 🙂 Oh and watch Call the Midwife. Anyone else loving that show? I signed up for a free month of Netflix solely to binge watch it this week.
Anywho check out my new laptop sleeve- loving it! And v. proud of self because I did all the maths for the dimensions and they worked out perfectly. If you know me, you will understand why that is such an exciting thing. Math and Me- not usually friends.

macbook caseI used the ipad cover tutorial over at One Shabby Chick to get an idea for the construction, then tweaked the dimensions to fit my 13” macbook air laptop. I did not do the flap at the top that she suggests. The case has a two layers of batting (one on exterior and one on interior fabric) and interfacing on the exterior fabric so it is a nice, sturdy sleeve. I also did straight line quilting on the exterior pieces to keep the fabrics in place.

samples (10 of 13)Exterior fabric is a Flea Market Fancy print and interior is a Lizzy House print that I’ve been hoarding for a while. It’s a fun pop of color for the inside! Also check out the Lizzy House Gelaskin that I got for the laptop. If you follow my IG (@oliversfancy) you saw that I was being very indecisive about which one to buy but I ended up with this Lizzy House and am pretty happy about it. In my experience LH is always the correct answer 🙂 I’m happy to finally have something to keep my laptop safe and sound!

samples (11 of 13)


Serger Tales, part 1

Have y’all heard of Craftsy, yet? It’s a pretty cool website that offers video classes for all sorts of crafts. Most of the classes have some sort of fee, but they do offer some free classes. If you sign up for their email list, they will send you random notifications of really good sales. A few months ago, I signed up for this serger class (taught by Amy Alan of Really Handmade) during one of those sales. The cool thing about this online format is that I can take the class whenever…the bad thing about this online format is that I can take the class whenever- no deadlines to force me to finish (it’s the only way I get things done around here, peeps). So the class just sat in my inbox waiting for me to have time to take it.

After my fun with knits during Kid’s Clothes Week, I promised myself that I would get my serger out and take that class ASAP! And this week (while my sewing machine was in the shop) was the assigned week. I just have a cheap serger (a Singer ProFinish that I got for my birthday 2 years ago) because I didn’t want to invest in a really nice one until I knew I would use it. I did, indeed, begin the class this week and am happy to report I completed my first project from the class. I think it turned out not-too-shabby… If I do say so myself. I’ve been wanting to make a boxed bag for a while and really love how easy it was. Can’t believe I made the entire thing with my serger! Also it turned out to be the perfect size for my latest knitting project- to be discussed later.serger box bag

I’m still struggling with tension on my serger. Maybe it’s because it’s cheap, but it seems like I have to put the tension up way high in order to get the correct stitches. It could be that I still really don’t know what I’m doing. Fake it till you make it, right? However, slowly but surely I am understanding more about this machine and seeing improvement in my work. And I’m happy to report that I can correctly thread my machine without fear! I’m glad I have this class as a resource to go back and review when I forget things. I would definitely recommend it to any other beginners like myself.

serger box bag

Next up on the class project list is an infinity scarf. After that I’m looking forward to trying out some clothes for the boys! Nothing is off limits from my serging now… you really should be scared for me. If the needles on a sewing machine weren’t bad enough, now I have knives on a serger to try not to hurt myself on. 😉

serger box bag

Gifts for the Ladies: Pouches and Keychains

I woke up Christmas Eve with the perfect handmade gift idea…. some open-wide pouches and coordinating key chains. Now this is no rocket science idea; I’ve made open wide pouches before, but for some reason I hadn’t though about them in a while, and it hit me that this was the perfect little addition to my presents for the women in my life: my mom, sister, sister-in-law, and mother-in-law.

open wide pouch

My long-suffering husband rolled his eyes and watched the boys for me so I could get in this last minute sewing. I found some metallic (!!) fabric at Joann that I knew would be perfect and quickly put together 3 pouches (one not shown) and 3 keychains.

open wide pouch and keychain

Pouch is the free pattern (small version) from Anna at Noodlehead.  For some reason, the first one I made took a little while as I had to re-read all the instructions especially for the bottom gusset, but once the first one was finished, the other two came together super fast. I just love the boxy bottom of these pouches- perfect for my sister to fill with pencils or makeup and throw in her school bag. Fabric used: Metallic from Joann, Robert Kaufman Chambray, and Yarn Dyed Linen in Flax.

open wide pouch and keychain

Keychains are loosely based on the tutorial from Jessica at CINO. I interfaced both sides of the fabric with Craft Fuse 808 and then also fused a piece of Fusible Fleece in the middle. I’ve tried a few of these in a circle style but have decided I prefer the rectangle. Altogether a few quick and easy projects to keep in your back pocket when you need a last minute gift idea.

 keychain

Coming this fall: more cute baby gear!

I’ve been a busy little bee behind the scenes over here cooking up some new stuff for the shops- both the etsy store and my booth at UrbanDigs. So many ideas floating around in my head, so little naptime to get it all done!

bibs

So far I’ve managed to get a few new products out the door and am working on some more. First off- I’ve been wanting to produce some bibs for a while now and have never settled on the style I wanted. Enter baby mcdroolypants and I have my inspiration. 🙂 (I love how all of my inspiration comes out of things I make for my boys!) I like these terrycloth backed bibs because you have a super cute print on the front and a nice absorbant back that keeps the drool/spit-up from soaking through to their clothes. Here’s Eliot showing off one for the shop pictures.

terrycloth bib

I think he likes it! Next off, I have a project that I had planned on making for Oliver and never got around to so child #2 was motivation to finally get this done. I love how easy these pacy clips are! And so cute too! After I posted these pictures to Instagram, I sold out in just a few hours! Here’s hoping the etsy store is just as successful. I was really excited to find the colored clips because I feel they add a little something extra.

pacy clips

Here’s Eliot looking adorable with his Dr. Seuss clip. (side benefit of selling these clips…I get to pick the best for myself and indulge my Dr. Seuss fetish by making two different ones for Mr. E 😉 )

eliot pacy clip

Not pictured are the burp/wash cloths I have been making to coordinate with the pacy clips and bibs. I am trying to plan ahead for what I hope will be busy fall/Christmas season and make up some gift sets for people to buy. Hopefully nap times will be long over the next week or so and I can get lots done! Must remember these little munchkins of mine are only little for a short time so I need to enjoy the precious time I get to spend with them… remind me this at 5:30 am feedings please! 🙂

Dr. Seuss Toddler Backpack

Checking back in here again to let you know I am still alive and baby is still happily swimming around his little cocoon. 🙂 39 weeks tomorrow and trying to relax and not anticipate his arrival any second…soo hard to do!

Dr Suess backpack

Dr Suess backpack

Well I hadn’t sewed in over a week because I am just so tired at nap-times that I take naps myself. My poor Bernina was looking so sad and neglected I just had to give her some attention yesterday! A few weeks back I had started a toddler backpack for Oliver using Rae’s pattern and some Dr. Seuss fabric I have been saving for just the right project. I got the outer backpack all finished and there it has been sitting waiting for a lining. Really happy I got to finish it yesterday because Oliver’s old backpack (also Dr. Suess 🙂 ) was a cheap nylon bag, and it is all but in shreds so he really needed a new one.

Dr Suess backpack

Thoughts on the pattern and construction:

I used Craft Fuse 808 to interface all the exterior pieces because they are quilting cotton weight. The lining is a medium weight twill fabric. I was worried it wouldn’t be sturdy enough but am happy to report that the interfacing and heavier weight lining combined to make a great sturdy bag! Now about the bag construction itself- This bag pattern is not for the faint of heart! It has quite the involved instructions and takes a bit of time to construct. However, like all of Rae’s patterns, the instructions are well-written and easy to follow- just be prepared to take your time. I am especially impressed with how professional-looking the strap turned out!

Dr Suess backpack Dr Suess backpack

I got to use some of my new feet for the bag construction and really liked how easy the piping foot made that section come together. I also looked through the flickr group before making my bag in order to get some ideas and decided to add pockets to each side panel. They were pretty straight-forward and easy to add except that I think the gathered one needs to be just a bit bigger in order to hold his water bottle. Oliver loves his new bag and likes to carry it around one-handed to show people…kinda cool that he’s old enough to appreciate what I make for him now!

Dr Suess backpack Dr Suess backpack Dr Suess backpack