Handmade Christmas Wrap-up

Well I meant to get a few more things blogged over Christmas break but you know what they say about the best laid plans of mice and men…. I am embracing the clean slate of a new year and hoping to settle into a good routine of sewing/blogging/home and family management and check in here more regularly than I have of late. Now that the little man is 7 months old, I am losing my excuse for not getting things done!

Here’s a few pics of the remainder of my handmade Christmas decor…including cute baby, of course. 🙂 Next up are a few of my handmade Christmas gifts- yes they actually happened this year- along with a semi-fail that I am sure you will be interested to see. 😉

of course E had to have one of my reindeer onesies...sold quite a few of these over the Christmas season- aren't they just so cute?!

of course E had to have one of my reindeer onesies…sold quite a few of these over the Christmas season- aren’t they just so cute?!

Some stockings I made for us a few years back using the rag quilting method...I made an extra that didn't quite turn out as planned and guess it worked out because E got a stocking too this year. Maybe next year, he'll get one that coordinates better with the other three.

Some stockings I made for us a few years back using the rag quilting method…I made an extra that didn’t quite turn out as planned and guess it worked out because E got a stocking too this year. Maybe next year, he’ll get one that coordinates better with the other three.

monogram ornament

A few of the monogrammed ornaments that were so popular in my shop this year. So popular in fact that I sold the ones I made for the boys!

A few of the monogrammed ornaments that were so popular in my shop this year. So popular in fact that I sold the ones I made for the boys!

Advertisement

Coming this fall: more cute baby gear!

I’ve been a busy little bee behind the scenes over here cooking up some new stuff for the shops- both the etsy store and my booth at UrbanDigs. So many ideas floating around in my head, so little naptime to get it all done!

bibs

So far I’ve managed to get a few new products out the door and am working on some more. First off- I’ve been wanting to produce some bibs for a while now and have never settled on the style I wanted. Enter baby mcdroolypants and I have my inspiration. 🙂 (I love how all of my inspiration comes out of things I make for my boys!) I like these terrycloth backed bibs because you have a super cute print on the front and a nice absorbant back that keeps the drool/spit-up from soaking through to their clothes. Here’s Eliot showing off one for the shop pictures.

terrycloth bib

I think he likes it! Next off, I have a project that I had planned on making for Oliver and never got around to so child #2 was motivation to finally get this done. I love how easy these pacy clips are! And so cute too! After I posted these pictures to Instagram, I sold out in just a few hours! Here’s hoping the etsy store is just as successful. I was really excited to find the colored clips because I feel they add a little something extra.

pacy clips

Here’s Eliot looking adorable with his Dr. Seuss clip. (side benefit of selling these clips…I get to pick the best for myself and indulge my Dr. Seuss fetish by making two different ones for Mr. E 😉 )

eliot pacy clip

Not pictured are the burp/wash cloths I have been making to coordinate with the pacy clips and bibs. I am trying to plan ahead for what I hope will be busy fall/Christmas season and make up some gift sets for people to buy. Hopefully nap times will be long over the next week or so and I can get lots done! Must remember these little munchkins of mine are only little for a short time so I need to enjoy the precious time I get to spend with them… remind me this at 5:30 am feedings please! 🙂

Indie Craft Parade 2013

You may remember my posting about our Indie Craft Parade 2012 experience last year. I wanted to give another update about this year’s experience and let you know about some cool new independent artists I discovered. This craft parade was a week ago but we left immediately after attending to head to the beach for a week so I am just now getting to share my finds with you.

indie craft 2013

I am especially excited about the sewing machine necklace…been wanting one of those for a long time!

Indie Craft Parade defines itself as a celebration of handmade art. This craft fair is located in my hometown and showcases local artists from the southeastern US. This was the fourth year, and it just keeps getting better! I really enjoy going because it inspires me in my creative endeavors.

Instagram photo of the night

Most of the craft fair is free but you can pay to attend the Gala event on Friday night which includes food, drinks, and giveaways as well as a smaller crowd of attendees to wade through. And just like last year, I won a giveaway (more than repaying the price of our tickets!). We had had a rough week with Oliver and Ian both feeling sick so a Friday night date night was just the thing we needed. Here is a collection both of what I won and what I bought with links to the artists’ websites/stores. And if you notice, there’s a bit of a jewelry theme going on. 🙂

indie craft 2013

WON: handfelted terrarium from once again sam.


WON: handstamped towel from PerlaAnne

WON: handstamped towel from PerlaAnne

WON: Ring from Lily Pottery

WON: Ring from Lily Pottery

indie craft 2013

WON: Arrow necklace from Acorn + Archer
BOUGHT: Wooden Beaded Necklace from Spectrum
BOUGHT: Laser Engraved Wooden Necklaces from Once Again Sam


Patchwork Quilt

I am so happy to report that I have finished the patchwork quilt that I was commissioned to make back in January. You may remember me talking about it here. Thankfully, when I agreed to make this, I made sure my clients knew that it would take me a while to complete the quilt, and they were happy with that arrangement. BUT crunch time came, and I needed to knock this project off my to-do list so I can move on to other things. (The list is never empty is it?)

Ray's Patchwork quilt

I was able to use up most of my leftover fabric to piece the back- just had to get some more Kona green to make up the difference. This was my first attempt at spray basting and I’m pretty happy with it. The only thing I would not recommend is that we tried basting outside and that was a bit of a mess- with the wind blowing the dirt onto the quilt and such. The smell wasn’t as bad as I was anticipating, so I think that next time I will be fine to spray baste inside.

Ray's Patchwork quilt

Ray's Patchwork quilt

I decided to try out the free motion quilting on my machine mainly because I don’t know how to use my walking foot yet and didn’t want to do straight line quilting without that. I loved the free motion! It was so much faster than straight line and really quite a bit of fun. I just did a random stippling and while it is not perfect by any means, I am pretty happy with it. I promise the blocks aren’t as wonky as they appear in this picture…the wind was giving us a time this afternoon!

Ray's Patchwork quilt

The binding is the same Kona green I bought to finish off the backing. I ended up machine stitching the binding on instead of hand stitching. I did this both for durability (It’s going on a little girl’s bed) and for time’s sake. It was quite hard to photograph this quilt because of the huge contrast between the lights and darks, but I tried.

Ray's Patchwork quilt

Finished quilt size is around 68×88 inches- twin sized. This is my largest quilt to finish yet. I’m going to take a little break from quilting to get some other projects done this week and hoping to work on the king-size quilt next week.

Couldn’t resist throwing this picture in there…Oliver was trying to figure out why Daddy was playing “man behind the curtain.”

Ray's Patchwork quilt

Spring Top Sewalong and Project Updates

First off, there’s not been much to show for this week. I got into two more local shops, (yay!) and have been super busy stocking them with goodies. While it’s been lots of fun creating new things and dropping them off at the stores, I am happy to have that done so I can take a break from shop sewing and get busy on my own projects. I am excited to see how these two stores work out for me. I am selling on a consignment basis so it’s a nice relief from pressure since I don’t have to pay any rent or whatnot upfront. For those interested parties, the two stores are UrbanDigs and The Natural Baby Store. I love both of these stores and am so happy they have agreed to partner with me! Now to sit back and let the sales roll in… (too optimistic? :)) Here’s some photos from the UrbanDigs Instagram account- love the displays she has created for me!

The next projects on my list are the two quilts to be quilted. Did I say I would finish those this week? Oops. Well I did get the back finished on the one, so now they are both completely ready to go except for basting. Unfortunately the hubs has been working late (tax season) and hasn’t had a chance to baste for me yet, but that is on the to-do list for this weekend. I’m thankful it’s going to be a nice one because we need to do the spray basting outside on our back patio. Those two projects are first on my list for next week! Now I have to finish them because I will be embarrassed to report back to you that I have procrastinated on them yet again. 🙂

And now we come to the fun part- Spring Top Sewalong 2013. I am so excited about this year’s event because I have been wanting to sew myself some maternity tops and now I have a push to do so. I know I only have a few weeks left (9 to be exact), but I’ve grown out of a lot of my current tees and could use a few more to get me through the last stretch. The challenge runs from April 1-19, giving me some time to work out my ideas. I’m thinking of using a few of my favorite maternity tops as patterns for my own tops. We shall see…hopefully this isn’t a complete bust. 🙂 I hope some of you will participate along with me. It is so fun to be working along with fellow sewists on similar projects. I just love perusing the flickr group for inspiration! Check out Rae’s post for more nitty, gritty details.

Custom Quilt Top

Ian’s cousin approached me a while back and asked if I would be willing to make them a custom twin-sized quilt to be used for their little girl’s bed. Although I don’t normally do quilt commissions, I thought this one would be fun to do because she was giving me free reign with the fabrics. We agreed on a color scheme of apple green, purple and white in a simple patchwork pattern. I decided to make the squares 5.5″ to mimic the look of charm squares. The finished quilt top measures around 70×90.

Beth's Quilt

Purple is my favorite color so I enjoyed pulling fabrics together for this quilt!  This is the first time I have used my design wall for a large scale quilting project and it was so nice to be able to use it to hold my pieces and not have to crawl around on the floor!  Thankfully, they have also given me plenty of time to finish this quilt- knowing that I have lots of projects running concurrently. I finished the quilt top last week and have been waiting for a nice day to photograph it. I thought today would finally be the day, but when I went outside, the wind was blowing quite hard and kept throwing my quilt around! Oh well, I ended up with a few fairly decent pictures and have no patience to wait for a less-windy day. 🙂

IMG_8849 IMG_8853

I need to go out and get some more fabric for the backing, and then I will begin quilting. Hopefully it will get finished in the next few weeks!

Shoppes on Trade

This weekend was the big day and we moved into our booth on Saturday morning! Now to wait and see what happens. 🙂 I wanted to share some pictures of the booth with you. The onesies, hoops, washcloths, and basket are mine…everything else is my friend, Christa, from Brio Trio. Don’t you just love her animal softies? I love how well our styles mesh together.

Shoppes on Trade St

Shoppes on Trade St Shoppes on Trade St Shoppes on Trade St

As you can see, we have the use of the entire cupboard space plus a little wall space on either side of the unit- which works great for my hoops! We are still working on filling up the space a little more and adding some fun decorations. Hopefully, this space will look even better over the next few weeks, but I am happy to have made a start. If you are local and get a chance, there are some really cool new artists in this building now! I had so much fun browsing the other spaces after setting up ours. In fact, I already have some jewelry and scarves on my want list. 🙂

Shoppes on Trade St Shoppes on Trade St

On a side note, check out the new banner!! I am so happy to have my new logo finished and ready to go! My good friend, Mary, came up with the original design and I commissioned another good friend and graphic designer to complete the project. I am sooo happy with how it all looks! I have already ordered my new mini-Moo business cards and cannot wait for them to come in the mail…making me feel so official and professional 🙂

Diaper Caddy Take 2

In my wrap up post a few weeks back, I briefly mentioned that I made a divided basket using Anna from Noodlehead’s new pattern. I liked the main idea but wasn’t super happy with my results so I wanted to try a few more out to see if I could tweak some things and end up with a better result- hopefully to offer for sale in my new booth (Squee!)

Diaper Caddy

Set up for the new space was this morning, and I stayed up way too late last night finishing this basket and accessories for it so that I would have it ready for today. So glad I did though because I love this! Aren’t the owls just adorable?!

Changes from last time:

  • Did not pre-wash fabric
  • Only used one layer of interfacing- Craft Fuse 808 instead of SF 101 and Fusible Fleece

Diaper Caddy

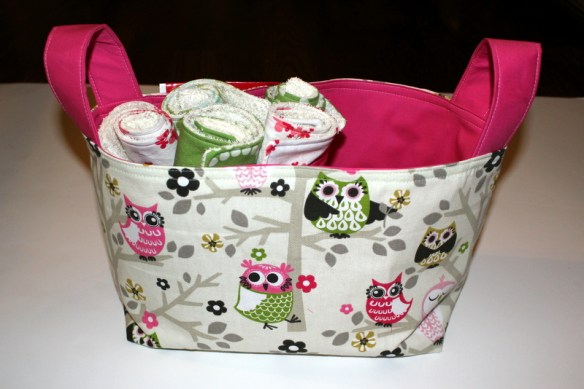
Only a few changes, but they made a huge difference. You see, I am not super comfortable using interfacing because I don’t have much experience with it, and the type where you have to wet the rag, press until dry, and then continually re-wet rag and repeat the process to adhere all interfacing to fabric is somewhat tedious in my book! Doing it for two layers of interfacing took me way too long. Then last time, I was too impatient to let the fabric dry after this process and sewed it together while wet- stretching out my outer fabric to be bigger than the lining. In contrast, the craft fuse 808 just needs a quick iron-on to adhere to your fabric…soo much faster and easier! I am also quite happy with the stability it gave to my basket. Not pre-washing the fabric kept it stiffer as well. FYI the outer fabric is duck cloth and the inner fabric is Kona cotton.

I love this pattern even more the second time around. Anna does a great job with making her instructions clear and easy to understand. My problems the first time were all user-error not pattern error. 🙂

Diaper Caddy

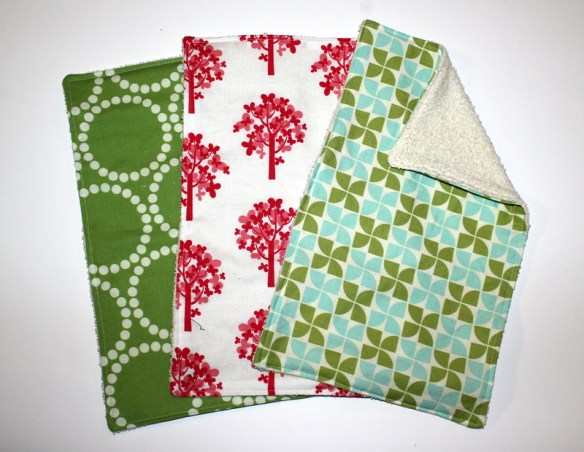
I wanted to make this diaper caddy part of a gift set so that someone can buy it for a baby gift and not need anything else to complete it, so I also whipped up some handmade burp cloths for the inside. I matched up some terry cloth with cute cotton prints from my stash. The burp cloths ended up around 8×13 in size… I love this result and made up a few bundles of burp and wash cloths to sell separately in the shop as well. This is a great project to do assembly line style! Not pictured is the newborn diapers and wipes I picked up on my way to the shop this morning to complete the caddy. I already have boy fabric picked out to make more of these and can’t wait to get on it! Hopefully others like these as much as I do! Oh and for those of you non-locals, I will be updating the etsy shop with some baskets and burp/wash cloth sets very shortly!

Burp Cloths


Shop booth set up went quite well this morning and we are headed back after Little Man wakes up from his afternoon nap to show the family my new space and take some pictures for the blog. 🙂 Now to keep myself from running down there every other day to see if I’ve sold anything. 😉

Oliver’s Fancy…coming to a shop near you!

I hinted last weekend on Instagram that I would be making a big announcement this week and here it goes! This may not be that big to you, but it is a big step for me. I have been given the opportunity to share a booth rental space at a shop in town! For you locals, it is the Shoppes on Trade Street in downtown Greer. This is a very exciting opportunity because the shop recently came under new management, and they are restructuring to include 14 new artisans in various fields- sewing, crafting, jewelry. They are really working to bring in a more modern vibe to the store. I will be sharing my space with Brio Trio. (Check out her super cute fox and wolf softies!) We open our booth the first weekend of March.

mustache onesies

As you can imagine, that means I have been a busy little bee cranking out lots of new onesies and hoops for my space. It’s a lot to do in a short amount of time, but I am feeling pretty confident with what I’ve gotten done so far. I’m hoping to get finished with all the things that I have on my list so I can branch out and try some new items…we shall see how that goes. Anywho, I have committed to try this out for 3 months at least. Here’s hoping to a great, new venture! I am a bit nervous about this, because I have done some re-evaluating of my prices and such and have made the leap to adjust my items how they really should be priced. Part of me is worried that means that no one will buy anything, but one of the things I learned at the Maker’s Summit was not to undervalue myself because I am crippling my future options.South Carolina Onesies

I thought I would share some pictures of some things I have been working on so far…really loving it! Spoiler alert… I am now branching out to include some girly items. I also updated the etsy shop for any of you who like what you see, but live out of town. Whew! I didn’t realize how long it had been since I did a proper update on etsy…it majorly needed it!

Boy Onesies

Boy Hoop Art hoop art State hoops girl hoop art

Another fun thing is that my logo has been completed (yay)! I am working on a new blog and etsy header, but  I was able to go ahead and order my custom stamp so that I can stamp my logo on my onesies and hoops. Feels so good to be official. Now to go make some money to reimburse all my supply costs!

Current Projects

I have been very busy doing a little of this and a little of that…not enough to share an entire post about each thing so I thought I’d give a bit of a collage of all my random projects.

First off, I have ventured into girly world with my hoops and onesies. After completing a custom Etsy order for a special little girl’s room, I used some of the scraps to make some onesies for a friend’s baby shower. I am loving this look and I think you might see some more girly stuff in my Etsy shop from here on out…not changing who I am but expanding a bit so I don’t lose out on an audience I am not currently reaching.

Hoop Art

I also completed another figure 8 scarf as a birthday present for my aunt. I have tweaked this pattern so that it is now super easy and such a fun little present! Really must make one of these for myself soon! This one was made in a cotton/linen blend fabric and I really love the weight and feel of it.

Figure 8 Scarf

I tried out Anna’s new pattern– the divided basket- to see if I want to sell these in the future… It ended up being the perfect container for the balls and books we purchased for a friend’s little man’s first birthday party. I need a few more practice rounds with this pattern to work out some kinks, but I’m thinking it’s a go. I’ll keep you posted on my progress.

Diaper Caddy

A custom quilt order has begun taking shape. The client gave me a color range of whites, dark purples, and apple greens and allowed me free range in fabric choices. I love projects like this because I don’t have to stress about what the client wants and can just have fun putting things together.


twin quilt-001

Last, but not least, I have completed the quilt back for the guestbook quilt! Woo Hoo! This is a huge weight on my mind right now and I am so happy that I have made progress on it. Next step, get some 505 spray and attempt quilting… you will definitely be updated on how that monumental step goes!