Sugar Pop Top V 2.0

Art Gallery Sugar Pop Top (2 of 4)

I wanted to get one more top in before Selfish Sewing Week and Spring Top Sewalong were over. Technically Selfish Sewing week is over now, but since I finished this on Saturday, I’m still counting it! If you follow my IG account- @oliversfancy, last week I asked for advice on which fabric to use for my SPT version 2.0 and then realized I had forgotten about the Art Gallery fabric I bought specifically for this purpose. So, for my IG peeps thanks for all your input and I will come back to those fabrics at some point soon, but, first, here is my AGF version of the Sugar Pop Top.

Art Gallery Sugar Pop Top (1 of 4)

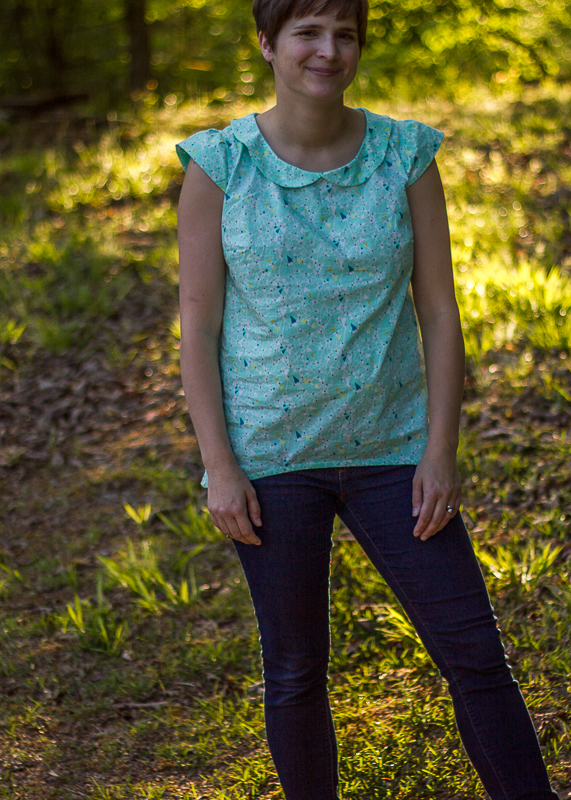
Art Gallery quilting cottons are a higher quality than normal quilting cotton and therefore are a really nice weight for garments. I love how lightweight and breezy this top turned out. But yet, it’s got enough substance that I don’t need to wear a tank under it. Perfect for the summer heat! Also can we talk about how cute this fabric is? I just love it! I picked it up at a quilting store in Asheville, but you can find some online at the Fat Quarter Shop hereArt Gallery Sugar Pop Top (3 of 4)

For this version, I added about 1.5 to the hem. I made the size L again but took in the sides 1/4″. I may try the size M next time and see how that works for me because I have plenty of room in this top. I also lowered the bust darts 1/2″. I wasn’t super scientific in my dart-lowering and one dart ended up being a teensy bit lower than the other one but other than that, they turned out really well.

Art Gallery Sugar Pop Top (4 of 4)

The Sugar Pop Top is a new pattern from Sew Caroline and is available for purchase here. It’s on my must-sew list for cute, spring and summer tops. You can check out my previous SPT here. What is on your must-sew top list? Any new patterns I need to know about? I’m always on the look-out for great patterns!

Advertisement

A Negroni for Easter: plus more family pics than you ever wanted to see…

Update: We had family pictures taken this week and got them back much sooner than I anticipated so I got permission from our photographer (check them out here!) to use these pictures for the blog post. Why not take advantage of having a professional shoot the shirt, right? So deleted the pictures that I took and put in these. Enjoy some great pics…and I might have thrown in a few extra just because they turned out so good! 🙂 Which is a miracle considering the antics that Oliver was pulling during the shoot.c2014jacphotography-crook002One of my goals for Easter this year was to have each of the 4 of us in something handmade. I’m not sure why I had this in my head, but I just thought it would be something special. I already had my Easter dress made several weeks ago, and I cheated a bit with Eliot because he fit into Oliver’s handmade vest from his first Easter. I knew I would be making the Hosh pants for Oliver, so that just left Ian as the final one who needed something.

c2014jacphotography-crook022

I had promised him another dress shirt after I made his first Negroni button down for our anniversary last year. He really wanted a version with a button placket and traditional collar. I picked up this navy and white pinstripe shirting at Joann. It is such a nice weight for the shirt!c2014jacphotography-crook009

The shirt construction was fairly easy because I had done it before. Pattern is the Negroni available here. Thankfully the size M fits Ian perfectly so I didn’t need to do any pattern alterations. I followed this tutorial for the button placket. The only change I made is that I interfaced the button plackets.c2014jacphotography-crook024

I continued along in the tutorial to attach the yoke to the shirt body and draft the collar and collar stand. Unfortunately my brain stopped working during the “burrito” part of the yoke attaching and I had to seam rip and reattach like 3 times…grrr…grumbledy, grumbledy, blerg. Once I finally got that down, the rest of the shirt was super easy.

c2014jacphotography-crook035

I used another of Ian’s shirts as a template to draft the collar and was v. proud of myself when it worked perfectly. Still cannot believe my luck on that one! Might be in danger of getting a big head. 😉

c2014jacphotography-crook038

I cut the pockets on the bias to add a little interest. FYI my walking foot was a life-saver here to keep the bias-cut fabric from stretching out of control during construction! Contrast facings are a joel dewberry plaid that Ian picked out. I love the little pop that they add to the shirt.

c2014jacphotography-crook004

All in all, it was a very successful sewing experience and I already have requests for several more shirts! Got quite a bit to get done before that happens though so don’t hold your breath to see any more anytime soon. I am pretty happy with myself that I finished a project for Ian on time! I am so bad about his projects that I tend to get them done months after I said I would. I may or may not have been completing the buttons on this shirt at 11:00 Saturday night, but hey, I made my deadline! 🙂 And below are a few more pictures for any who wish to view…feel free to not scroll down if you’re sick of us already!

c2014jacphotography-crook034

c2014jacphotography-crook005 c2014jacphotography-crook018c2014jacphotography-crook013


A Bianca Dress for Easter


double gauze bianca dress
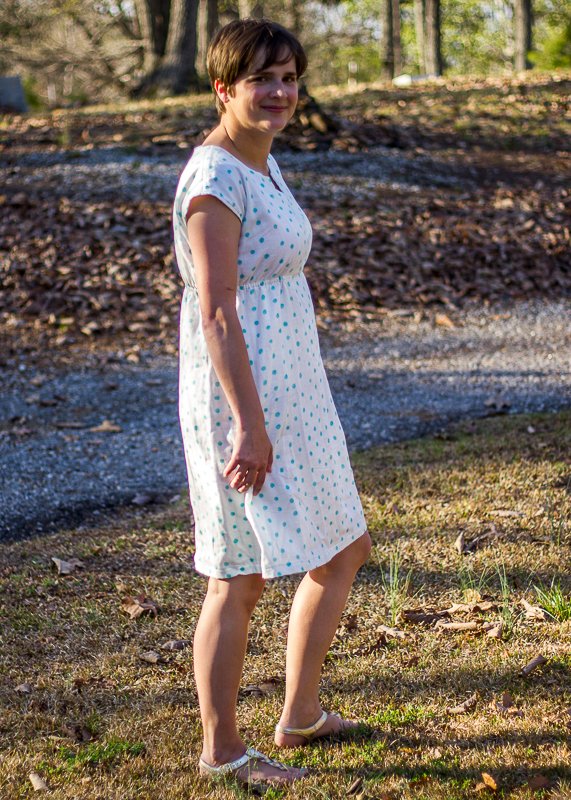
Well, it’s done folks. My lovely Bianca dress is all finished and oh so beautiful! I think it’s my favorite handmade item so far. Part of that has to do with this great pattern from Rae and the other part of it is due to this amazing fabric- double gauze from miss matatabi fabrics in Japan. I have seen fellow bloggers use double gauze for a while and wanted to try it, but the price tag has always deterred me. Enter one middle-of-the-night nursing session with Eliot, an awesome sale posted on IG, sleep deprivation, and I just HAD to buy some of this fabric. The next morning I had a bit of a scare wondering what I had bought in the middle of the night and put myself on restriction from etsy browsing during night-time feedings. But it was worth it when I got this lovely fabric in the mail. And really, the sale price was so good that even with shipping from Japan, this dress (not including lining) only cost me $27! Not bad for a custom-made Easter dress, I’d say.

double gauze bianca dress

Only problem now is that I want to buy all the double gauze! It is so heavenly to wear. Okay enough rambling about fabric purchases; on to the dress details…

double gauze bianca dress

Pattern: Upcoming Bianca Dress/Top from Made by Rae

Pattern Mods:

  • Followed directions to lower front facing 7/8″ based on my measurements (very important to check because it totally changes the fit!)
  • Added 4 inches to original length (what I believe would be 2 inches to the final version of the pattern) to make it knee length.
  • Added a white batiste lining: Now let me pause here for just a moment. I added a lining after the fact when I realized my double gauze was completely see-through (oops). The lining would have been fairly easy to add if I had done it while I was making the dress, but it was kind of a pain to do after the fact. I attached the skirt and bodice separately. The skirt is just a rectangle sewn down one side to make a tube, serged at the top and bottom hems, and then hand-sewn to the elastic casing. Bodice is machine-stitched at shoulder and arms seams but hand-stitched on all other seams- i.e. lots of hand stitching! It’s not the best stitching job (and that’s putting it nicely), but you can’t see it once the dress is on, and I figure this will be a hand-wash only dress so I don’t need to worry about the lining fraying or coming apart in the wash. For future reference though- check your garment for opacity before construction!

Fabric: As previously mentioned, Nano Iro double gauze from the Miss Matatabi etsy shop. (FYI I managed to squeak it out of 2 yards of fabric even with the added length)

double gauze bianca dress

Now that’s enough selfish sewing. I’m tired of editing pictures of myself- gets a bit awkward after a while. Plus, I have a lofty goal that all 4 of us will be in something handmade for Easter, so next week it’s KCW and clothes for the boys and then after that another Negroni shirt for the husband- fingers crossed for good naps and productive sewing!

double gauze bianca dress


WIP Wednesday: A dress, a quilt, and some fabric piles for inspiration

So the sickies hit our house this week and the kids and I have been down for the count. I’m going to apologize in advance that all my pictures are IG pics. Just the way life is sometimes. So many projects brewing in my mind, and so little time to get them done! I am *almost* finished with my second Bianca– this one is going to be my Easter dress! I just have a teensy bit left on it and hope to finish that and get some pics for you by this weekend. Here’s a sneak peek from my IG feed (@oliversfancy). I took the plunge and cut into my Nano Iro double gauze! And its gonna be awesome!

I am also hoping to finish the binding on Oliver’s quilt this week so I can finally cross that project off my list! Can’t wait to show you the finished product. Btw did you know that quilt and myself made it into our local paper? Yep, I am now famous. 🙂 A reporter came to check out our quilt guild at the March meeting and ended up using my picture for the front of the article. Pretty cool. I ran out and got the last copy of the paper at a gas station and think I shall frame it in my craft room. Hey, my first time in print has to be special, right? Here’s a link to the article if you want to read it.

my attempt at a picture of the actual newspaper article.

Don’t forget, next week is Kid’s Clothes Week! I’ve been making all kinds of plans in my head and am getting antsy to begin. My goal is to have all my patterns prepped and fabric cut out by Monday morning so I can spent next week sewing. Here’s my IG capture of my new knits purchase…got some pretties from Girl Charlee in preparation for KCW. I also took the plunge and bought Dana’s shorts pattern since it came highly recommended from my sources. And last, but not least, I bought some stretch thread after Rae recommended it so highly. I’ll be sure to let you know how these all work out for me.

As I was writing this post, it unintentionally morphed into a WIP post…funny how blog posts take on a life of their own, huh? So I’m linking up over with WIP Wednesday at freshly pieced for the first time today.

Bianca Top

bianca top

This past week I was able to test an upcoming Made-By-Rae pattern- the Bianca. You guys, I may sound like a broken record sometimes, but this Rae, she really knows her stuff. I really, really love this top. In fact I love it so much that I cut into my hoarded double gauze to make myself an Easter dress version of this pattern. It has some really nice customization options to make it the most flattering fit on every body style. The pattern was set to be released very soon, but Rae’s adorable little baby boy made an early appearance so she’s busy snuggling up a little newborn, and I’m not too sure what the release date is now. I’m sure it won’t be too long; she has a great team that is continuing to keep things running. I will update this post and let y’all know when you can go and get it! In the meantime have a look at mine and enjoy brainstorming what fabric you could use for this. I think it’s the perfect style for a comfy summer dress… and that makes me long for summer and warm weather to finally be here! The calendar says it’s officially spring, but we’ve had some pretty cold, nasty days this week.

bianca top

If you recognize the fabric used in this top, it’s because I got a bolt of this Joel Dewberry voile on clearance a while back so I use it for all of my samples and testing before I cut into the good stuff. I now have about 4 tops that use this fabric in some way. I’m not sure what I’ll use for testing when my bolt is gone! Oh and I have a bit of bragging to do. My mom and sister came over when I had this top on for picture-taking, and they both commented on how cute it was. That’s pretty high praise because they’re not so much into the whole sewing-thing. They’d rather buy something at the store than make it, so I do a little happy dance when they think something I made looks like it could come from the store (but better because it’s perfectly adjusted to my measurements!). I can’t wait to see everyone else’s version of this top/dress once the pattern is released!

bianca top

Spring 2014 KCW Plans

KCW logo

Did I mention that I am a contributing blogger for this Spring’s KCW? Well I am, and I’m very excited to be there! Today I’m over on the blog talking about my plans for April’s challenge week. Yeah, I know April seems like forever away, but in reality, the next KCW is only a few weeks away! I discovered that I like the push to plan in  advance this time because it takes me a while to think through what patterns I have and what clothes my kids need. Now I’ve done all the hard work of pre-planning and can just have fun sewing during the challenge week!

raw edge raglan

If you are interested to see my sewing list head over here to the KCW blog to check it out…plus you get to see this adorable picture of Oliver that I had forgotten about. Funny story behind this picture- I was searching google for a pattern picture of the raglan tee from Sewing for Boys and my own picture turned up in the search results. Why I guess I could use my own picture, couldn’t I? 🙂 FYI this picture is from Fall 2012’s Project Run and Play sewalong…you can read all about it here if you’re interested.

Kid’s Clothes Week Final Wrap-Up

Days 5-6: I spent so much extra time finishing up the Bimaa hoodie on day 4 that I kinda burnt myself out, so I took a bit of a break for 2 days- figuring 3 hour’s work on one day = 1 hour of work on 3 different days.
Day 7: I wanted to finish strong this KCW so I managed to find an hour on Sunday and pulled together these Valentine’s Day shirts for the boys. I made some Valentine’s outfits for the shop a few weeks back and felt bad that the boys didn’t have their own versions. Love how these turned out, and I think they’ll be pretty cute in them. This was the perfect, quick and easy final project. Sorry I wasn’t able to get a picture of them wearing the shirts so an Instagram picture will have to suffice.

My final wrap-up thoughts:
I wanted this KCW to be about experimenting with different knit fabrics. Especially when buying online, you really have to know your knits or you will end up with the wrong type for your project. I have done some upcycling with knits in the past but not much with knits bought from the store. I really enjoyed this learning curve and am inspired to do more playing around with knits in the future. They are not nearly as scary as they are made out to be. 🙂 Plus they normally result in practical, comfortable clothing for the boys.
Some tips that I have discovered when sewing with knits:

  • Use your walking foot- so helpful!!
  • Lower your pressure foot pressure (keeps the fabric from getting all wavy while sewing).
  • Always use some sort of stretch/ballpoint needle.
  • If you want a good resource for knit helps, check out Rae’s Kniterviews– solid gold mine there!

Here’s my collage of finishes from this past week: clockwise-beginning with top left: Valentine’s Tees, Flashback Tee and Fancy Pants Leggings, Bimaa 2, and Bimaa 1

KCW Winter 2014Collage

Go check out the Flickr group and KCW website to see all the other goodness that was made last week. There’s some pretty amazing things in there. Looks like the Bimaa was the project of choice this time around. I think it’s always fun to see which pattern is going to be the popular one during the week. And that’s a wrap until spring. What were your thoughts this KCW? Did you get to all your projects on your list? Next up on my agenda: serger and knitting classes. I’ll be sure to keep you informed of my progress in each 🙂
kid's clothes week

KCW Day 4- Bimaa hoodie take 2

striped bimaa

Well you knew I couldn’t just stop at one once I’d been hooked onto the Bimaa train, didn’t you? Here’s another one for Oliver made from some cotton jersey I got from the Fabric Fairy (using a gift card I got from a Sew, Mama, Sew contest).

striped bimaa

Since this jersey was similar in stretchiness (or lack thereof) to the triangle fabric from Bimaa 1, I sewed up a 4T this time and I love the fit throughout the body. The hood is a wee bit big- we think he kinda looks like a jedi knight with it pulled up. It doesn’t bother O at all though- in fact, he cried when I tried to take his hood off for a few pictures. If When I make another one, I will probably still make the 4T size but do a 3T in the hood. The hood lining fabric is from an old knit dress of mine that was in the upcycle bin.

striped bimaa

O was up from his nap when I was putting the finishing touches to his hoodie, and it was so cute because he kept asking if I were done, so he could put it on and go play in the snow. 🙂 He’s getting the hang of this blogger child thing…and the fact that photoshoots normally come with some sort of bribery. Lol. Ok, you northerners don’t laugh at our pitiful amount of snow on the ground. He doesn’t know any better!

striped bimaa

Once again, major photo props to the husband. So glad I have him around to get good pictures for me. 🙂striped bimaa

KCW Day 3: Flashback Tee and Fancy Pants Leggings

FBT and FPL-5

nope, pants aren’t hemmed yet…had to get the photoshoot in while the getting was good!

Lest little brother feel neglected, I made Day 3 of Kid’s Clothes Week all about him. This little guy is growing at a faster rate than his older brother, and, as a result, all of his hand-me-down winter pajamas are a bit snug. Why buy more when you can make them? Especially when you have such great fabric sitting around.

FBT and FPL

E’s top is the trusty Flashback Tee in size 12-18 months. (yes he’s 7 months old, why do you ask? 😉 ) and bottoms are the Fancy Pants Leggings- also in size 12-18 months. This was my first time sewing this leggings pattern, and I can see myself coming back to it quite often to make pj pants and shorts for the boys. I would say this pattern would be great for a beginner because the designer really holds your hand throughout the entire construction process. The only changes I would make next time would be to make the rise higher in the back because it was way too low on E’s big cloth-diapered bum.

FBT and FPL-2

And now that I’ve made 3 garments from the same fabric, I think it’s time to move on to something else. I have in mind another Bimaa for O from some cool red/blue stripes I’ve been saving. 4 more days left in this challenge so still lots of opportunities to sew! Make sure you head over to the Flickr pool to see all the fun clothes everyone has been making. Also check out the #kidsclothesweek hashtag on Instagram for even more action shots.

FBT and FPL-3

KCW Days 1&2: Bimaa Hoodie

bimaa hoodie

For my first Kid’s Clothes Week challenge, I give you the Bimaa hoodie. I have two things to say about it…

  1. I’m going to learn to use my serger- STAT
  2. Can there be anything more adorable than a 2 year old in a hoodie? I think not.

bimaa hoodie

But seriously, I absolutely love this pattern and I cannot wait to make many more of them! My only sadness is that I don’t know how to use my serger yet (beginning Craftsy serger class next week!) because that would make this hoodie ridiculously fast to put together. As it is, it’s still a fairly quick and easy pattern. I used my walking foot and a jersey needle for the entire thing and didn’t have any problems with the construction.

bimaa hoodie

The main fabric is a clearance jersey blend knit ($3/yard!!) from Girl Charlee. It isn’t a 4 way stretch like the pattern recommends and as a result, it’s a bit snug on him even though I sized up to the 3T but I kinda like that it shows off a bit of the toddler belly. He loves it and didn’t take it off all afternoon so it’s a win all around. If I use another similar knit, I will size up to the 4T so he will get more wear out of it.

bimaa hoodie

To make this even more perfect, we got snow this afternoon! Y’all it rarely snows here so this is a special occurance. My hubby took O outside to play in the snow, and I coerced him to snap a few pictures of O in his Bimaa before we put his jacket on. Poor little fellow lasted about 2 minutes before he was begging for gloves so I don’t have a good full body shot but thankfully the husband is a master photographer and managed to take these adorable (IMO) pictures in that short period of time.
kid's clothes week