DIY Dining Room makeover plus bridal shower fun

So my sewing has been a little scarse (read nonexistent) the past few weeks since I finished my Vintage May outfit. And I am so excited to show you the reason why! To preface- my brother just recently got engaged and it worked out for him to come home for a week in May and introduce us to his fiancée. Three weeks before they were to come visit, my mom realized this would be the perfect occasion to throw a bridal shower…at my house. Yeah, so I am not the world’s best housekeeper (who has time with two toddlers and sewing? 🙂 ) and my house was in no condition to host a bridal shower, but we decided to use this opportunity to get our bums in gear and finish up a few house projects languishing on our to-do list:

  • paint the dining room white and redecorate it,
  • give the entire house a good purging- specifically our den/junk room and back porch,
  • finish up some landscaping and, of course,
  • spring cleaning
181752_10150411824530137_6551465_n

a view of the green dining room- also before we painted the china cabinet so you get a sense of how much better it looks now!


Well it was a crazy few weeks especially since part of it was spent at the beach but it’s done and I got all the important things finished! Whew…now I just wanna sleep for weeks..and show of my house while it’s still clean. LOL.

Jared And Steph Shower (7 of 9)

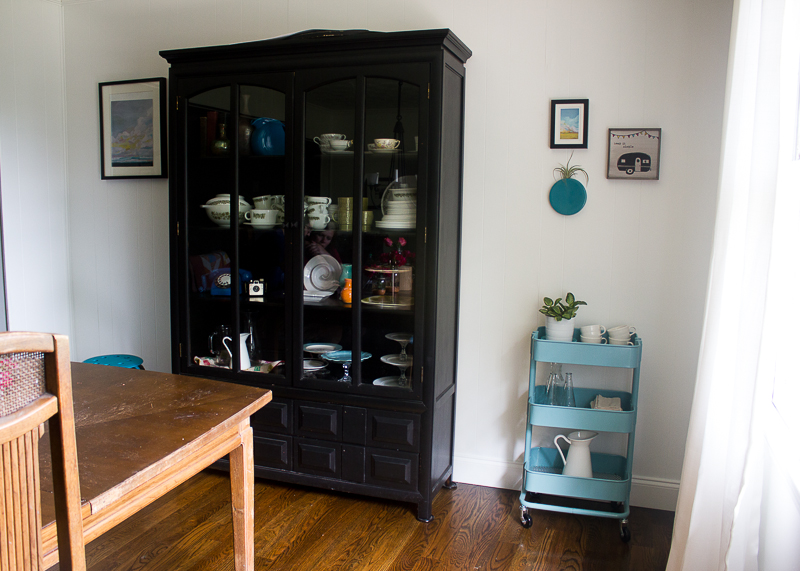
It feels so good to have a freshly cleaned house that is empty of a TON of useless clutter. I took several car loads to Goodwill and several more to the trash! So much that we were just holding on to for no reason. We are trying to live a more minimalistic life and it is so rewarding and freeing to move toward that goal. Also my dining room is now a soothing white instead of its previous bright green. I am definitely in a “paint all the things white” mood right now. I love the calming influence that white paint has on things.

Jared And Steph Shower (6 of 9)

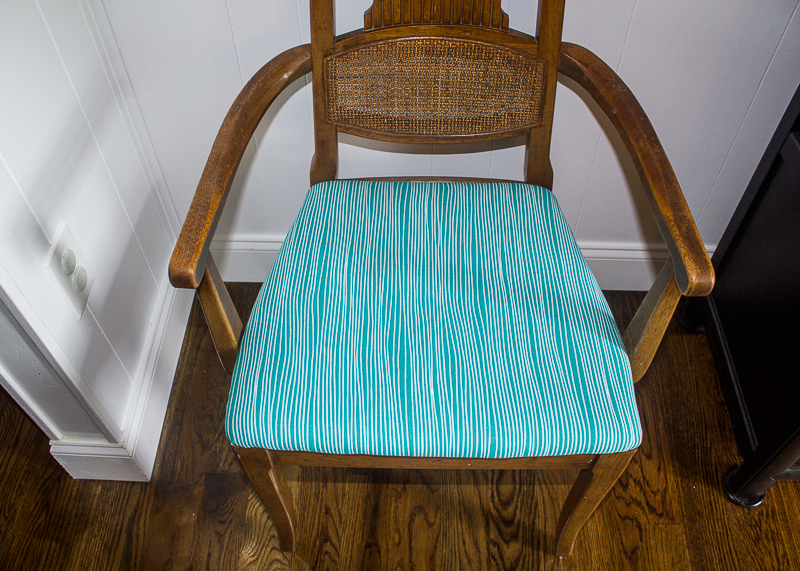
So let’s talk about the dining room projects a bit. I recovered the dining room chairs in this awesome Lotta Jansdotter Canvas print from her Glimma line (I got mine from Pink Castle Fabrics and they don’t carry it anymore but I found some on etsy here) that I’ve had sitting around for several months for this very purpose. Easiest DIY project ever: 1. unscrew the chair cushions from the chair 2. pull the new fabric over the cushion tightly and staple in place 3. screw cushion back on chair and enjoy! Make sure you pull the fabric tightly or it will wrinkle as the chairs get used.

Jared And Steph Shower (9 of 9)

Blue cart is the Ikea Raskog that so many other peeps have. It’s currently housing our cloth napkin stash and some pretty dishes. I’m still waiting on my light gray curtains for the windows but I have some family members making an ikea trip soon so they are going to pick them up for me. The 2 landscape wall prints are by Emily Jeffords (who happens to be local to us right now!) and I highly recommend them for their high quality! The prints actually look like originals. I love how peaceful her work is also. Please forgive the wonky look of the large one- we just got the frame for it and need to go get a new mat for it since the current one is not the correct size- which is why I don’t have a close-up of it.

Here’s some fun pictures from the bridal shower. The bride-to-be loves burlap, mason jars and roses so we took those things into account when decorating. My sister in law made the awesome bunting for the mantel by freezer paper stenciling onto drop cloth.

Jared And Steph Shower (3 of 9)

Jared And Steph Shower (1 of 9)

Jared And Steph Shower (2 of 9)


Hope y’all enjoyed a little trip around my newly-redecorated house. I always like to see other’s house projects and so I thought I would share a bit with you. Plus I needed an excuse to show off all our hard work! 🙂


Advertisement

The Clemson Clock- and a semi-Pinterest Fail

I have the finale of my handmade Christmas presents to share with you today and in the spirit of keeping it real, I’m going to share my semi-fail project. I saw this handmade fabric clock on Pinterest a while back and pinned it with the thought it would make a good present idea. I had some leftever Clemson fabric from the quilts for my dad and brother and decided to try out this project for my dad’s Christmas present. He has an office that is slowly being re-decorated with Clemson paraphernalia, and this would be the perfect touch.

The basic premise of this idea is that you cut out the hexagons from cardstock, cut out the fabric hexagons a 1/4″ bigger, glue them around the cardstock, and then glue the hexagons to each other. Let me tell you, cutting out and gluing all those hexagons was no joke! I think my first problem was that my cardstock was not heavy enough. Also I wasn’t careful enough with the glue and you can see dried patches on the front of the clock. In the process, I wasn’t sure that the whole thing would end up staying together. It did end up staying together but I had to add a few pieces behind because I ended up with gaps (guess my hexagons weren’t cut perfectly even- such a surprise since I’m known for my precision 😉 ).clemson clock

In the end, it turned out ok. I think once it’s mounted up on the wall, you won’t notice all the imperfections, but it definitely doesn’t look as profesh as I wanted it to and doesn’t reflect the amount of time invested in it. We will just chalk this one up to a good learning experience and move on.

Handmade Christmas Wrap-up

Well I meant to get a few more things blogged over Christmas break but you know what they say about the best laid plans of mice and men…. I am embracing the clean slate of a new year and hoping to settle into a good routine of sewing/blogging/home and family management and check in here more regularly than I have of late. Now that the little man is 7 months old, I am losing my excuse for not getting things done!

Here’s a few pics of the remainder of my handmade Christmas decor…including cute baby, of course. 🙂 Next up are a few of my handmade Christmas gifts- yes they actually happened this year- along with a semi-fail that I am sure you will be interested to see. 😉

of course E had to have one of my reindeer onesies...sold quite a few of these over the Christmas season- aren't they just so cute?!

of course E had to have one of my reindeer onesies…sold quite a few of these over the Christmas season- aren’t they just so cute?!

Some stockings I made for us a few years back using the rag quilting method...I made an extra that didn't quite turn out as planned and guess it worked out because E got a stocking too this year. Maybe next year, he'll get one that coordinates better with the other three.

Some stockings I made for us a few years back using the rag quilting method…I made an extra that didn’t quite turn out as planned and guess it worked out because E got a stocking too this year. Maybe next year, he’ll get one that coordinates better with the other three.

monogram ornament

A few of the monogrammed ornaments that were so popular in my shop this year. So popular in fact that I sold the ones I made for the boys!

A few of the monogrammed ornaments that were so popular in my shop this year. So popular in fact that I sold the ones I made for the boys!

Handmade Christmas: Wreaths

Things have been super crazy behind the scenes here. Christmas orders have been coming in in abundance. I am so very thankful for the work and income that it is bringing in, but I must admit to being ready for a nice Christmas break. As of this morning, my etsy shop is on vacation and my local store is not taking any more custom orders. So all I have to do is finish up the 5 or so orders I have in queue and then I am on break!! Maybe then I will actually be able to get to those handmade Christmas presents I have on my list. 😉

Speaking of handmade, I thought I would run a little series on Handmade Christmas. Over the years, I have been curating a collection of my own handmade items as well as those from others. I will showcase some of my favorites over the next week or so. Today we begin with wreaths. I don’t know about y’all, but I love wreaths…but not necessarily in the way you might think. Sure, I do normally have one on the front door, but no one ever uses our front door so I think of that as a bit of a waste. Instead I like to put them inside the house at various places where I can see them on a daily basis. Here are a few of my current faves.

First off is the plastic baggie wreath. This was made several years ago with some good friends. This wreath is simply plastic baggies tied around a metal hanger with some ornaments added to it. The bags were given to me and I am told that these are special bags that can only be found in northern stores because they have no closure at the top- making them perfect for this craft.  This wreath hangs on the inside of my front door.

christmas wreath

Next, we have the empty frame wreath. I made one for myself and my mother last year for Christmas. We used a pinterest pin for inspiration which I tried to find for you but the link has been broken now for some reason. 😦 I really love this simple, yet fun “wreath”. We thrifted some picture frames, took out the insides and glass, painted the frames, and then added ornaments and a bow to finish them off. Mine sits on my mantle this year.

christmas wreath


Lastly, we have my newest addition to the collection- the fabric wrapped wreath. I have always wanted to try this technique out and a wreath-making party with our church’s young families’ group last weekend gave me the perfect opportunity. I cut approx. 2.5 inch strips of a red polka dot fabric, wrapped it around my straw wreath form and then strung a felt bunting along it for some fun. It’s not necessarily super Christmassy looking but it is fun and I love it. It was also very quick and easy to make. If I had more time, I would take more care on the cutting and stringing of the bunting strips (In fact, I’ll probably redo it at some point) but I’m ok with the carefree look they are currently portraying. 🙂  Right now this wreath on my mantle also, but I think I shall move it to my sewing room once Christmas is over so I can keep it up all year long.

christmas wreath christmas wreath

What about you? Do you have any favorite Christmas wreaths that you like to pull out this time of year?

DIY Fall Wreath and Bunting

It has finally started to feel a bit like fall around here, and I have been getting the itch to change up the decor again. I think I’ve mentioned this before but I really enjoy the change of seasons because it gives me a chance to do some purging and re-organizing, leaving the house feeling less cluttered and more open. I don’t do a lot of decorating for each season, but I like to change out the living and dining room a bit with some little touches here and there.

maple leaf bunting

Until this week I still had the spring decor up since a certain little baby’s arrival took away my decorating urge this summer. I had some wreaths made up from last year but I didn’t really like them and was inspired by this Pin to try my hand at a new one. I liked this final result so much that I made a little bunting for my windows to match. The hubs said he feels like we are in Canada with all the maple leaves. I still think the windows need something else but haven’t decided yet what that will be… Feel free to chime in with ideas!

fall wreath fall wreath

By the way, I cut out all the little maple leaves by hand using a template provided in the link above (the original Pin). I doubled the felt and sewed the pairs together with perle cotton, then glued them to the yarn-wrapped wreath. The bunting is strung up with perle cotton, but it is just single leaves because I was getting a blister from cutting so much felt that I didn’t want to make those a double layer as well. 🙂

maple leaf bunting

Birthday Chair

A quick little project to share with you today…a rocking chair I recovered for my grandma’s birthday present. My mom owned the chair, and it had really old ratty fabric on the cushions. She asked me to re-do the chair for my grandma’s birthday because my grandma loves this rocking chair. I’ve already recovered two rocking chairs so this was pretty straight forward- take apart the old cushion fabric and use as a pattern for the new cushion covers (made from a twill fabric). The only change I would make is use a thicker fabric next time because the twill wasn’t quite as thick as we had anticipated and therefore didn’t turn out quite as professional-looking

rocking chair recover2

Once it was done, it needed a little something extra so I used some Ikea fabric in my stash to make a quick envelope backed pillow. That gave it the perfect pop and I think it’s super cute. Thankfully Grandma does too!

rocking chair recover

Lotta Pillows

Wow, time sure does fly with a newborn and toddler in the house! I am loving every (well almost) minute of it but it doesn’t leave me much time for extracurricular activities.  I have been using every spare minute for fun sewing and now have an over-abundance of things to share with you….to find time for photo-shoots, however, is another story. Feel free to follow me on instagram (@brookecrook) for lots of gratuitous baby pics and a glimpse into our everyday lives.

First off on my list of back-to-blogging projects, the promised project from before-baby. I finished up these pillows the week before Eliot was born when I was so tired of being pregnant and wanted a quick, happy project. I have been hoarding this Lotta Jansdotter fabric since it came out because I have never found a project worthy of it. It’s mostly from the Echo line with a few from the Bella line mixed in. Lightbulb moment- new pillows for the living room! Then I can look at my beautiful fabrics every day. 🙂 I made three super quick and easy pillows- one fabric in front, envelope closure on back. I did baste the front fabrics with a piece of white kona cotton to give them more structure. This is the first time I have done that, and I will definitely be doing it with all quilting cotton weight pillows from now on. The extra layer gives just the right weight to the pillow.

lotta pillows

The fourth pillow I made a bit more interesting but still easy. Two rows of patchwork squares surrounded by some essex linen in flax.

lotta pillows2

Our local Modern Quilt Guild had a pillow swap a few months back and my partner made me an adorable pillow using mostly Lotta fabrics. I love the additional pop this pillow gives to the others.

lotta pillows

I love looking at my favorite fabrics every day and already bought some Lotta Glimma canvas to re-do the chairs cushions in my adjacent dining room. Hoping to have time to get to that soon except I have in mind an entire room redo so it will be a bit of a larger project that requires more time than I currently have!

lotta pillows

Sewing Room Remodel

For quite a while now, we (especially the hubs) have been wanting to redo my craft room. The room had had random plastic organizers and such added to it until it was quite cluttered looking, and my hubby hates clutter! On a recent Ikea trip, we picked up a solid oak tabletop from the as-is section for super cheap and decided that I could use that as a sewing/cutting table. I am super excited about this because I really wanted a long table where I could have both my sewing machine and serger set up- therefore hopefully actually using my serger.

sewing room sewing room sewing room

My wonderful husband had the brilliant idea that the best way to organize was to take everything out of the room and then only put back select items so that the room would not get cluttered again. In addition to the Ikea tabletop, we picked up an Ikea Expedit unit from a local store that was closing and selling their furnishings. Perfect timing for the room redo!

sewing room sewing room

I am loving my new room! I really like the open layout and lack of clutter now. FYI most of my fabric stash is in the closet which I “forgot” to open and take a picture of… oops. I have a shelving unit in the closet filled with plastic tubs in which the fabric (up to a yard) is organized by color. The yardage and my sewing books and patterns are in the expedit unit. The blue bookshelf holds all my etsy shop supplies- onesies and hoop fabrics.

sewing room sewing room sewing room

I had gift wrap and a present stash stored in this room, but we were able to find other storage spaces in the house for that stuff. I also got rid of some clutter and junk I didn’t need- sold my super old Singer on craigslist. Woot! I am still on the lookout for a cool chair and a shelving unit to put under the left side of the table. I also have this blank wall waiting for some sewing-related decor and hopefully some more mini-quilts. So still some work to be done but a happy place to create in the meantime.

sewing room

This rug has special significance because learning how to make these rugs was what sparked my interest in re-entering the crafting world… and the rest is history 🙂

sewing room sewing room

On the design wall… a toddler quilt

I have so many projects right now that I really need to be working on, but some unforeseen pregnancy complications and sicknesses have left me without energy to do much at all the past few weeks. Thankfully I have found something to do which can be done in the short pockets of time and energy that I have- the beginning of Oliver’s toddler quilt for his big boy bed. Seeing as his 2nd birthday is in a month, and that’s when he is (hopefully) making the transition from his crib to a twin bed, it’s about time I got started on it. I searched good ‘ol Pinterest for some ideas and here is some of my inspiration.


My original idea for the nursery was to do orange, green, blue and gray but it never really ended up that way. I’m using this second baby boy as inspiration to re-do the room a bit how I originally envisioned it. Maybe now it will finally get curtains! 🙂 The boys will be sharing a room once the new baby starts sleeping well so the toddler quilt needs to coordinate with the room. (You didn’t think I was going to give up my craft room for this baby did you? 🙂 )

Oliver toddler quilt

I picked up a fat quarter pack of the Michael Miller Children at Play series a long time ago envisioning it as the perfect toddler quilt fabric. I am using those prints as my focal points for the blocks and building up coordinating solids and prints around them. I have four blocks out of my twelve finished and am really loving it so far. The nice thing is that I can just do a row or two of this as I have time so it works well for my small pockets of sewing time. The finished blocks will measure around 22 inches square.

Oliver toddler quilt

Oliver toddler quilt

Now that I am finally feeling better, I am hoping to finish up some other big projects in the works before getting back to this- mainly two big quilts I have to quilt and bind. I’m excited to try out the quilting on my new machine… just have to find time for the hubs to baste them for me, and I can get started. (Going to try out spray basting this time) I need to be disciplined and use this toddler quilt as incentive to get those other quilts done quickly so I can get back to this fun!

Oliver toddler quilt Oliver toddler quilt

Stacked Coins Table Runner

Stacked Coins Runner

Last spring I wanted to make something to cover my coffee table and decided to try out a bit of a variation of the stacked coins pattern. I took a charm pack, cut the squares in random widths, then sewed them together in 2 long rows. I used some white Kona cotton in between the long rows and backed the whole thing with a home dec. fabric from Ikea. I wanted the coins to stand out so I quilted the white area fairly densely with straight lines and then left the coins unquilted. I just happened to have this pink bias tape in my stash to coordinate so nicely with everything. The end result is a bit girly, but fun for spring. The best part is that I had everything I needed on hand and didn’t need to make a trip to the store for supplies. I love it when that happens, and it feels like I am making something for free. 🙂

Stacked Coins Runner

Stacked Coins Runner

When I pulled it out again for this season, I decided to use it on my dining room table along with a new container and colored rocks that I picked up during a recent Ikea trip. I like it even better on my table and think it dresses up the room nicely. Oops, I didn’t notice until editing my pictures that I really should wash the runner because it’s got some major spots going on…Hence some creative photo editing because I’m too lazy to wash it and retake my pics. Or maybe I should have just shown you all the spots and chalked it up to being real, huh? Also pay no attention to the “distressed” table… that’s one of those projects we will get to, eventually, haha. When does eventually ever happen? 🙂 At least now I have a nice runner to cover up some of the worst spots on it!

Stacked Coins Runner