Unknown's avatar

About oliver's fancy

I am wife to a patient husband named Ian and stay-at-home mom to a busy little boy named Oliver. When not running around after him, I enjoy dabbling in all sorts of craftiness. I am a self-proclaimed fabric-aholic and proud of it! I have started this blog to document my journey of bettering my sewing/ crafting skills and show off occasional pictures of my little man and superb culinary creations:).

Love is in the Air

With Valentine’s Day coming up next week, I thought I would share a few of my own decorations I have collected over the last few years. After Christmas decor comes down, I get tired of all the blah winter decorations and get the urge to put up Valentine’s stuff. I don’t go super crazy but a few touches here and there make me smile, and help pass the time between Christmas and Spring. Because you know, here in the South, I consider Spring to come after Valentine’s day and think it’s perfectly appropriate for me to begin setting out my Spring decor when I take down all the hearts. 🙂 If I’m wrong, just leave me to my happy delusion.

Valentine Heart Wreath

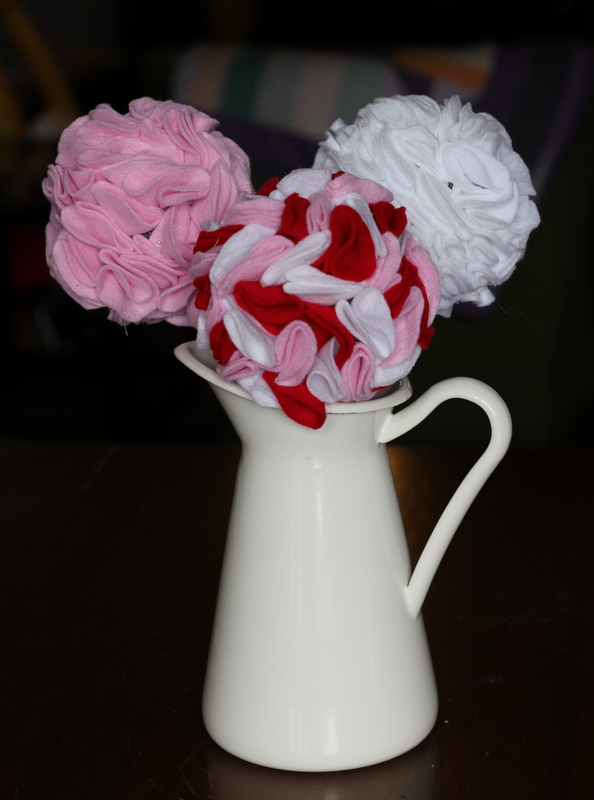
Several years ago I saw tutorials posted on the Idea Room for both this Valentine Heart wreath and topiary. I liked them so much that I decided to try them out for myself. The heart wreath graces in the inside of my front door. Oh that door’s not finished, you say? Just keeping it real, people! I took a bit of a different take on the topiary and instead of just having one in a vase, I made three to group together like a flower arrangement for my dining room table. I love the results, and they are all quite easy to make. The only caveat is that your hands get kind of sore after cutting out what seems like gazillions of felt circles! I would advise doing this tedious part during a movie or a craft night with friends to make it more fun.

Valentine Balls

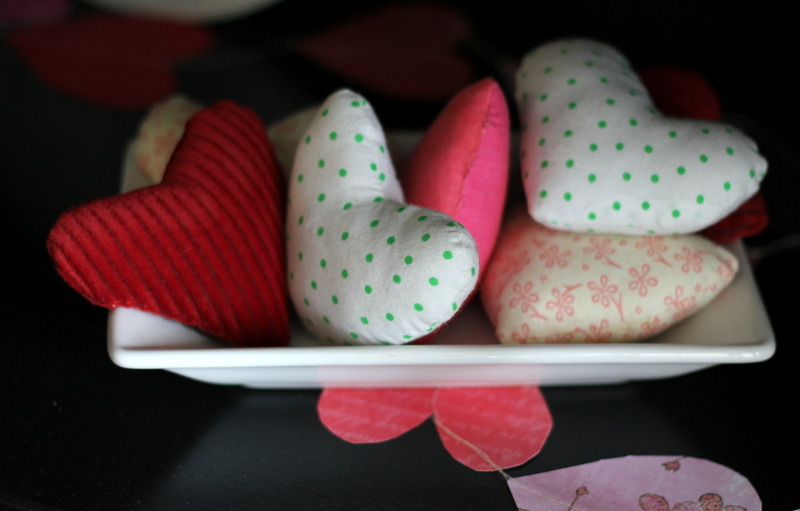
I cannot remember where I saw this idea for the stuffed hearts, but they are a fun addition to my china cabinet this year. Also I cut out a bunch of hearts from scrapbook paper and sewed together a small garland which is hanging out in the china cabinet with the stuffed hearts. Trying to take a picture of my china cabinet was a creative exercise! Maybe if I had taken the time to clean the table off, it wouldn’t have been so difficult as the table junk kept reflecting in the cabinet doors. 🙂

Valentine HeartsValentine hearts and garland

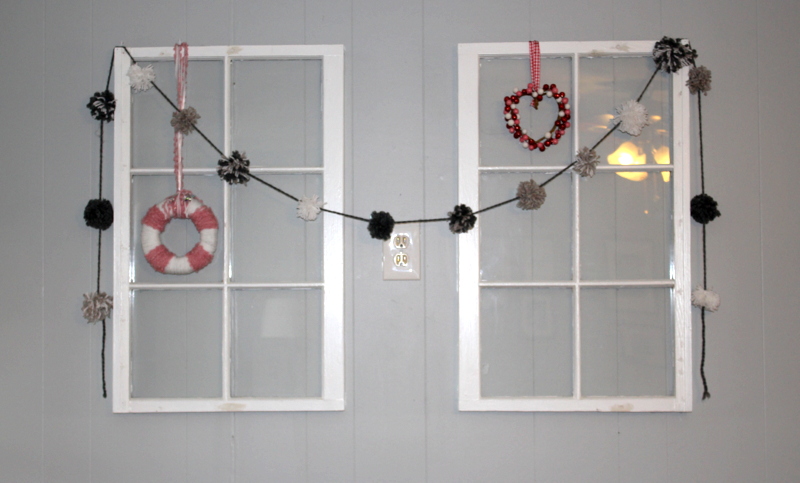
I also have some old windows on the wall in my living room that I like to change up with the seasons. I put the yoyo garland up for winter and then just kept it and added a yarn-wrapped wreath and another wreath (bought at target) to make it more festive.

valentine windows

Makers Summit

This weekend I had the opportunity to attend the Makers Summit. In their own words, the Makers Summit is “a one-day business conference for the art, craft, and design world” where you can “connect with fellow creatives while learning how to start or grow your creative business, hear practical advice from industry experts and participate in collective discussions.”

This conference was run by the same people who have run the Indie Craft Parade for the past 3 years. I knew that it would be a good conference but wasn’t sure that it would be worth it for me to attend. Thankfully my husband convinced me otherwise and I decided to try it out. It. Was. Amazing. The three main speakers were Stephen Fraser from Spoonflower, Kimm Alfonso from Etsy, and Grace Kang from Pink Olive. In addition, there were several discussion panels with various crafters/designers and chances for individual consultations with the speakers. I was inspired, challenged, motivated, and overall had tons of fun! How great to have the opportunity to meet and brainstorm with other indie crafters who were also seeking business direction and inspiration.

I plan on taking this week to think over the notes that I took and work on some plans for the future. Right now my brain is spinning with all the info that I absorbed and I am looking forward to mulling over it and developing some new ideas. I just happened to sit near Stephen Fraser for both lunch and dinner and really enjoyed hearing his Spoonflower story and getting to know him as a person. Everyone who came was so down to earth and willing to impart helpful tips and advice to those of us beginning our creative careers.

Makers Summit

Kimm’s speech: I couldn’t resist snapping a pic of this Dr. Seuss quote!

Makers Summit

Very nice lunch table decor

Makers Summit

Amy Flurry explaining how to pitch yourself to a blogger or magazine editor during one of the discussion panels

Makers Summit Makers Summit


In addition to the Makers Summit, I also attended the after party also known as The Best Craft Party Ever. It was tons of fun and Ian was able to attend this with me so we got a fun date night in on the deal. We had a great dinner, letter pressed cards, screen printed tees, and made a terrarium and beeswax candles. It was quite the full day and I am totally exhausted now but it was worth it! Events like this make me feel so blessed to live in this great town where so many fellow crafters are working to create a larger arts community! I tried to take semi-decent phone pics throughout the day so that  I could give you a taste of what it was like…

Me looking quite preggers in that apron screenprinting my own tee.

the afterparty crowd- stolen from the hub’s Instagram feed 🙂


Etsy Shop Focus

I thought I would take a minute today to let you know about one of my new favorite Etsy shops- Meadow Mist Designs. This shop is run by Cheryl Brickey, who just happens to be the newest member of our Greenville chapter of the Modern Quilt Guild. I have been wanting a cute pincushion for a while, but have had too much going on to make one myself. At our last GMQG meeting, Cheryl happened to mention she sold them on etsy. I immediately checked out her shop and was so happy with what I found that it took me a week to decide on what I wanted. Look at some of her shop goodies!

Source: etsy.com via Brooke on Pinterest

Source: etsy.com via Brooke on Pinterest


In the end, I contacted Cheryl directly to ask for a pincushion with all Lotta Jansdotter fabrics. She put together the perfect pairing of fabrics and also made me a needle book and a thread catcher. Look at how cute they are! Excuse the fact that I took this picture in a poorly lighted room…We all like instagram pics every once in a while, right? 🙂

She doesn’t have the needle book or thread catcher up on her shop but I’m sure if you asked nicely, she might be willing to start selling those too! 🙂 This is not a paid endorsement in any way. I just love finding new etsy shops that are affordable and have good craftsmanship, and I thought you might also appreciate the knowledge!

Madrona Road Challenge

Michael Miller Fabrics partnered with the Modern Quilt Guild to create a challenge for QuiltCon. The company donated fabric from the Madrona Road line to each quilt guild that wanted to participate in the challenge! I think that’s pretty generous.Michael Miller Fabrics and Violet Craft (the designer of the fabric line) will be picking some of the entries to display in the Michael Miller Fabrics booth at QuiltCon. The photos must be uploaded to the flickr group by January 31st, so I had a bit of a time constraint to complete my project.

I had such a hard time deciding what to make for this challenge. I knew that I wanted to make a mini-quilt because that has been on my list for a while and what better opportunity than with free fabric? I finally decided to try out Jeni’s Flagged Quilt that I have been dying to make. This quilt uses half-rectangle triangles. I used a combo of her directions and the Modern Quilt Guild’s directions that she links to for my quilt. I didn’t want my quilt as big as hers so I cut 5×7 inch rectangles. This is a super quick and easy quilt pattern! Once I got started, I just couldn’t stop because it practically flew together.

madrona road challenge- front

For the backing, I rearranged some of the leftover triangles to form a different pattern and surrounded them with my remaining fabric in large blocks. I used the fabric given to me plus some Kona White and Charcoal.

madrona road challenge- back

Quilting: I debated for a while about the quilting but ended up using the same loopy quilting technique that Jeni used in her quilt. It’s a fairly easy free-motion quilting technique so it’s perfect for a beginner like me. Except for the fact that I had only completed about 1/4 of the quilting and the timing went off on my machine. I am not sure what happened, but somehow I must have jammed it and then yanked the fabric. 😦 I was so upset- this close to finishing and my machine is down and out! I have some nice friends though and one of them let me finish the FMQ on her Bernina. (And can I say that I now have my Bernina fund started because that was the most fun I have ever had while sewing!! There really is a huge difference between my machine and that one!). The repair man was able to fix my machine quickly so I had it back within 48 hours and finished the binding last night.

madrona road challenge- quilting closeup

I wasn’t sure what I would use for the binding because (I thought) I had used up every single scrap of fabric given to me, but when I was cleaning up from the quilting, I discovered more fabric on the floor! Perfect! Just enough to make my binding!  I guess you could call that a happy mistake.

madrona road challenge- front closeup

I am loving this quilt. It was lots of fun to make. (Other than the machine breaking part of it…grr) I don’t have any hope of it getting picked for the challenge but it was good to make something just because, and now I have a mini-quilt for my sewing room wall! The finished quilt measures 25×25.

IMG_8514 madrona road challenge

Echino Pillows

And now to show you the few projects that I completed in anticipation of hosting a baby shower at my house. Of course, originally I had a huge to-do list that I wanted to complete but the reality of my pregnant state honed it down to just a few important items.

Echino Nico London pillows

I bought this Echino Nico London fabric at on online clearance sale probably a year and a half ago with the idea that I would use it for pillows in my den area. I kept waiting to make the pillows because the hubs is making me some built-in bookshelves and these pillows were to be part of the window seat area. Well the bookshelf project is on a bit of a hold right now, but I decided to go ahead and make the pillows to spruce up that area a bit. The bookshelves will be built on top of this build-in cupboard (now hiding many of Oliver’s toys) and so I will just pull all the pillows to the middle window-seat area when they finally are finished. I la,la love how it turned out! I am a bit of a book nerd and have a love affair with England so this fabric suits me perfectly. I also had my sister come over and help me hang some art work and lanterns that I had sitting around waiting for this room to be completed. (Art work is by the very talented Mary Lekoshere)  Now it looks like a cozy little space and I am so happy to have pulled this nook together. Ignore the fact that the pillows are sitting on raw boards- remember the whole work-in-progress fact and appreciate that there is at least one part of this project completed. I need to take some more pictures in the later afternoon because the sun was shining directly in the window- making it impossible to get a shot of the entire wall but I think you get the general idea. IMG_8477IMG_8480-001

I have about a yard of the tan London print left over as well as some nice-sized scraps of the other prints so I hope to make a quilt for the day bed also located in this den to really pull the room together. As a final note, I highly recommend this linen-cotton blend fabric as the perfect weight for pillows! It sews like a dream and creates a nice thick, but not too heavy pillow cover! Also I am lazy and create envelope backs for all my pillows! Super easy and you don’t have to fiddle with zippers, buttons or hand-sewing.IMG_8487IMG_8490

A Showering of Fun

This past Saturday I hosted a baby shower for a good friend, K. I had lots of fun planning the decor for the shower especially since she is having a baby boy- my area of expertise 🙂 . The baby room colors are grey and green which just happen to match my dining and living room colors as well! Perfect for decorating! Another friend is making the baby bedding, and I contacted her to get the details on the fabric she is using so I could buy some to use in the decor.

When I talked to K, she told me that she did not have a specific theme but was thinking of using some elephants as decor and really wanted a tissue pom mobile. I looked up her Pinterest wall to see what she had pinned for the baby’s room and found my perfect inspiration!

Source: imgfave.com via Kimberly on Pinterest


I googled felt elephant templates and found the perfect one for my needs. Here is the link for any interested. I enlarged the template two different times in order to have two different sized elephants- one enlargement was about 225% and the other was about 300%. Then I gathered all the materials needed and hosted a fun crafting morning with my fellow shower helpers to get all the decor made. Together we made 5 elephants and 7 tissue poms. Later on, I made a felt circle garland and name bunting.

I am so happy with how all the decor turned out as it was my first time making the tissue poms and I was a bit apprehensive that they wouldn’t look quite right. The best part is that the mama-to-be got to take all the decor home to use in her baby room! Now prepare yourself for a barrage of pictures! I apologize that the brightness from my huge front windows make it difficult to get a good shot of the table decor.

Kimber baby shower

Kimber baby shower-2

Kimber baby shower-3


Kimber baby shower-5


Kimber baby shower-7

Kimber baby shower-8

New Year Update…

And we’re back! That was a bit of an unintended, extended break, but we are back up and running folks! Wanna see what’s been taking up all my time and energy?
Baby #2 Ultrasound

Yep, you got it…another little rugrat will be running around our house come June. And we are excited to announce that it is yet another boy child so let the boy crafting keep coming! No ruffles and bows at this house, peeps. Having an active toddler running around while going through the loveliness that is pregnancy sure has set me back a bit. However crafting must still go on and I am excited to get back into this space and share some fun projects I have been working on. To begin with, let’s just do a quick recap of what’s happened since I last visited this space. Most of the pics will be instagram since these were all captured on the go.

First: CRAFT FAIRS

I was in two craft fairs. The first craft fair was a small, local affair and I must admit to being a bit disappointed at the amount of money I made for all the work involved. The second craft fair was located just a little ways from me in Columbia, SC and turned out to be a huge success! I loved everything about the Crafty Feast and hope to make it an annual event! My thoughts on craft fairs- they are tons of work, but if you pick the right one, the outcome can be quite good. I think I will pick one or two a year to focus on because any more than that is too much time for this part-time crafty mama.

My first little craft fair booth

Second craft fair- notice the new contraption the hubs made me to keep my hoops on. This worked out great!

Next: CHRISTMAS CRAFTS

I didn’t set too many goals for Christmas crafting because my last craft fair was December 15 and I knew that I wouldn’t have much time for handmade gifts this year. I did manage to make a few things though. I made a little side table topper for my mother to match a vintage quilt in her guest room. This was a fun, easy little project. I used a quarter square triangle tutorial to make a version of the Ohio Star block

The other big Christmas gift I managed to make was a Clemson quilt for my brother. This was a joint venture with my parents. They asked me if I would make the quilt if they provided all the materials. I don’t have any pictures of the finished quilt- seriously, how terrible is that? However, I made the quilt was a copy of the one I made my dad for Father’s Day so I’ll cheat and show you a picture of that one as an example.

001-001

That about wraps it up for now. I am hosting a baby shower at my house this weekend and I cannot wait to show you the cute decorations we have made in preparation for this shower. However, the decor is a surprise to the mama-to-be so I shall have to wait till next week to reveal the cuteness. 🙂 I will be back later this week to show some fun house projects that I have completed in anticipation of all the visitors that will be here on Saturday.


KCWC fall 2012 Final Update


I thought I would give a final update as to my results for KCWC. As normally happens, my list morphed during the week, and my end results are not quite the same as my to-do list, but in this case I am very happy with the amount of work I was able to accomplish.

The before list:

  • Charlie tunic
  • Green cords
  • 4 Raglan Tees
  • Appliqued onesies- hopefully 10

Actual Accomplishments:

  • Charlie Tunic
  • Green Cords
  • Grey Cords
  • 2 Raglan Tees- one with hand embroidery
  • 1 Raglan Cardigan
  • 6 Appliqued onesies- still need final machine stitching.

Whew! That was a crazy week! I will be taking a break from that kind of crazy sewing and will be getting caught up with all my other things piling up. First thing to do is to clean my mess of a sewing room. Then the rest of this week will be spent working on items for the craft fair- only 3 weeks away! Be sure to check out the flickr group to see all the amazing things everyone else produced this week!

I will leave you with a picture of Oliver in church nursery yesterday wearing his mama-made clothes as proof that the Charlie tunic now has buttons. 🙂 Oh and can just say how nice it is to have a community who understand the need to make things. I got some comments this weekend about making Oliver’s clothes… “I’ve never met a mom who makes her kid’s clothes” and “how long will you keep making him wear things you make?”. These comments made me feel like I was a bit of a freak for enjoying the art of constructing clothing, and then I remembered Karen’s beautiful post and all the wonderful peeps participating in KCWC and I know that I am not alone! So glad to have a community to back me up!

KCWC Fall 2012 Day 5

Today’s update isn’t anything grand and glorious.I used up so much energy the beginning of the week that, honestly, I was kinda burnt out to sew today. But then I read Meg’s encouragement to push through and I saw that we made it to her front page (yay :)) so I pushed through and worked on some craft fair projects today- still counts as kid’s clothes even if it’s not for mine, right? I was able to get 6 onesies appliqued today. I still have to sew around the appliques but the hard work of cutting them out and  fusing to the onesies is finished . Yay for some of my to-do list out of the way! Especially since I only have 3 weeks till my first show! I used some Christmas fabric that I picked up last weekend in preparation for this week as the bow tie appliques. My thoughts are that these will make great outfits for little boys’ special Christmas events.

We are headed out of town this afternoon for our church retreat, so I won’t be able to participate tomorrow. But I want to participate on Sunday and get all these onesies sewn up. I’ll be back Sunday night or Monday morning with my final update and KCWC wrap up.

Project Run and Play Week 5- Fall Holiday

Well I totally got my wires crossed for this week’s challenge. Up until Monday afternoon, I thought this week’s challenge was your signature look. Oops. I thought about sitting this one out, but after reading Deborah’s post on Tuesday night, I was inspired with some great ideas for Thanksgiving. I designed an outfit that Oliver can wear to the Thanksgiving dinner table. I love the idea of having a special outfit he can wear for this often-overlooked holiday! And yet it’s still super comfy for him to run around in after dinner.

First off, the cardigan!! 🙂 I got this idea after seeing several Greenpoint cardigans in the KCWC flickr group. I am sure that is a great pattern, but I decided to take a stab at drafting my own pattern. I used several old tees from Goodwill as my fabric. I took the raglan tee as my base and then completely dissasembled and rearranged it. I moved the fold line over several inches in the front, back and sleeve pieces so it would fit more like a sweater than a skinny tee. Then I cut the front piece straight down the middle and created a curve down the front. I sewed the base cardi together- enclosing all raw edges and made all the binding- for the sleeves, bottom, and neck/buttonhole facings. This I sewed on in similar fashion to adding cuffs. The only thing I didn’t do quite right was to take enough off the neck to account for the binding so it was a little big/high in the back. To fix this, I made something similar to a dart down the middle of the back of cardigan. It’s still a bit big, but it is supposed to be a sweater and it will give him time to grow into it. I am already thinking about how I will make the next one!

The pants- self-drafted pattern using what I learned from the green cords. (made these a little smaller and shorter.) They have a faux fly, lined pockets, flat fell seams, flat front with elastic back, and hand embroidery on the back pockets.

The tee- I knew I wanted to make a tee to coordinate with the cardigan and wanted it to have some sort of applique or embroidery on it. My hubby suggested the word THANKS. I embroidered it with Perle Cotton. The pattern is the Raw-Edged Raglan, but I enclosed all the seams on mine instead of leaving them raw. I used a ribbed knit for the neckband (and enlarged the neckband by 2 inches:) ) and it fits great! No problem fitting over head.

the photoshoot came to a sad and abrupt end after a fast trip down the slide ended in a face full of mulch and a scratched and bloody face 😦

This is also my update for KCWC days 3-4. Whew! I have enjoyed both PRP and KCWC but I am looking forward to a break in order to get to all my other sewing lists piling up around me! I think Oliver will be well-stocked with handmade clothing once this week and next are over!