Star Wars Quilt

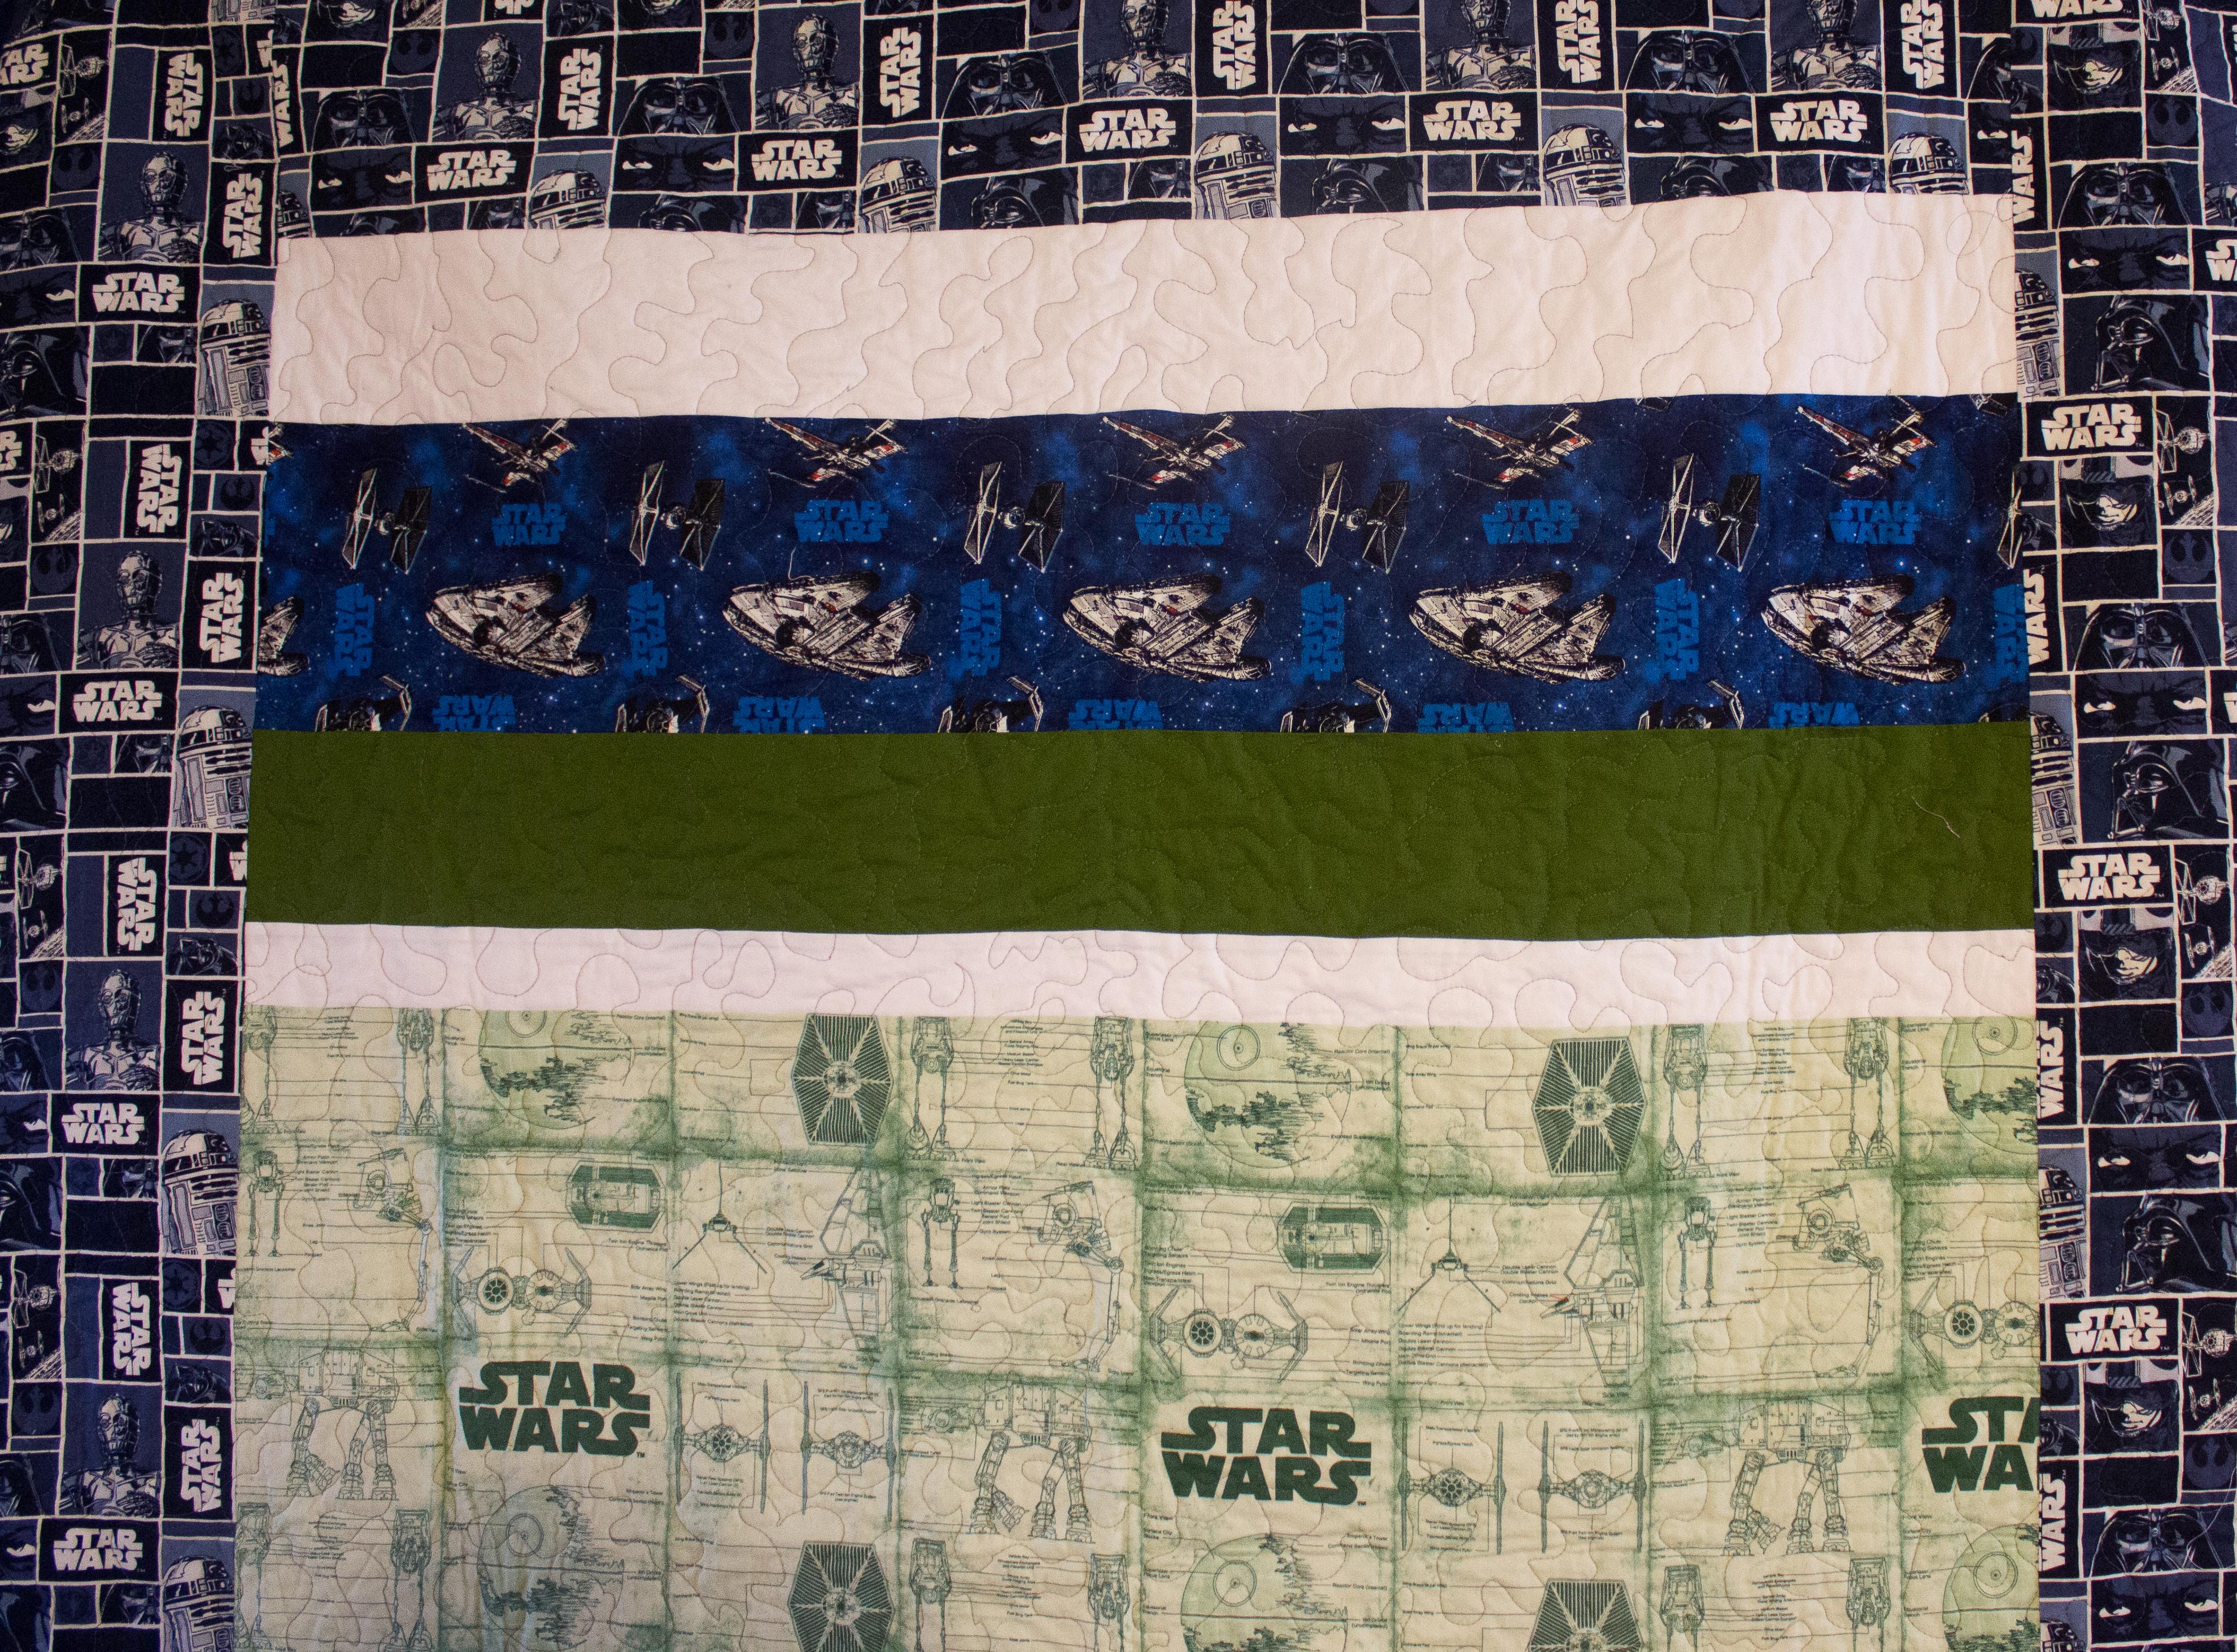
My younger brother is a huge Star Wars fan, and for his 18th birthday I thought a special Star Wars quilt was in order. I searched Pinterest for quilt ideas (you can see my quilt board here) and never really found exactly what I was looking for; so I decided to head to my local Joann Fabric, check out their selection of prints, and go from there. Based on what I found at the store, I decided to do a strip quilt with coordinating solids interspersed between the Star Wars panels. Once I finished the strip quilt section, I realized the quilt was going to be too narrow (no surprise I erred in my math calculations…math and me, we’re not good friends) and that’s when my husband gave me the idea to add the side sections to make a border around the quilt. The quilt finished up around 60″x80″ -a nice throw size blanket.

star wars quilt

Of course, I can’t just complete a project and give it to the person on time. No that would be too simple and planning way too far in advance. I was actually proud of myself that I was doing such a great job on finishing a project on time, when a little over halfway through the quilting, I ran out of thread- the afternoon of the party. Oops. My bad. I ended up finishing the quilt right before Christmas. Two months late but better late than never, right? 😉 Considering my last quilt gift was finished on the one year anniversary of the occasion, I’d say I’m doing much better these days. LOL.

star wars quilt

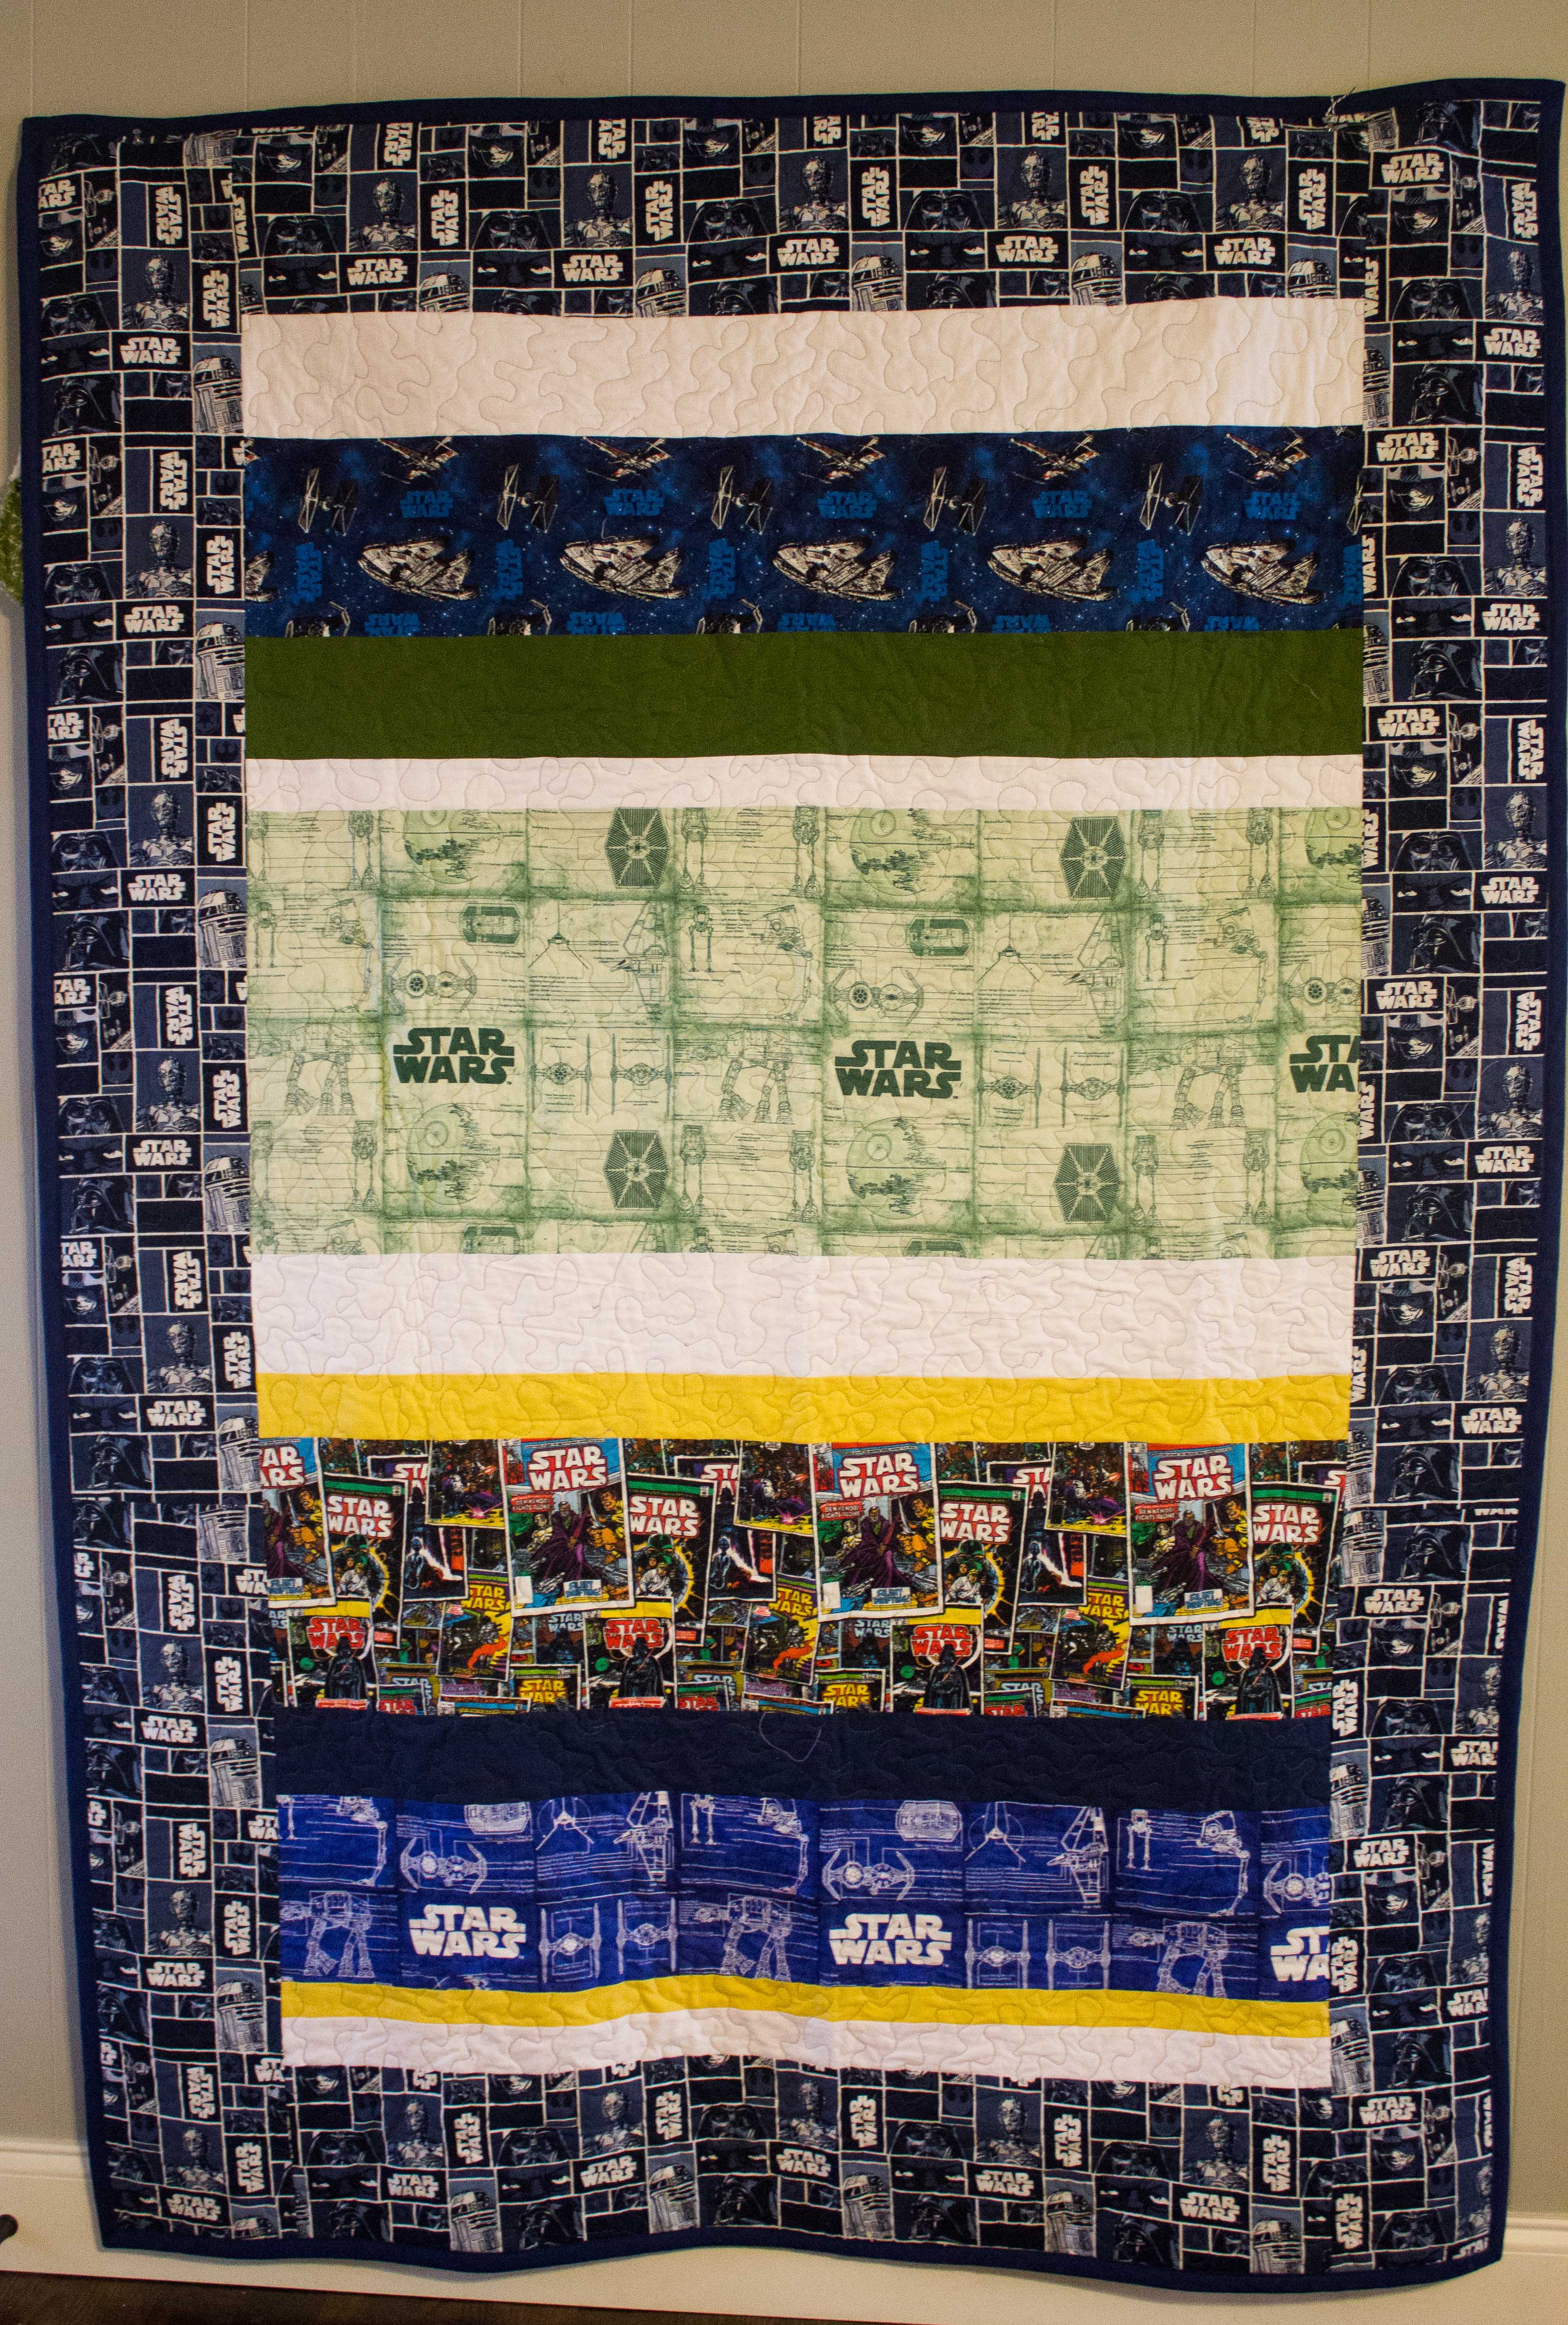
I used Kona Navy for the backing with the addition of one of the leftover border stripes and bound the quilt in a navy blue store-bought binding (I know, I know, for shame). The quilting is my current go-to method- stippling. I promise I’ll try another method soon! All in all I am really happy with how this turned out and hope my brother is happy with his personalized quilt.

star wars quilt

Advertisement

How to Make a Guest Book Wedding Quilt: Part 3 and Finished!

First of all, the giveway continues on through tomorrow night so head over and leave a comment if you haven’t yet to get your name in the hat. I’ve really enjoyed all the comments and new followers I have met this week!

Part 1 of the tutorial: here

Part 2 of the tutorial: here

Final Part: Backing and Quilting

  • I just did a basic strip piecing for the backing- cutting varying widths of fabrics and sewing them together until it was long enough for a backing
  • Because this turned out so big (King Size!) I spray basted the quilt and then just did an all-over stipple on my sewing machine.
  • I traced out the initials and the date with my fabric marker and then hand-embroidered through all layers with perle cotton using a basic embroidery stitch
  • Binding is machine sewn
  • And done! Yay! 🙂

Oh I wish you could see the happy dance that I am doing right now! I am so very, very happy to have this quilt finished. Part of me thought I could never get it done, but I was wrong- due in main part to the amazingness of my new Bernina. I never could have quilted this thing on my old Singer.

I have had the backing and top finished for a while and have been putting off quilting it because I was not sure how I was going to get the king-size quilt through a regular sewing machine. I am not going to say it was the easiest thing in the world but it was possible. I have a list of projects that need to be completed before baby comes and this was number one on the list so I just determined that this week would be the week that I finished it.

guestbook quilt

Monday, I spray basted the quilt (quite a job with a quilt this big!) and then added a few pins to give a little additional support. I spent Tuesday and Wednesday quilting both during nap time and at night. I think it took me a total of about 5 hours to machine quilt. I decided to stipple the quilt because I liked how it turned out on the last quilt I did, and, for me, it’s a lot faster than any other method. I’m not gonna lie- those middle sections of the quilt were tough! All that extra material bunched up in the harp space was a bit of a pain. However, all things considered, it was easier than I had anticipated it being. Then I did some hand quilting in the very middle of the quilt with the initials of the married couple and their wedding date. (Yeah notice how it’s almost exactly a year ago…lol).

guestbook quilt

Today it was binding time. I was way too tired at this point to even think about making 12 yards of bias tape myself. Thankfully, my local Hobby Lobby had exactly the amount I needed in a gray color almost perfectly matching the Kona gray in the quilt. I also decided to machine stitch the binding on for time and energy reasons. I used my walking foot for the first time and really like how it keeps the bias tape nice and even!

guestbook quilt

And now the grand ta-da…all finished at last! I really like how the finished project turned out. The stipple quilting is the perfect accent without taking away from the signatures. I would totally recommend doing this for a great wedding keepsake- just do better math that I did and don’t make it quite so large (It is almost exactly the size of my 8×10 rug!)! Sorry for the lack of amazing pictures. If someone has any great ideas of how to photograph a king size quilt feel free to pass that info on to me! Plus I am just too exhausted at this point to attempt a cool photoshoot. If you need me this weekend, I will most likely have my 36 week preggers body on the couch recovering from my quilting marathon!

guestbook quilt


Patchwork Quilt

I am so happy to report that I have finished the patchwork quilt that I was commissioned to make back in January. You may remember me talking about it here. Thankfully, when I agreed to make this, I made sure my clients knew that it would take me a while to complete the quilt, and they were happy with that arrangement. BUT crunch time came, and I needed to knock this project off my to-do list so I can move on to other things. (The list is never empty is it?)

Ray's Patchwork quilt

I was able to use up most of my leftover fabric to piece the back- just had to get some more Kona green to make up the difference. This was my first attempt at spray basting and I’m pretty happy with it. The only thing I would not recommend is that we tried basting outside and that was a bit of a mess- with the wind blowing the dirt onto the quilt and such. The smell wasn’t as bad as I was anticipating, so I think that next time I will be fine to spray baste inside.

Ray's Patchwork quilt

Ray's Patchwork quilt

I decided to try out the free motion quilting on my machine mainly because I don’t know how to use my walking foot yet and didn’t want to do straight line quilting without that. I loved the free motion! It was so much faster than straight line and really quite a bit of fun. I just did a random stippling and while it is not perfect by any means, I am pretty happy with it. I promise the blocks aren’t as wonky as they appear in this picture…the wind was giving us a time this afternoon!

Ray's Patchwork quilt

The binding is the same Kona green I bought to finish off the backing. I ended up machine stitching the binding on instead of hand stitching. I did this both for durability (It’s going on a little girl’s bed) and for time’s sake. It was quite hard to photograph this quilt because of the huge contrast between the lights and darks, but I tried.

Ray's Patchwork quilt

Finished quilt size is around 68×88 inches- twin sized. This is my largest quilt to finish yet. I’m going to take a little break from quilting to get some other projects done this week and hoping to work on the king-size quilt next week.

Couldn’t resist throwing this picture in there…Oliver was trying to figure out why Daddy was playing “man behind the curtain.”

Ray's Patchwork quilt

Spring Top Sewalong and Project Updates

First off, there’s not been much to show for this week. I got into two more local shops, (yay!) and have been super busy stocking them with goodies. While it’s been lots of fun creating new things and dropping them off at the stores, I am happy to have that done so I can take a break from shop sewing and get busy on my own projects. I am excited to see how these two stores work out for me. I am selling on a consignment basis so it’s a nice relief from pressure since I don’t have to pay any rent or whatnot upfront. For those interested parties, the two stores are UrbanDigs and The Natural Baby Store. I love both of these stores and am so happy they have agreed to partner with me! Now to sit back and let the sales roll in… (too optimistic? :)) Here’s some photos from the UrbanDigs Instagram account- love the displays she has created for me!

The next projects on my list are the two quilts to be quilted. Did I say I would finish those this week? Oops. Well I did get the back finished on the one, so now they are both completely ready to go except for basting. Unfortunately the hubs has been working late (tax season) and hasn’t had a chance to baste for me yet, but that is on the to-do list for this weekend. I’m thankful it’s going to be a nice one because we need to do the spray basting outside on our back patio. Those two projects are first on my list for next week! Now I have to finish them because I will be embarrassed to report back to you that I have procrastinated on them yet again. 🙂

And now we come to the fun part- Spring Top Sewalong 2013. I am so excited about this year’s event because I have been wanting to sew myself some maternity tops and now I have a push to do so. I know I only have a few weeks left (9 to be exact), but I’ve grown out of a lot of my current tees and could use a few more to get me through the last stretch. The challenge runs from April 1-19, giving me some time to work out my ideas. I’m thinking of using a few of my favorite maternity tops as patterns for my own tops. We shall see…hopefully this isn’t a complete bust. 🙂 I hope some of you will participate along with me. It is so fun to be working along with fellow sewists on similar projects. I just love perusing the flickr group for inspiration! Check out Rae’s post for more nitty, gritty details.

On the design wall… a toddler quilt

I have so many projects right now that I really need to be working on, but some unforeseen pregnancy complications and sicknesses have left me without energy to do much at all the past few weeks. Thankfully I have found something to do which can be done in the short pockets of time and energy that I have- the beginning of Oliver’s toddler quilt for his big boy bed. Seeing as his 2nd birthday is in a month, and that’s when he is (hopefully) making the transition from his crib to a twin bed, it’s about time I got started on it. I searched good ‘ol Pinterest for some ideas and here is some of my inspiration.


My original idea for the nursery was to do orange, green, blue and gray but it never really ended up that way. I’m using this second baby boy as inspiration to re-do the room a bit how I originally envisioned it. Maybe now it will finally get curtains! 🙂 The boys will be sharing a room once the new baby starts sleeping well so the toddler quilt needs to coordinate with the room. (You didn’t think I was going to give up my craft room for this baby did you? 🙂 )

Oliver toddler quilt

I picked up a fat quarter pack of the Michael Miller Children at Play series a long time ago envisioning it as the perfect toddler quilt fabric. I am using those prints as my focal points for the blocks and building up coordinating solids and prints around them. I have four blocks out of my twelve finished and am really loving it so far. The nice thing is that I can just do a row or two of this as I have time so it works well for my small pockets of sewing time. The finished blocks will measure around 22 inches square.

Oliver toddler quilt

Oliver toddler quilt

Now that I am finally feeling better, I am hoping to finish up some other big projects in the works before getting back to this- mainly two big quilts I have to quilt and bind. I’m excited to try out the quilting on my new machine… just have to find time for the hubs to baste them for me, and I can get started. (Going to try out spray basting this time) I need to be disciplined and use this toddler quilt as incentive to get those other quilts done quickly so I can get back to this fun!

Oliver toddler quilt Oliver toddler quilt

Stacked Coins Table Runner

Stacked Coins Runner

Last spring I wanted to make something to cover my coffee table and decided to try out a bit of a variation of the stacked coins pattern. I took a charm pack, cut the squares in random widths, then sewed them together in 2 long rows. I used some white Kona cotton in between the long rows and backed the whole thing with a home dec. fabric from Ikea. I wanted the coins to stand out so I quilted the white area fairly densely with straight lines and then left the coins unquilted. I just happened to have this pink bias tape in my stash to coordinate so nicely with everything. The end result is a bit girly, but fun for spring. The best part is that I had everything I needed on hand and didn’t need to make a trip to the store for supplies. I love it when that happens, and it feels like I am making something for free. 🙂

Stacked Coins Runner

Stacked Coins Runner

When I pulled it out again for this season, I decided to use it on my dining room table along with a new container and colored rocks that I picked up during a recent Ikea trip. I like it even better on my table and think it dresses up the room nicely. Oops, I didn’t notice until editing my pictures that I really should wash the runner because it’s got some major spots going on…Hence some creative photo editing because I’m too lazy to wash it and retake my pics. Or maybe I should have just shown you all the spots and chalked it up to being real, huh? Also pay no attention to the “distressed” table… that’s one of those projects we will get to, eventually, haha. When does eventually ever happen? 🙂 At least now I have a nice runner to cover up some of the worst spots on it!

Stacked Coins Runner

Custom Quilt Top

Ian’s cousin approached me a while back and asked if I would be willing to make them a custom twin-sized quilt to be used for their little girl’s bed. Although I don’t normally do quilt commissions, I thought this one would be fun to do because she was giving me free reign with the fabrics. We agreed on a color scheme of apple green, purple and white in a simple patchwork pattern. I decided to make the squares 5.5″ to mimic the look of charm squares. The finished quilt top measures around 70×90.

Beth's Quilt

Purple is my favorite color so I enjoyed pulling fabrics together for this quilt!  This is the first time I have used my design wall for a large scale quilting project and it was so nice to be able to use it to hold my pieces and not have to crawl around on the floor!  Thankfully, they have also given me plenty of time to finish this quilt- knowing that I have lots of projects running concurrently. I finished the quilt top last week and have been waiting for a nice day to photograph it. I thought today would finally be the day, but when I went outside, the wind was blowing quite hard and kept throwing my quilt around! Oh well, I ended up with a few fairly decent pictures and have no patience to wait for a less-windy day. 🙂

IMG_8849 IMG_8853

I need to go out and get some more fabric for the backing, and then I will begin quilting. Hopefully it will get finished in the next few weeks!

Current Projects

I have been very busy doing a little of this and a little of that…not enough to share an entire post about each thing so I thought I’d give a bit of a collage of all my random projects.

First off, I have ventured into girly world with my hoops and onesies. After completing a custom Etsy order for a special little girl’s room, I used some of the scraps to make some onesies for a friend’s baby shower. I am loving this look and I think you might see some more girly stuff in my Etsy shop from here on out…not changing who I am but expanding a bit so I don’t lose out on an audience I am not currently reaching.

Hoop Art

I also completed another figure 8 scarf as a birthday present for my aunt. I have tweaked this pattern so that it is now super easy and such a fun little present! Really must make one of these for myself soon! This one was made in a cotton/linen blend fabric and I really love the weight and feel of it.

Figure 8 Scarf

I tried out Anna’s new pattern– the divided basket- to see if I want to sell these in the future… It ended up being the perfect container for the balls and books we purchased for a friend’s little man’s first birthday party. I need a few more practice rounds with this pattern to work out some kinks, but I’m thinking it’s a go. I’ll keep you posted on my progress.

Diaper Caddy

A custom quilt order has begun taking shape. The client gave me a color range of whites, dark purples, and apple greens and allowed me free range in fabric choices. I love projects like this because I don’t have to stress about what the client wants and can just have fun putting things together.


twin quilt-001

Last, but not least, I have completed the quilt back for the guestbook quilt! Woo Hoo! This is a huge weight on my mind right now and I am so happy that I have made progress on it. Next step, get some 505 spray and attempt quilting… you will definitely be updated on how that monumental step goes!


Madrona Road Challenge

Michael Miller Fabrics partnered with the Modern Quilt Guild to create a challenge for QuiltCon. The company donated fabric from the Madrona Road line to each quilt guild that wanted to participate in the challenge! I think that’s pretty generous.Michael Miller Fabrics and Violet Craft (the designer of the fabric line) will be picking some of the entries to display in the Michael Miller Fabrics booth at QuiltCon. The photos must be uploaded to the flickr group by January 31st, so I had a bit of a time constraint to complete my project.

I had such a hard time deciding what to make for this challenge. I knew that I wanted to make a mini-quilt because that has been on my list for a while and what better opportunity than with free fabric? I finally decided to try out Jeni’s Flagged Quilt that I have been dying to make. This quilt uses half-rectangle triangles. I used a combo of her directions and the Modern Quilt Guild’s directions that she links to for my quilt. I didn’t want my quilt as big as hers so I cut 5×7 inch rectangles. This is a super quick and easy quilt pattern! Once I got started, I just couldn’t stop because it practically flew together.

madrona road challenge- front

For the backing, I rearranged some of the leftover triangles to form a different pattern and surrounded them with my remaining fabric in large blocks. I used the fabric given to me plus some Kona White and Charcoal.

madrona road challenge- back

Quilting: I debated for a while about the quilting but ended up using the same loopy quilting technique that Jeni used in her quilt. It’s a fairly easy free-motion quilting technique so it’s perfect for a beginner like me. Except for the fact that I had only completed about 1/4 of the quilting and the timing went off on my machine. I am not sure what happened, but somehow I must have jammed it and then yanked the fabric. 😦 I was so upset- this close to finishing and my machine is down and out! I have some nice friends though and one of them let me finish the FMQ on her Bernina. (And can I say that I now have my Bernina fund started because that was the most fun I have ever had while sewing!! There really is a huge difference between my machine and that one!). The repair man was able to fix my machine quickly so I had it back within 48 hours and finished the binding last night.

madrona road challenge- quilting closeup

I wasn’t sure what I would use for the binding because (I thought) I had used up every single scrap of fabric given to me, but when I was cleaning up from the quilting, I discovered more fabric on the floor! Perfect! Just enough to make my binding!  I guess you could call that a happy mistake.

madrona road challenge- front closeup

I am loving this quilt. It was lots of fun to make. (Other than the machine breaking part of it…grr) I don’t have any hope of it getting picked for the challenge but it was good to make something just because, and now I have a mini-quilt for my sewing room wall! The finished quilt measures 25×25.

IMG_8514 madrona road challenge

How to Make a Guestbook Quilt: Part 2

I was so good at accomplishing my weekend to-do list! Got both sewing-related items checked off so now I have a finished quilt top to show you, finally!

Part 2 of the tutorial:

  • Gather all your blocks together.
  • Iron all the written-on blocks to set the ink into the fabric
  • Lay out on design wall or floor to decide on preferred layout. I interspersed the signed squares with blank squares and left a large block in the middle for the monogrammed portion of the quilt
  • Sew the squares into rows and then the rows to each other.
  • Part 3 of the tutorial (finishing steps) here

This quilt is queen size and boy is it huge! I didn’t quite realize how big queen-size would be when I set out to make it. I LOVE the way it turned out…exactly how I had pictured in my head. Good news is that my sis-in-law loves it too! My only concern now is how I am going to quilt it! I wanted to do some straight line quilting, but I am not quite sure how I will fit that humongous quilt under my machine?! Guess I will just jump in, give it a whirl, and see how it goes. However, I kinda doubt I will start on the quilting this week so I won’t quite worry about it yet. My goal this week (regarding this quilt) is to get it basted and all ready for quilting- meaning it’s time to find some fabric for the backing.

It was hard to take good pictures of this quilt because of its size. I needed a big ladder to stand on so I could get a straight-on shot but I only had a chair so you have to see it from a bit of an angle. Maybe I can tape it to the side of the house to get a full-on shot for later. It’s about 75/25 percent between the signed and unsigned blocks. The large, white, center square will be hand-quilted with the initials of the bride and groom as well as the wedding date. Part 1 of this tutorial can be found here.