Oliver’s Fancy…coming to a shop near you!

I hinted last weekend on Instagram that I would be making a big announcement this week and here it goes! This may not be that big to you, but it is a big step for me. I have been given the opportunity to share a booth rental space at a shop in town! For you locals, it is the Shoppes on Trade Street in downtown Greer. This is a very exciting opportunity because the shop recently came under new management, and they are restructuring to include 14 new artisans in various fields- sewing, crafting, jewelry. They are really working to bring in a more modern vibe to the store. I will be sharing my space with Brio Trio. (Check out her super cute fox and wolf softies!) We open our booth the first weekend of March.

mustache onesies

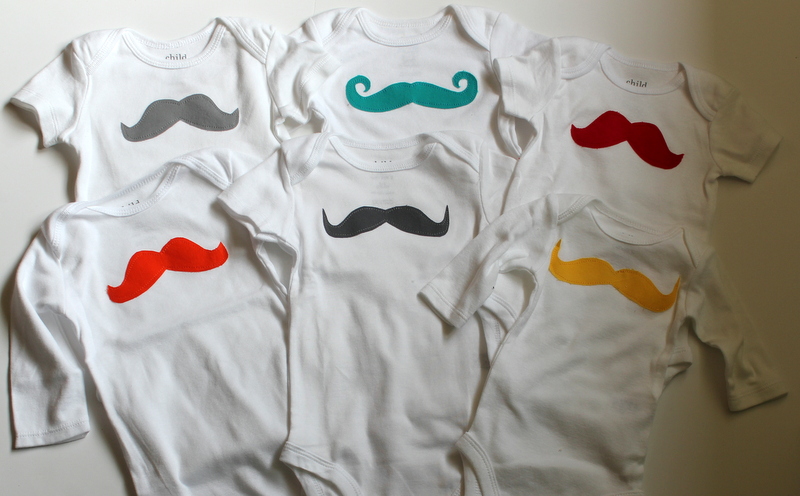
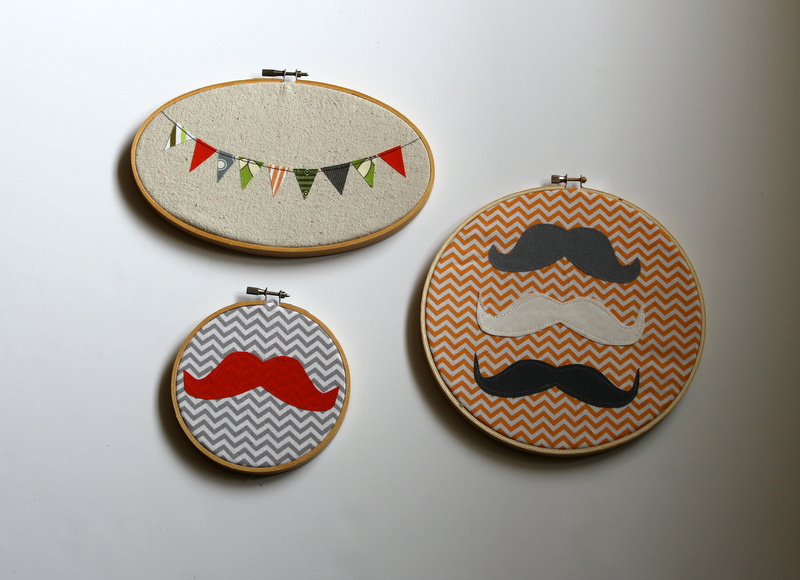
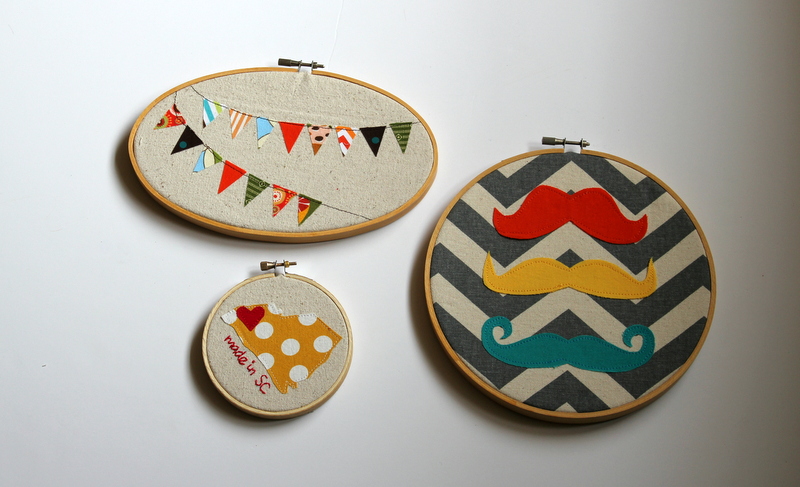
As you can imagine, that means I have been a busy little bee cranking out lots of new onesies and hoops for my space. It’s a lot to do in a short amount of time, but I am feeling pretty confident with what I’ve gotten done so far. I’m hoping to get finished with all the things that I have on my list so I can branch out and try some new items…we shall see how that goes. Anywho, I have committed to try this out for 3 months at least. Here’s hoping to a great, new venture! I am a bit nervous about this, because I have done some re-evaluating of my prices and such and have made the leap to adjust my items how they really should be priced. Part of me is worried that means that no one will buy anything, but one of the things I learned at the Maker’s Summit was not to undervalue myself because I am crippling my future options.South Carolina Onesies

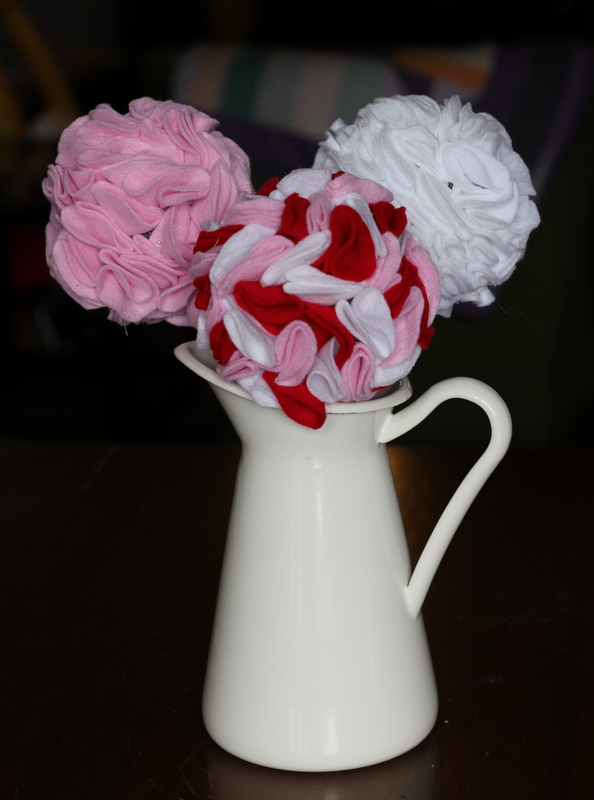
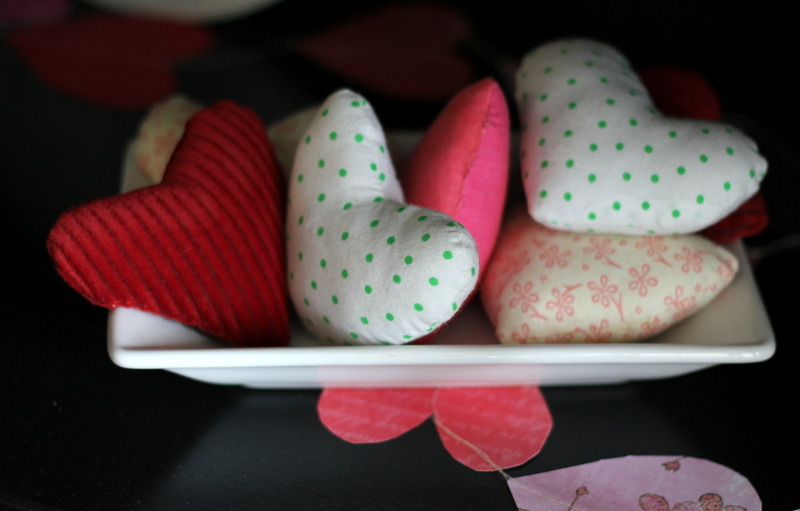
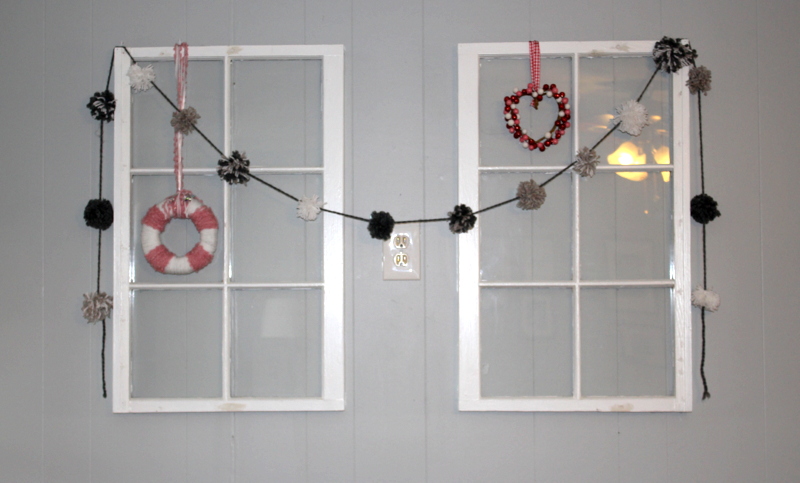
I thought I would share some pictures of some things I have been working on so far…really loving it! Spoiler alert… I am now branching out to include some girly items. I also updated the etsy shop for any of you who like what you see, but live out of town. Whew! I didn’t realize how long it had been since I did a proper update on etsy…it majorly needed it!

Boy Onesies

Boy Hoop Art hoop art State hoops girl hoop art

Another fun thing is that my logo has been completed (yay)! I am working on a new blog and etsy header, but  I was able to go ahead and order my custom stamp so that I can stamp my logo on my onesies and hoops. Feels so good to be official. Now to go make some money to reimburse all my supply costs!

Advertisement

Love is in the Air

With Valentine’s Day coming up next week, I thought I would share a few of my own decorations I have collected over the last few years. After Christmas decor comes down, I get tired of all the blah winter decorations and get the urge to put up Valentine’s stuff. I don’t go super crazy but a few touches here and there make me smile, and help pass the time between Christmas and Spring. Because you know, here in the South, I consider Spring to come after Valentine’s day and think it’s perfectly appropriate for me to begin setting out my Spring decor when I take down all the hearts. 🙂 If I’m wrong, just leave me to my happy delusion.

Valentine Heart Wreath

Several years ago I saw tutorials posted on the Idea Room for both this Valentine Heart wreath and topiary. I liked them so much that I decided to try them out for myself. The heart wreath graces in the inside of my front door. Oh that door’s not finished, you say? Just keeping it real, people! I took a bit of a different take on the topiary and instead of just having one in a vase, I made three to group together like a flower arrangement for my dining room table. I love the results, and they are all quite easy to make. The only caveat is that your hands get kind of sore after cutting out what seems like gazillions of felt circles! I would advise doing this tedious part during a movie or a craft night with friends to make it more fun.

Valentine Balls

I cannot remember where I saw this idea for the stuffed hearts, but they are a fun addition to my china cabinet this year. Also I cut out a bunch of hearts from scrapbook paper and sewed together a small garland which is hanging out in the china cabinet with the stuffed hearts. Trying to take a picture of my china cabinet was a creative exercise! Maybe if I had taken the time to clean the table off, it wouldn’t have been so difficult as the table junk kept reflecting in the cabinet doors. 🙂

Valentine HeartsValentine hearts and garland

I also have some old windows on the wall in my living room that I like to change up with the seasons. I put the yoyo garland up for winter and then just kept it and added a yarn-wrapped wreath and another wreath (bought at target) to make it more festive.

valentine windows

Echino Pillows

And now to show you the few projects that I completed in anticipation of hosting a baby shower at my house. Of course, originally I had a huge to-do list that I wanted to complete but the reality of my pregnant state honed it down to just a few important items.

Echino Nico London pillows

I bought this Echino Nico London fabric at on online clearance sale probably a year and a half ago with the idea that I would use it for pillows in my den area. I kept waiting to make the pillows because the hubs is making me some built-in bookshelves and these pillows were to be part of the window seat area. Well the bookshelf project is on a bit of a hold right now, but I decided to go ahead and make the pillows to spruce up that area a bit. The bookshelves will be built on top of this build-in cupboard (now hiding many of Oliver’s toys) and so I will just pull all the pillows to the middle window-seat area when they finally are finished. I la,la love how it turned out! I am a bit of a book nerd and have a love affair with England so this fabric suits me perfectly. I also had my sister come over and help me hang some art work and lanterns that I had sitting around waiting for this room to be completed. (Art work is by the very talented Mary Lekoshere)  Now it looks like a cozy little space and I am so happy to have pulled this nook together. Ignore the fact that the pillows are sitting on raw boards- remember the whole work-in-progress fact and appreciate that there is at least one part of this project completed. I need to take some more pictures in the later afternoon because the sun was shining directly in the window- making it impossible to get a shot of the entire wall but I think you get the general idea. IMG_8477IMG_8480-001

I have about a yard of the tan London print left over as well as some nice-sized scraps of the other prints so I hope to make a quilt for the day bed also located in this den to really pull the room together. As a final note, I highly recommend this linen-cotton blend fabric as the perfect weight for pillows! It sews like a dream and creates a nice thick, but not too heavy pillow cover! Also I am lazy and create envelope backs for all my pillows! Super easy and you don’t have to fiddle with zippers, buttons or hand-sewing.IMG_8487IMG_8490

A Handmade Fall

Well, folks, it is now mid-September which means that the time has come to put away all remnants of summer and bring out the fall decor. After the extreme heat of this summer, I must confess that I am looking forward to the cooler temps. Today I pulled out the fall decorations and thought that I would share some of the handmade items. These are all made over the last couple of years. I would like to add a few more things this year, but we’ll see if I have time.

First off, I have a thing for wreaths. My door happens to have a wreath hook on the inside and outside which means both are normally in use. Only bummer is that we never use our front door so that outer wreath doesn’t get seen a whole lot. Last year I saw an idea for a wreath made from fabric strips tied to a frame. I can’t remember where I found it or I would post the link. However I loved the idea and it was a super easy project since I used all my scraps and a frame I had in storage.

For the inside wreath I just wrapped a wreath form with some burlap ribbon and then tied a fall ribbon around it in a bow. Very plain and simple but it adds a little touch of fall. Please ignore the fact that our door is unfinished. We moved into a foreclosure 2 years ago and are still remodeling!

On the dining room table is a runner I made last year. I like the fall print but am not super happy with the runner because I used some old fabrics for the solids, and they look really worn. Eventually I want to make another one, but who knows when that will happen.

And now on to the living room. I have vintage windows hung on the wall, and I like to change them out with the seasons. I don’t have too much there for fall yet, but am working on some more ideas. I  want to fix up that wreath on the right with some little pumpkins or acorns or something.

On my mantle I have a glass jar filled with fabric balls and pumpkins I made last year. I am fairly proud of those because I saw them in a snazzy home decor store last year for a ridiculous price and thought, “I can make those.” And I did. 🙂

Well that’s about it for the house tour… I did pull out some fall pillows but they are not handmade so they didn’t make the photo shoot. 🙂 I don’t know about you, but there’s something nice about seasonal changes. Gives me a chance to sort through all the junk that accumulates over several months and make everything nice and clean the fresh looking. Love getting rid of clutter! How about you? Got your pumpkin on the front porch yet or still holding on to the last vestiges of warm weather?


Etsy Shop Update!

I try not to do too much sales pitching on the blog for my etsy shop, but I have been so busy the last few days cooking up new ideas that I couldn’t help but share them with you. I tell you, Indie Craft Parade just really gets my creative juices flowing! 🙂

I am sure you have noticed that mustaches seem to be a big theme nowadays. I have  sold a bunch of mustache hoops and have been wanting to try something out with the onesies. I picked up a bunch of newborn onesies this weekend and went to town. I absolutely love the result! They turned out so cute, if I do say so myself. 😉

I also experimented with some more suspender/bowtie combos and chunky ties. I am working on getting more fall colors/styles in stock since summer weather is fading quickly. I have visions of pumpkins, candy corn and other seasonal designs that I hope will come to fruition soon also!

I also worked on some more hoop ideas. I have been stuck in a rut with ideas and just re-listing the same old ones after they sell without getting new ideas. I came up with a few new designs yesterday and today and like how the work together both individually and as a collage. Almost wishing I could hang these up in Oliver’s room because I like them so much!


Feel free to check out the shop to see all the other fun stuff that I have had fun designing over the last few days! Also if you have any brilliant ideas for new hoop or onesie designs, please comment and let me know. I am always in need of fresh ideas!

This Weekend

Last night the hubs and I dropped Little Man off at Grandma’s house and went on a date night to the Indie Craft Parade Gala event. Sooo worth the money we paid for tickets! This is their third year running the Parade and our third year attending. I look forward to this every year! The Gala event featured yummy food, live music, and giveaways, (and I won! 🙂 ) not to mention a chance to peruse everything without the crazy crowds of Saturday and Sunday. If you are even somewhat local, I encourage you to come down to this event. So much fun! Spoonflower is a sponsor of the event this year and has donated fabric for everyone to make their own stuffed elephants ( from the indie craft logo). There is also a free photobooth for your posing enjoyment.

I got to meet the lovely Rachel of Stitched in Color and got stuck for a long time at her booth. So many pretties. I ended up splurging and taking home one of her fabric-covered journals AND a picnic quilt. I just couldn’t resist the quilt- full of Lizzy House and Flea Market Fancy pretty fabrics. It just called to me!

Here’s a bit of a photo journal of last night- mostly stolen from my hubby’s instagram feed.

The loot I bought: handmade cloth napkins, picnic quilt, fabric-covered journal, and children’s art book.

My winnings! Cory Godbey print (which happens to be part of a collection we have in Oliver’s room), Lily Pottery ring, Ink Meets Paper letterpress greeting cards, found*ling leather wrap bracelet. Valued at $173!


Now for the rest of the weekend. Since I more than emptied my paypal account last night, I need to get busy stocking up my Etsy shop with lots of goodies that will hopefully make up for the fun I had on my spending spree. 🙂 I am also happy to report that I have made some progress on the guestbook quilt and plan to plug away a little more at that as well. Oh and LIttle Man is officially a big kid and is moving up to toddler nursery tomorrow at church! Sniff, my baby is all growed up! 🙂

The Creative Process

I thought that I would show you a little behind-the-scenes tour of my etsy shop and the creation of my embroidery hoop art. This past week I received a custom order for 3 hoops.

The client wanted to buy this red and blue striped balloon hoop shown above that I had listed in my shop and asked if I could make 2 more hoops in varying sizes to coordinate with her nursery colors. She sent me a picture of her fabric swatches for the nursery.

fabric swatches

We communicated back and forth about hoop sizes and design and settled on a 8″ and 10″ hoop. The 8″ hoop would have one balloon with grass and clouds, and the 10″ hoop would have a group of balloons in the clouds- with at least one balloon far back in the picture. I sketched out a quick picture of each on a sheet of paper placed under each hoop for sizing guide.

After determining what type of hoops I would design, my next step was to decide on fabrics. I needed to coordinate her swatches with the hoop she had already bought. I pulled to some coordinating fabrics to see which would work best.

I struggled a bit on my final fabric choices. I thought my hoop was a bit off in color from her fabric swatches (red instead of burgundy) so I needed to make all three mesh nicely while not clashing with her colors. After some trial and error, I picked out some stripes and chevrons that I thought would mirror her theme well. Then came the cutting out of the balloons, grass, and clouds (using templates I had made previously); applying the fusible webbing to the fabric and felt; and ironing the web-backed fabric to the background fabric. My last step in this process was to machine stitch around all the designs in order to ensure their durability.

Now to back the hoop with a second piece of background fabric for a nice clean-looking back and, voila, a finished set of 3 hoops, custom designed for a little boy’s nursery. I hope he and his mommy are very happy with their new art!

New Pillows for Mom, part 2

I have finally finished the pillows for my mom’s living room. Here is a picture of her living room with all 4 new pillows. I really like how well they complement the room.

These brown pillows have a long history. Last year for Mother’s Day my sister-in-law had the fabric monogrammed, and I made pillows out of them. In order to save some money, we used pillow forms from some pillows my mom currently had in her living room. Big mistake! These were not normal pillow forms and I had to re-sew the pillows quite a few times trying to get them tight enough to the pillow. They still ended up being kinda lumpy and I had to put button holes in the back of them to make the envelope closure stay closed. Unfortunately, I made the button holes too big so they just looked kinda tacky. All in all, not a very satisfying project, but I had spent too much time and money on them to change them at the moment (plus i had a brand new baby which meant no time for sewing) so they sat in her living room for a year.  With the advent of the blue pillows a few weeks ago, we decided to redo the brown ones (finally!). My mom bought some much smaller pillow forms, and I seam ripped the pillows and cut them down to size…much better now! I was hoping to not have to seam rip since there were about 4 lines of stitching around the pillows, but I needed to use part of the seam allowance in order for the envelope closure to be wide enough, so I watched some Olympics this week and ripped my little heart out.

The fabric used is a brown micro-suede. For future reference, I would not recommend this fabric for pillows because it shows all dirt and sticks a bit funny to the pillow form- lots of static, but I made it work for this project. I wish I had a picture of the before pillows to show you, but I forgot to take one before I fixed them. Just take my word for it that these look much better than the previous ones!

New pillows for mom

Yesterday I finished a quick project that I want to share with you. My mom had picked out some fabric for new pillows, and I have let it languish around my craft room for a few weeks. Once I actually sat down to make the pillows yesterday, they came together so quickly that I wondered why I took so long to begin them! I made simple square 20″ pillows with an envelope back and I used this tutorial from Sew, Mama, Sew to figure out how wide to make the back panels. It’s a great resource to have when you are making pillows! The change I made is to cut my pillows the same size as the insert (20″ in my case) and sew with a 3/8″ seam so the fabric fits nice and snug on the pillow form. The fabric is a Waverly upholstery print we picked up at Jo-Ann’s. The stiffness of the upholstery weight makes ironing over the inside seams so easy and they sew together beautifully! I really liked how professional the pillows looked when finished. The print and color matches perfectly with my mom’s living room and adds some needed pizzazz. Now I want to buy some more upholstery fabric and make myself new pillows! But first I must redo some other pillows I made for my mom a while back that turned out kinda rough…We used old pillow forms which were not square and it ended up being a rumpled mess with ill-fitting buttonholes. I will take a before and after shot of these so you can see the difference. Hopefully, it won’t take me another 3 weeks to finish them! 🙂

Grand Opening!

Just a quick post to tell you that the etsy shop is now open! See that new widget button to the right of this post with an E on it? That’s the link to my shop. I set up shop yesterday posting some of my hoop art and appliqued onesies, and I have already had my first sale! So pumped about this. I hope to continue to refine my shop over the next few weeks to increase its popularity but I feel that I am off to a good start. Wish me luck and feel free to pop over and take a look around. 🙂 I haven’t posted a ton yet because I know you are only supposed to post a few items at a time to increase views so I will be adding more items to the shop over the next few days. This is a step out for me and I look forward to see where it goes!