

Tuesday we leave for 3 weeks on the west coast! Yeah, I know we might be partly crazy to be attempting this long of a trip with two young children, but there’s no time like the present, right? Well actually my brother gets married on Friday in California so we figured if we were going to have to make the trip out there we might as well make a big trip out of it and go all out. I’ve been to California before but it’s my first time to visit the Pacific Northwest and I am so excited. My luggage is pretty old and falling apart, so I decided that I most definitely needed a new bag for this trip. Also we are trying to pack very minimally (carry-on only) and a cute new bag to fill would help me stay motivated to bring only the essentials! Don’t worry I’ve got an extra bag stashed to help me bring back all the fabric I may or may not be planning to pick up along the way at the amazing west coast fabric stores I cannot wait to visit! 😉
I have been wanting to try out the cargo duffle pattern from Anna of Noodlehead ever since she released it. Bonus being that it’s a FREE pattern! How cool is that? I did some extensive research into this pattern before I made mine because I wanted this duffle to actually be big enough to fit my needs, but not too huge to disqualify it as a carry on. I think this is one of the first times that I have felt confident enough in my skills to make some extensive modifications to an existing pattern in order to make it fit my specifications exactly. It was a pretty liberating feeling and made the construction so fun! Totally worth the effort that went into it.

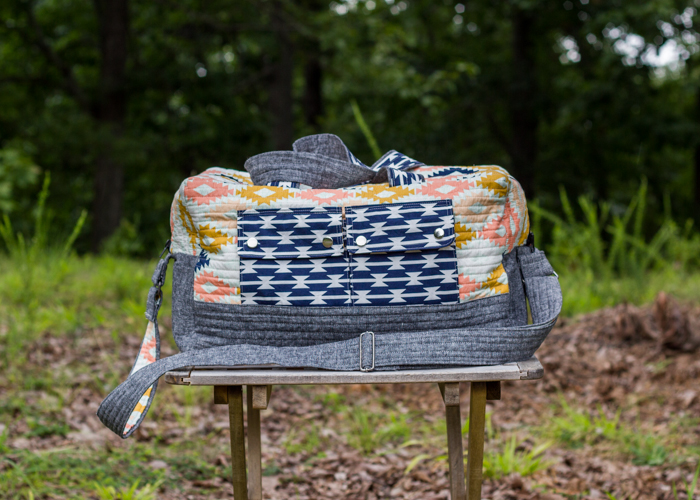
Main fabric used is from the Arizona line by April Rhodes for Art Gallery Fabrics. I got the main print at Five Eighth Seams during a weekend trip to Charleston several weeks ago and accent Arizona prints are from a 1/2 bundle I bought of the entire line (I just couldn’t resist this line) at Fabricworm. Bottom accent and strap fabric is essex yarn dyed linen in black that I think I picked up at Pink Castle Fabrics (sold out there now but a google search shows some available at Fabric.com) a long time ago.
Modifications:
The original cargo duffle pattern includes sides that finish at 6″ wide. I wanted my sides to be 10″ wide so I cut the bottom gusset 10.5″x30.5″ and the zipper gussets 5.25″x27.5″.
I added a lining to the interior and used Kristin’s mini tutorial as a starting point. Because I added so much width to the duffle, the lining sagged pretty badly so I couldn’t just tack it into place, and it look good. I ended up sewing the lining to the duffle right above the pockets following the outer quilting lines and that worked pretty well to make the lining a bit sturdier and hold everything in place.

I wanted lots of pockets in the inside of the duffle to help with organization. I added two welt pockets to the front side and a long pocket that spanned with width of the back side. I ended up stitching this long pocket down about 1/3 of the way down the length of it because it was flapping open pretty badly. I used Delia’s tutorial to figure out the welt pockets. This was my first time making welt pockets and they went pretty well but turned out a bit wonky in between the pockets. I’m thinking that was partly due to the fact that I made two right next to each other and that I need some more practice on them.
I also knew that I wanted to add a long strap to the duffle. I cut off the hardware from an old backpack strap and used another duffle of my husband’s as a guide for how to construct the strap. I got a lot of questions about the long strap when I posted the pictures on Instagram so I made a mini tutorial for all of you. Hopefully I will make sense and you can follow my thought process. Please feel free to ask questions in the comment section if something doesn’t make sense. I took some closeup pictures to try to help clarify things.

- I made a short strap (about 5″ long) for the side rectangle rings, threaded the strap through the ring, folded one end under, and stitched it down to secure the ring. Then I attached the other end of the short strap to the bottom gusset before I sewed the bottom gusset to the zipper gusset. I wanted this seam to be really strong because of all the weight it would need to carry so I sewed the seam about 5 times and then zigzagged the edges to prevent any fraying. Repeat for both sides.

- I made the long strap the same width dimensions of the top straps but changed the length to 65″.
- I interfaced the strap pieces with SF 101 and then a 1.25″ width of fusible fleece and added the canvas strip as suggested in the directions for the top straps.
- For one end of the long strap, I looped it through the rectangle ring, folded the end under and stitched it down. The other end I threaded through the strap adjuster, looped it through the rectangle ring, threaded it back through the strap adjuster, folded the end under, and stitched it down right below the strap adjuster. It really helps if you have another adjustable strap in your house that you can look at while you do this part!

In my cargo duffle research I read another blogger who added Peltex 72F to the bottom gusset and decided to do that also (she gave me the idea of expanding the width of the duffle too). I highly suggest that you add this interfacing if you want more stability to your bag. I’m very happy with how sturdy it made my bag and it really wasn’t horribly hard to sew the extra bulk- as long as you use the size 16 needles that Anna recommends!

And now the longest blog post ever is over! If you stuck around this long- good for you! I cannot wait to put my new duffle bag to the test as we head out on our trip tomorrow and I’ll be sure to keep you updated as to how it holds up as a real luggage piece.

