Unknown's avatar

About oliver's fancy

I am wife to a patient husband named Ian and stay-at-home mom to a busy little boy named Oliver. When not running around after him, I enjoy dabbling in all sorts of craftiness. I am a self-proclaimed fabric-aholic and proud of it! I have started this blog to document my journey of bettering my sewing/ crafting skills and show off occasional pictures of my little man and superb culinary creations:).

How I don’t really have a plan for KCW

kid's clothes week

So yes, as I mentioned before, Kid’s Clothes Week is this coming week- Monday through Sunday. I have every intention of participating in this challenge; however, I have a slight confession to make- I don’t have my project list finished or my work prepped and ready to go. I’ve decided to take it a bit more stream of consciousness this year and see where the week takes me. It’ll be fun, right? (says the girl who lives by her lists!)

But really, I get so inspired from the Flickr group every challenge season that I want to give myself a little more freedom this week to come up with more ideas as the week progresses. I know that I want to make a Bimaa hoodie for Oliver and perhaps one for Eliot too. I’ve got that pattern printed and taped but still need to trace out my correct sizes. I’ve got a pretty stack of washed and folded knits calling my name (purchased from the Fabric Fairy with some giveaway winnings). And I am excited to see what I can accomplish this week! What about you? Are you a fly-by-the-seat-of-your-pants type of sewer or do you prefer to have your lists all made out and everything prepped the week in advance? Whatever happens, it’s sure to be a fun week and I look forward to seeing everyone’s accomplishments throughout the week!

The Clemson Clock- and a semi-Pinterest Fail

I have the finale of my handmade Christmas presents to share with you today and in the spirit of keeping it real, I’m going to share my semi-fail project. I saw this handmade fabric clock on Pinterest a while back and pinned it with the thought it would make a good present idea. I had some leftever Clemson fabric from the quilts for my dad and brother and decided to try out this project for my dad’s Christmas present. He has an office that is slowly being re-decorated with Clemson paraphernalia, and this would be the perfect touch.

The basic premise of this idea is that you cut out the hexagons from cardstock, cut out the fabric hexagons a 1/4″ bigger, glue them around the cardstock, and then glue the hexagons to each other. Let me tell you, cutting out and gluing all those hexagons was no joke! I think my first problem was that my cardstock was not heavy enough. Also I wasn’t careful enough with the glue and you can see dried patches on the front of the clock. In the process, I wasn’t sure that the whole thing would end up staying together. It did end up staying together but I had to add a few pieces behind because I ended up with gaps (guess my hexagons weren’t cut perfectly even- such a surprise since I’m known for my precision 😉 ).clemson clock

In the end, it turned out ok. I think once it’s mounted up on the wall, you won’t notice all the imperfections, but it definitely doesn’t look as profesh as I wanted it to and doesn’t reflect the amount of time invested in it. We will just chalk this one up to a good learning experience and move on.

Kid’s Clothes Week Winter 2014

kid's clothes week

Just popping in to remind everyone about KCW coming up next week! I am pretty excited about this coming week because I have some kid sewing projects I am really looking forward to and need this push to get started on them! I’ll be back later in the week to share my list with you…have to finish it first. I hope that many of you will join in with me. The goal is to sew one hour a day for 7 days. Doable for anyone, right? I just love the community that KCW brings and how I get inspired with everyone’s creativity. For more info check out the KCW blog. And this week is giveaway week so you may want to check out some of the cool things they are giving away this week over on the blog as well!

Ruby Top #2

I have a fun selfish sewing project finish to show you today! This top was started back in the fall and then shelved when I got so busy with Christmas orders and presents. The first of the year, I was really wanting a quick and easy project to finish for myself and pulled this semi-completed shirt out of the works-in-progress bin. About an hour later and I had myself a new top!

ruby top

The bottom fabric is from Jeni Baker’s Color Me Retro line for Art Gallery Fabrics. It’s quilting cotton but Art Gallery fabrics are a lighter weight quilting cotton so it works for this pattern. I have loved this fabric ever since it came out and finally snatched this up during a fabric sale (I can’t remember where). Top fabric is a Robert Kaufman linen.

ruby top

The pattern is Rae’s Ruby Dress/Top and it’s my second Ruby top. This is such a fun pattern to mix and match prints and solids. And it’s also a quick and easy sew- perfect for beginners. Really the thing that takes the longest is binding the sleeves and neck. The actual construction of the top takes like 30 minutes. I love how I can layer this top underneath a sweater right now and then wear it alone later when the weather warms up.

ruby top

Star Wars Quilt

My younger brother is a huge Star Wars fan, and for his 18th birthday I thought a special Star Wars quilt was in order. I searched Pinterest for quilt ideas (you can see my quilt board here) and never really found exactly what I was looking for; so I decided to head to my local Joann Fabric, check out their selection of prints, and go from there. Based on what I found at the store, I decided to do a strip quilt with coordinating solids interspersed between the Star Wars panels. Once I finished the strip quilt section, I realized the quilt was going to be too narrow (no surprise I erred in my math calculations…math and me, we’re not good friends) and that’s when my husband gave me the idea to add the side sections to make a border around the quilt. The quilt finished up around 60″x80″ -a nice throw size blanket.

star wars quilt

Of course, I can’t just complete a project and give it to the person on time. No that would be too simple and planning way too far in advance. I was actually proud of myself that I was doing such a great job on finishing a project on time, when a little over halfway through the quilting, I ran out of thread- the afternoon of the party. Oops. My bad. I ended up finishing the quilt right before Christmas. Two months late but better late than never, right? 😉 Considering my last quilt gift was finished on the one year anniversary of the occasion, I’d say I’m doing much better these days. LOL.

star wars quilt

I used Kona Navy for the backing with the addition of one of the leftover border stripes and bound the quilt in a navy blue store-bought binding (I know, I know, for shame). The quilting is my current go-to method- stippling. I promise I’ll try another method soon! All in all I am really happy with how this turned out and hope my brother is happy with his personalized quilt.

star wars quilt

Gifts for the Ladies: Pouches and Keychains

I woke up Christmas Eve with the perfect handmade gift idea…. some open-wide pouches and coordinating key chains. Now this is no rocket science idea; I’ve made open wide pouches before, but for some reason I hadn’t though about them in a while, and it hit me that this was the perfect little addition to my presents for the women in my life: my mom, sister, sister-in-law, and mother-in-law.

open wide pouch

My long-suffering husband rolled his eyes and watched the boys for me so I could get in this last minute sewing. I found some metallic (!!) fabric at Joann that I knew would be perfect and quickly put together 3 pouches (one not shown) and 3 keychains.

open wide pouch and keychain

Pouch is the free pattern (small version) from Anna at Noodlehead.  For some reason, the first one I made took a little while as I had to re-read all the instructions especially for the bottom gusset, but once the first one was finished, the other two came together super fast. I just love the boxy bottom of these pouches- perfect for my sister to fill with pencils or makeup and throw in her school bag. Fabric used: Metallic from Joann, Robert Kaufman Chambray, and Yarn Dyed Linen in Flax.

open wide pouch and keychain

Keychains are loosely based on the tutorial from Jessica at CINO. I interfaced both sides of the fabric with Craft Fuse 808 and then also fused a piece of Fusible Fleece in the middle. I’ve tried a few of these in a circle style but have decided I prefer the rectangle. Altogether a few quick and easy projects to keep in your back pocket when you need a last minute gift idea.

 keychain

Handmade Christmas Wrap-up

Well I meant to get a few more things blogged over Christmas break but you know what they say about the best laid plans of mice and men…. I am embracing the clean slate of a new year and hoping to settle into a good routine of sewing/blogging/home and family management and check in here more regularly than I have of late. Now that the little man is 7 months old, I am losing my excuse for not getting things done!

Here’s a few pics of the remainder of my handmade Christmas decor…including cute baby, of course. 🙂 Next up are a few of my handmade Christmas gifts- yes they actually happened this year- along with a semi-fail that I am sure you will be interested to see. 😉

of course E had to have one of my reindeer onesies...sold quite a few of these over the Christmas season- aren't they just so cute?!

of course E had to have one of my reindeer onesies…sold quite a few of these over the Christmas season- aren’t they just so cute?!

Some stockings I made for us a few years back using the rag quilting method...I made an extra that didn't quite turn out as planned and guess it worked out because E got a stocking too this year. Maybe next year, he'll get one that coordinates better with the other three.

Some stockings I made for us a few years back using the rag quilting method…I made an extra that didn’t quite turn out as planned and guess it worked out because E got a stocking too this year. Maybe next year, he’ll get one that coordinates better with the other three.

monogram ornament

A few of the monogrammed ornaments that were so popular in my shop this year. So popular in fact that I sold the ones I made for the boys!

A few of the monogrammed ornaments that were so popular in my shop this year. So popular in fact that I sold the ones I made for the boys!

Handmade Christmas: Wreaths

Things have been super crazy behind the scenes here. Christmas orders have been coming in in abundance. I am so very thankful for the work and income that it is bringing in, but I must admit to being ready for a nice Christmas break. As of this morning, my etsy shop is on vacation and my local store is not taking any more custom orders. So all I have to do is finish up the 5 or so orders I have in queue and then I am on break!! Maybe then I will actually be able to get to those handmade Christmas presents I have on my list. 😉

Speaking of handmade, I thought I would run a little series on Handmade Christmas. Over the years, I have been curating a collection of my own handmade items as well as those from others. I will showcase some of my favorites over the next week or so. Today we begin with wreaths. I don’t know about y’all, but I love wreaths…but not necessarily in the way you might think. Sure, I do normally have one on the front door, but no one ever uses our front door so I think of that as a bit of a waste. Instead I like to put them inside the house at various places where I can see them on a daily basis. Here are a few of my current faves.

First off is the plastic baggie wreath. This was made several years ago with some good friends. This wreath is simply plastic baggies tied around a metal hanger with some ornaments added to it. The bags were given to me and I am told that these are special bags that can only be found in northern stores because they have no closure at the top- making them perfect for this craft.  This wreath hangs on the inside of my front door.

christmas wreath

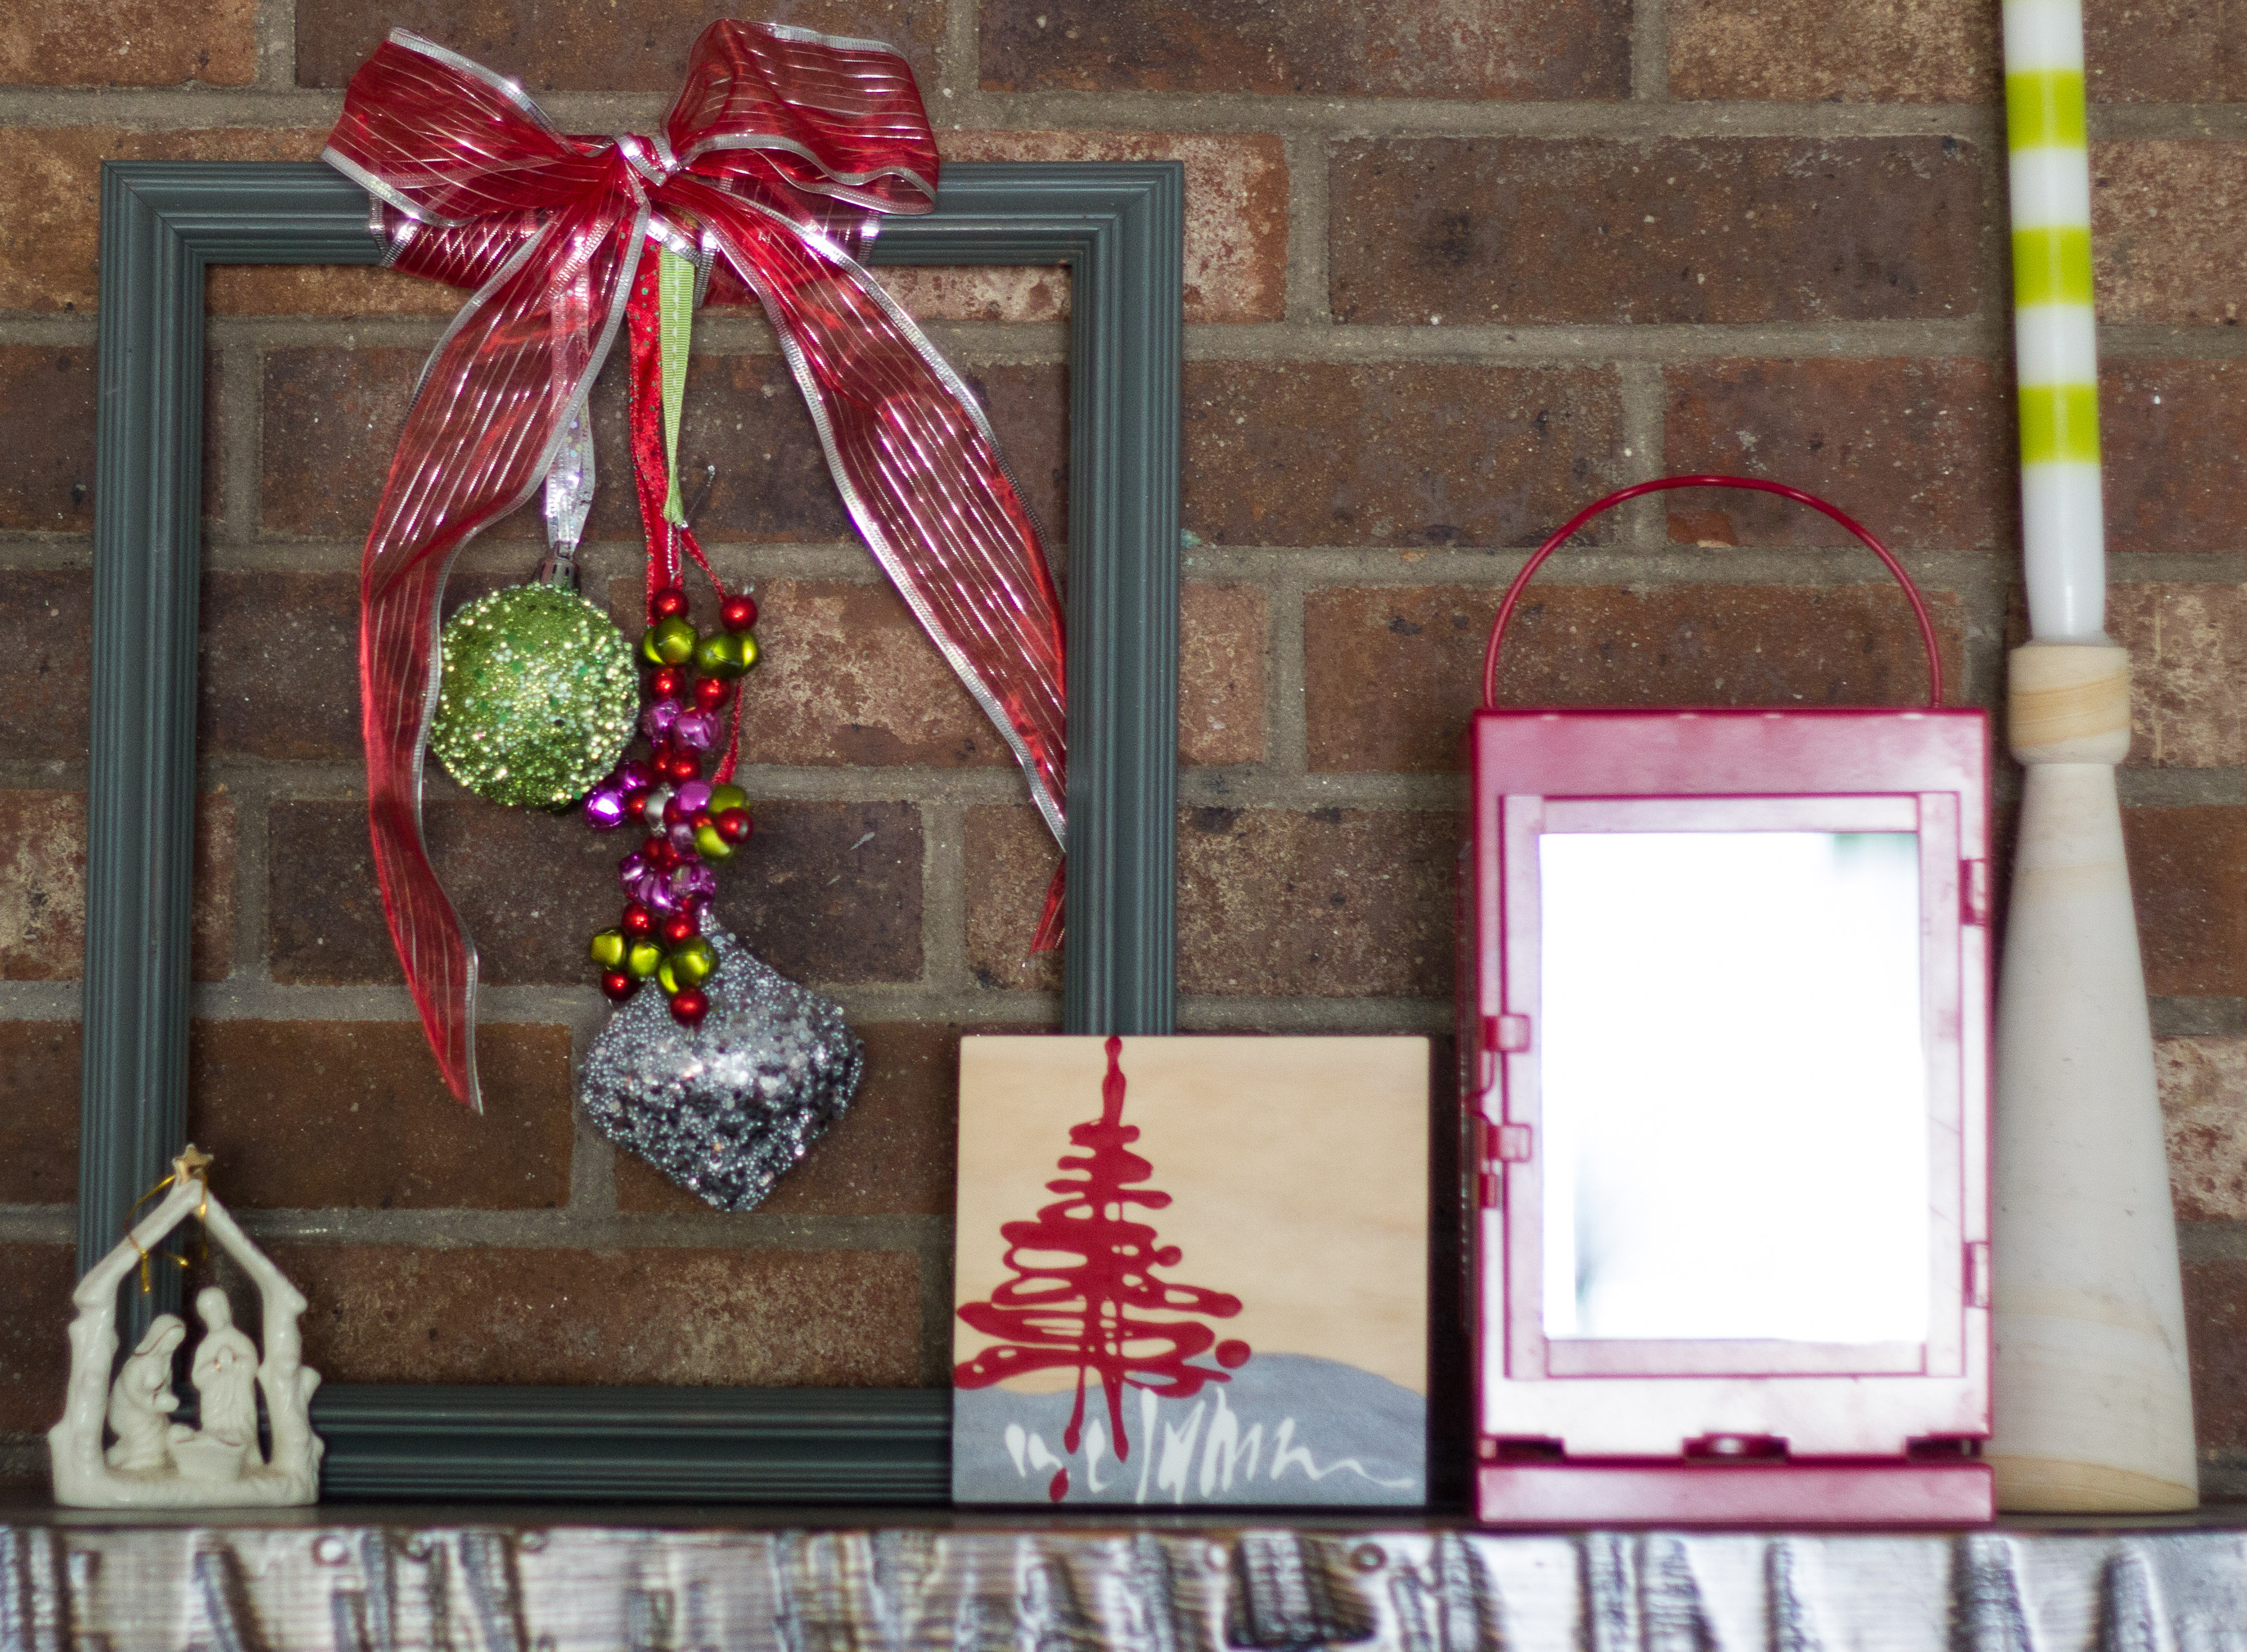
Next, we have the empty frame wreath. I made one for myself and my mother last year for Christmas. We used a pinterest pin for inspiration which I tried to find for you but the link has been broken now for some reason. 😦 I really love this simple, yet fun “wreath”. We thrifted some picture frames, took out the insides and glass, painted the frames, and then added ornaments and a bow to finish them off. Mine sits on my mantle this year.

christmas wreath


Lastly, we have my newest addition to the collection- the fabric wrapped wreath. I have always wanted to try this technique out and a wreath-making party with our church’s young families’ group last weekend gave me the perfect opportunity. I cut approx. 2.5 inch strips of a red polka dot fabric, wrapped it around my straw wreath form and then strung a felt bunting along it for some fun. It’s not necessarily super Christmassy looking but it is fun and I love it. It was also very quick and easy to make. If I had more time, I would take more care on the cutting and stringing of the bunting strips (In fact, I’ll probably redo it at some point) but I’m ok with the carefree look they are currently portraying. 🙂  Right now this wreath on my mantle also, but I think I shall move it to my sewing room once Christmas is over so I can keep it up all year long.

christmas wreath christmas wreath

What about you? Do you have any favorite Christmas wreaths that you like to pull out this time of year?

Dapper Dan Bow Ties

My husband’s sister got married this past weekend and had asked if Oliver would be a ring bearer for her wedding. With great trepidation we agreed to try to see if we could coerce him into it. 🙂 Originally I was going to try to make him a tweed jacket to wear but happened to find the perfect jacket on sale at Old Navy and decided to go with that option. However my sister-in-law asked if I would make bow ties for both Oliver and the other little ring bearer. Of course I left this to do until the day we were leaving to travel to the wedding so, thankfully, it’s a quick and easy project. I used this tutorial from Delia Creates as a starting point. Instead of doing elastic in the back, I sewed velcro onto the bow tie so that we could leave them tied and remove using the velcro. Who wants to have to tie those things over and over again?!

bowtie

Funny story, as I’m sitting there the night before the wedding using Delia’s picture tutorial to attempt to tie the bow tie correctly, I try to see if any of the 5 or so guys in the room could tie it for me. Nope, they were all clueless, so it was left to the woman to figure it out. 😉

bow tie

I liked little E’s bow tie even better than Oliver’s but unfortunately his hand blocked half of the bow tie in the one shot I got of him.

My one advice is to make the tie part extra long because I made the other little boy’s too short and had to add some extra fabric to it at the last minute. Thankfully that part of the bow tie is hidden under the collar so you can’t see my wonky fix.

I really wanted to get some cute pics of the boys wearing their bowties and spiffy outfits (really everyone stopped us to tell us how cute they were) but the wedding took place during nap time and it was all we could do to get the boys to walk down the aisle. No picture taking for them! So you are stuck with a few fuzzy iphone pics and an Instagram shot. Oh well, now I have a cute bowtie for Oliver to wear for special occasions and maybe I’ll get some good pictures another time. Fingers crossed we’ll get use out of this outfits for our Christmas card photo shoot! Are we crazy to even try to good pictures with an infant and 2 year old? 🙂bow tie

Halloween 2013

While I really wanted to make Oliver a handmade costume this year for Halloween, I also knew that practically I would not have much time to make said costume. I also didn’t want to spend hours on something that would be worn once and then discarded. I went through lots of ideas until I saw this post on KCW making a kid’s tee with a cape sewn into the shirt. What a brilliant idea! Oliver has some Batman pajamas given to him by a friend and he absolutely loves to wear them so what better costume for him?! Plus I had an old gray polo of Ian’s and a black knit dress of mine just waiting around in the upcycle bag so no shopping was required.

Oliver batman

I used my trusty Flashback Skinny Tee pattern in a 3T and followed this tutorial for the cape. It’s sewn into the shoulder seam while the shirt is being constructed. I didn’t have quite enough of the polo for long sleeves so I added black cuffs. I considered attempted freezer paper stenciling for the batman logo but I didn’t have any paint at home so I went with applique instead. I traced out the bat logo from Oliver’s pajama shirt onto the same black knit I used for the cape.

Oliver batman

The best thing about using the polo is that I was able to keep the existing shirt hem! Less work for me! 🙂

I really wanted to make him a mask and pants to go with the shirt, but there’s no way he’s keeping a mask on his head and he already has gray pants so we went the easy way this year. But I’m very happy that I ended up with a cute costume that can be worn over and over this fall and winter. Sorry we don’t have any really great pictures. Batman was just not in the photo taking mood this past week!