KCW Day 4- Bimaa hoodie take 2

striped bimaa

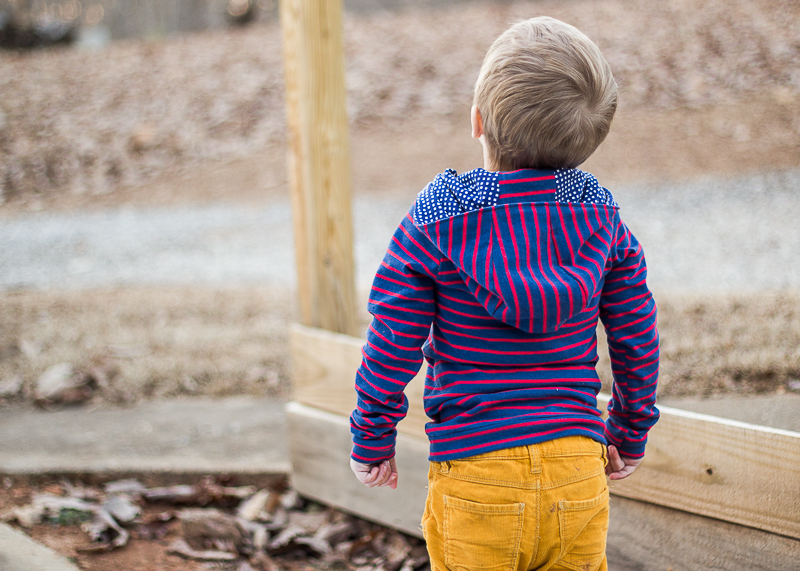
Well you knew I couldn’t just stop at one once I’d been hooked onto the Bimaa train, didn’t you? Here’s another one for Oliver made from some cotton jersey I got from the Fabric Fairy (using a gift card I got from a Sew, Mama, Sew contest).

striped bimaa

Since this jersey was similar in stretchiness (or lack thereof) to the triangle fabric from Bimaa 1, I sewed up a 4T this time and I love the fit throughout the body. The hood is a wee bit big- we think he kinda looks like a jedi knight with it pulled up. It doesn’t bother O at all though- in fact, he cried when I tried to take his hood off for a few pictures. If When I make another one, I will probably still make the 4T size but do a 3T in the hood. The hood lining fabric is from an old knit dress of mine that was in the upcycle bin.

striped bimaa

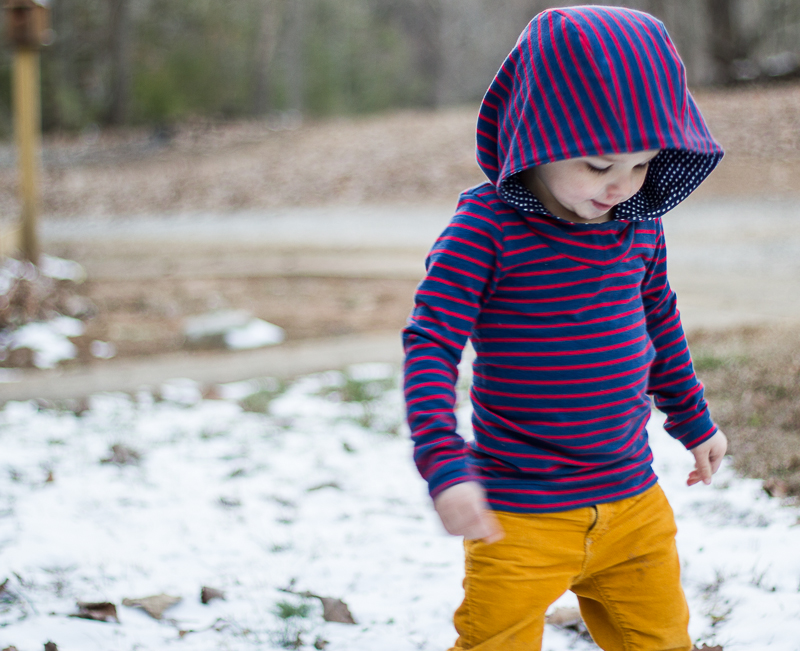
O was up from his nap when I was putting the finishing touches to his hoodie, and it was so cute because he kept asking if I were done, so he could put it on and go play in the snow. 🙂 He’s getting the hang of this blogger child thing…and the fact that photoshoots normally come with some sort of bribery. Lol. Ok, you northerners don’t laugh at our pitiful amount of snow on the ground. He doesn’t know any better!

striped bimaa

Once again, major photo props to the husband. So glad I have him around to get good pictures for me. 🙂striped bimaa

KCW Day 3: Flashback Tee and Fancy Pants Leggings

FBT and FPL-5

nope, pants aren’t hemmed yet…had to get the photoshoot in while the getting was good!

Lest little brother feel neglected, I made Day 3 of Kid’s Clothes Week all about him. This little guy is growing at a faster rate than his older brother, and, as a result, all of his hand-me-down winter pajamas are a bit snug. Why buy more when you can make them? Especially when you have such great fabric sitting around.

FBT and FPL

E’s top is the trusty Flashback Tee in size 12-18 months. (yes he’s 7 months old, why do you ask? 😉 ) and bottoms are the Fancy Pants Leggings- also in size 12-18 months. This was my first time sewing this leggings pattern, and I can see myself coming back to it quite often to make pj pants and shorts for the boys. I would say this pattern would be great for a beginner because the designer really holds your hand throughout the entire construction process. The only changes I would make next time would be to make the rise higher in the back because it was way too low on E’s big cloth-diapered bum.

FBT and FPL-2

And now that I’ve made 3 garments from the same fabric, I think it’s time to move on to something else. I have in mind another Bimaa for O from some cool red/blue stripes I’ve been saving. 4 more days left in this challenge so still lots of opportunities to sew! Make sure you head over to the Flickr pool to see all the fun clothes everyone has been making. Also check out the #kidsclothesweek hashtag on Instagram for even more action shots.

FBT and FPL-3

KCW Days 1&2: Bimaa Hoodie

bimaa hoodie

For my first Kid’s Clothes Week challenge, I give you the Bimaa hoodie. I have two things to say about it…

  1. I’m going to learn to use my serger- STAT
  2. Can there be anything more adorable than a 2 year old in a hoodie? I think not.

bimaa hoodie

But seriously, I absolutely love this pattern and I cannot wait to make many more of them! My only sadness is that I don’t know how to use my serger yet (beginning Craftsy serger class next week!) because that would make this hoodie ridiculously fast to put together. As it is, it’s still a fairly quick and easy pattern. I used my walking foot and a jersey needle for the entire thing and didn’t have any problems with the construction.

bimaa hoodie

The main fabric is a clearance jersey blend knit ($3/yard!!) from Girl Charlee. It isn’t a 4 way stretch like the pattern recommends and as a result, it’s a bit snug on him even though I sized up to the 3T but I kinda like that it shows off a bit of the toddler belly. He loves it and didn’t take it off all afternoon so it’s a win all around. If I use another similar knit, I will size up to the 4T so he will get more wear out of it.

bimaa hoodie

To make this even more perfect, we got snow this afternoon! Y’all it rarely snows here so this is a special occurance. My hubby took O outside to play in the snow, and I coerced him to snap a few pictures of O in his Bimaa before we put his jacket on. Poor little fellow lasted about 2 minutes before he was begging for gloves so I don’t have a good full body shot but thankfully the husband is a master photographer and managed to take these adorable (IMO) pictures in that short period of time.
kid's clothes week

How I don’t really have a plan for KCW

kid's clothes week

So yes, as I mentioned before, Kid’s Clothes Week is this coming week- Monday through Sunday. I have every intention of participating in this challenge; however, I have a slight confession to make- I don’t have my project list finished or my work prepped and ready to go. I’ve decided to take it a bit more stream of consciousness this year and see where the week takes me. It’ll be fun, right? (says the girl who lives by her lists!)

But really, I get so inspired from the Flickr group every challenge season that I want to give myself a little more freedom this week to come up with more ideas as the week progresses. I know that I want to make a Bimaa hoodie for Oliver and perhaps one for Eliot too. I’ve got that pattern printed and taped but still need to trace out my correct sizes. I’ve got a pretty stack of washed and folded knits calling my name (purchased from the Fabric Fairy with some giveaway winnings). And I am excited to see what I can accomplish this week! What about you? Are you a fly-by-the-seat-of-your-pants type of sewer or do you prefer to have your lists all made out and everything prepped the week in advance? Whatever happens, it’s sure to be a fun week and I look forward to seeing everyone’s accomplishments throughout the week!

The Clemson Clock- and a semi-Pinterest Fail

I have the finale of my handmade Christmas presents to share with you today and in the spirit of keeping it real, I’m going to share my semi-fail project. I saw this handmade fabric clock on Pinterest a while back and pinned it with the thought it would make a good present idea. I had some leftever Clemson fabric from the quilts for my dad and brother and decided to try out this project for my dad’s Christmas present. He has an office that is slowly being re-decorated with Clemson paraphernalia, and this would be the perfect touch.

The basic premise of this idea is that you cut out the hexagons from cardstock, cut out the fabric hexagons a 1/4″ bigger, glue them around the cardstock, and then glue the hexagons to each other. Let me tell you, cutting out and gluing all those hexagons was no joke! I think my first problem was that my cardstock was not heavy enough. Also I wasn’t careful enough with the glue and you can see dried patches on the front of the clock. In the process, I wasn’t sure that the whole thing would end up staying together. It did end up staying together but I had to add a few pieces behind because I ended up with gaps (guess my hexagons weren’t cut perfectly even- such a surprise since I’m known for my precision 😉 ).clemson clock

In the end, it turned out ok. I think once it’s mounted up on the wall, you won’t notice all the imperfections, but it definitely doesn’t look as profesh as I wanted it to and doesn’t reflect the amount of time invested in it. We will just chalk this one up to a good learning experience and move on.

Kid’s Clothes Week Winter 2014

kid's clothes week

Just popping in to remind everyone about KCW coming up next week! I am pretty excited about this coming week because I have some kid sewing projects I am really looking forward to and need this push to get started on them! I’ll be back later in the week to share my list with you…have to finish it first. I hope that many of you will join in with me. The goal is to sew one hour a day for 7 days. Doable for anyone, right? I just love the community that KCW brings and how I get inspired with everyone’s creativity. For more info check out the KCW blog. And this week is giveaway week so you may want to check out some of the cool things they are giving away this week over on the blog as well!

Ruby Top #2

I have a fun selfish sewing project finish to show you today! This top was started back in the fall and then shelved when I got so busy with Christmas orders and presents. The first of the year, I was really wanting a quick and easy project to finish for myself and pulled this semi-completed shirt out of the works-in-progress bin. About an hour later and I had myself a new top!

ruby top

The bottom fabric is from Jeni Baker’s Color Me Retro line for Art Gallery Fabrics. It’s quilting cotton but Art Gallery fabrics are a lighter weight quilting cotton so it works for this pattern. I have loved this fabric ever since it came out and finally snatched this up during a fabric sale (I can’t remember where). Top fabric is a Robert Kaufman linen.

ruby top

The pattern is Rae’s Ruby Dress/Top and it’s my second Ruby top. This is such a fun pattern to mix and match prints and solids. And it’s also a quick and easy sew- perfect for beginners. Really the thing that takes the longest is binding the sleeves and neck. The actual construction of the top takes like 30 minutes. I love how I can layer this top underneath a sweater right now and then wear it alone later when the weather warms up.

ruby top

Star Wars Quilt

My younger brother is a huge Star Wars fan, and for his 18th birthday I thought a special Star Wars quilt was in order. I searched Pinterest for quilt ideas (you can see my quilt board here) and never really found exactly what I was looking for; so I decided to head to my local Joann Fabric, check out their selection of prints, and go from there. Based on what I found at the store, I decided to do a strip quilt with coordinating solids interspersed between the Star Wars panels. Once I finished the strip quilt section, I realized the quilt was going to be too narrow (no surprise I erred in my math calculations…math and me, we’re not good friends) and that’s when my husband gave me the idea to add the side sections to make a border around the quilt. The quilt finished up around 60″x80″ -a nice throw size blanket.

star wars quilt

Of course, I can’t just complete a project and give it to the person on time. No that would be too simple and planning way too far in advance. I was actually proud of myself that I was doing such a great job on finishing a project on time, when a little over halfway through the quilting, I ran out of thread- the afternoon of the party. Oops. My bad. I ended up finishing the quilt right before Christmas. Two months late but better late than never, right? 😉 Considering my last quilt gift was finished on the one year anniversary of the occasion, I’d say I’m doing much better these days. LOL.

star wars quilt

I used Kona Navy for the backing with the addition of one of the leftover border stripes and bound the quilt in a navy blue store-bought binding (I know, I know, for shame). The quilting is my current go-to method- stippling. I promise I’ll try another method soon! All in all I am really happy with how this turned out and hope my brother is happy with his personalized quilt.

star wars quilt

Gifts for the Ladies: Pouches and Keychains

I woke up Christmas Eve with the perfect handmade gift idea…. some open-wide pouches and coordinating key chains. Now this is no rocket science idea; I’ve made open wide pouches before, but for some reason I hadn’t though about them in a while, and it hit me that this was the perfect little addition to my presents for the women in my life: my mom, sister, sister-in-law, and mother-in-law.

open wide pouch

My long-suffering husband rolled his eyes and watched the boys for me so I could get in this last minute sewing. I found some metallic (!!) fabric at Joann that I knew would be perfect and quickly put together 3 pouches (one not shown) and 3 keychains.

open wide pouch and keychain

Pouch is the free pattern (small version) from Anna at Noodlehead.  For some reason, the first one I made took a little while as I had to re-read all the instructions especially for the bottom gusset, but once the first one was finished, the other two came together super fast. I just love the boxy bottom of these pouches- perfect for my sister to fill with pencils or makeup and throw in her school bag. Fabric used: Metallic from Joann, Robert Kaufman Chambray, and Yarn Dyed Linen in Flax.

open wide pouch and keychain

Keychains are loosely based on the tutorial from Jessica at CINO. I interfaced both sides of the fabric with Craft Fuse 808 and then also fused a piece of Fusible Fleece in the middle. I’ve tried a few of these in a circle style but have decided I prefer the rectangle. Altogether a few quick and easy projects to keep in your back pocket when you need a last minute gift idea.

 keychain

Handmade Christmas Wrap-up

Well I meant to get a few more things blogged over Christmas break but you know what they say about the best laid plans of mice and men…. I am embracing the clean slate of a new year and hoping to settle into a good routine of sewing/blogging/home and family management and check in here more regularly than I have of late. Now that the little man is 7 months old, I am losing my excuse for not getting things done!

Here’s a few pics of the remainder of my handmade Christmas decor…including cute baby, of course. 🙂 Next up are a few of my handmade Christmas gifts- yes they actually happened this year- along with a semi-fail that I am sure you will be interested to see. 😉

of course E had to have one of my reindeer onesies...sold quite a few of these over the Christmas season- aren't they just so cute?!

of course E had to have one of my reindeer onesies…sold quite a few of these over the Christmas season- aren’t they just so cute?!

Some stockings I made for us a few years back using the rag quilting method...I made an extra that didn't quite turn out as planned and guess it worked out because E got a stocking too this year. Maybe next year, he'll get one that coordinates better with the other three.

Some stockings I made for us a few years back using the rag quilting method…I made an extra that didn’t quite turn out as planned and guess it worked out because E got a stocking too this year. Maybe next year, he’ll get one that coordinates better with the other three.

monogram ornament

A few of the monogrammed ornaments that were so popular in my shop this year. So popular in fact that I sold the ones I made for the boys!

A few of the monogrammed ornaments that were so popular in my shop this year. So popular in fact that I sold the ones I made for the boys!