Unknown's avatar

About oliver's fancy

I am wife to a patient husband named Ian and stay-at-home mom to a busy little boy named Oliver. When not running around after him, I enjoy dabbling in all sorts of craftiness. I am a self-proclaimed fabric-aholic and proud of it! I have started this blog to document my journey of bettering my sewing/ crafting skills and show off occasional pictures of my little man and superb culinary creations:).

spring kcw: boba fett and green shorts

RaglanTeeGreen Shorts

the dinosaurs came along for our photo shoot today. I think they had fun. πŸ˜‰

You tired of seeing shorts and tees yet? Well I hope not because that’s what I’ve got for you again today. Far from being bored myself, I actually keep coming up with more and more tee ideas! Which is good because what I get done this week composes a good deal of Oliver’s spring/summer wardrobe.

RaglanTeeGreen Shorts2

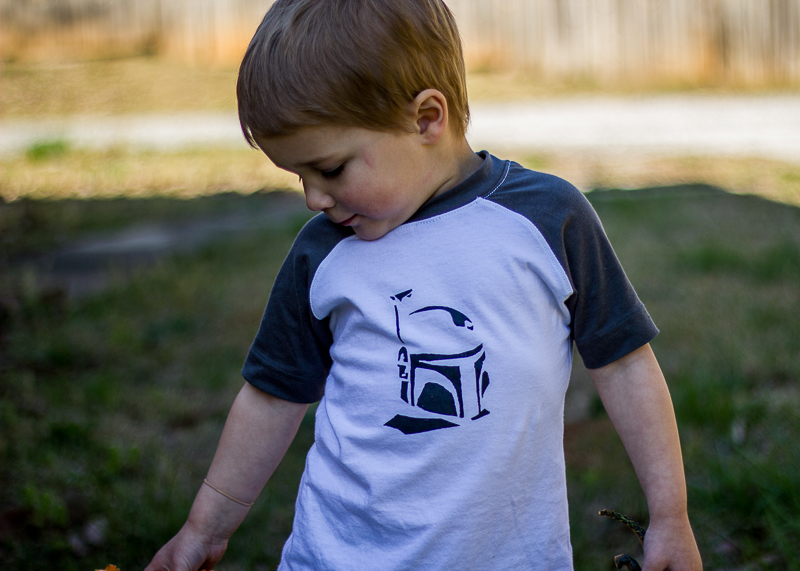
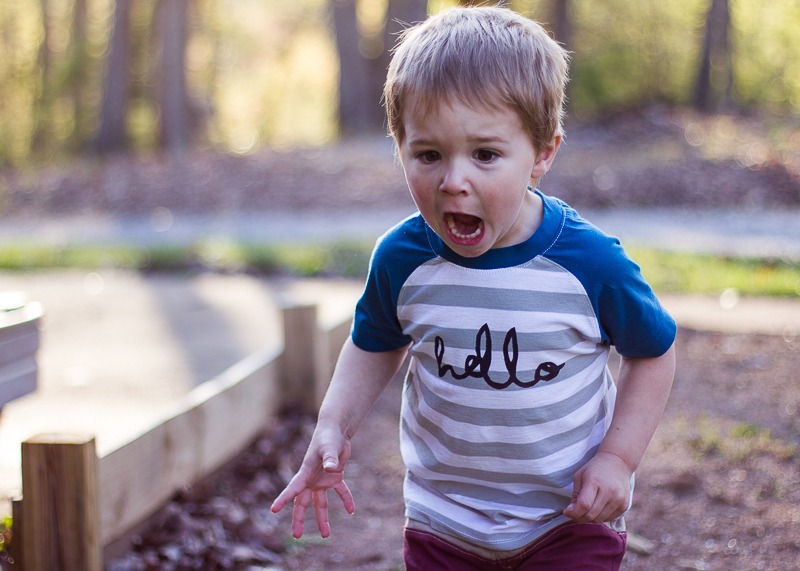
For the tee, I used the raw-edged raglan in a size 4/5 from Sewing for Boys again. I like the pattern pieces of this tee, but, as a side note, I follow a lot of the instructions of the Flashback tee in the construction of this shirt. After this week I think I will be able to sew tees in my sleep! Oliver has two long-sleeve Star Wars shirts and would be happy to wear one or the other every day, so in planning his summer shirts, I knew that I would need at least one Star Wars one. Boba Fett happens to be my little brother’s favorite character so he was an easy choice (Oliver loves to be like Uncle Alex). My second time freezer paper stenciling was even easier than the first! This could get addicting. LOL. The white fabric is a jersey knit from Hobby Lobby of all places. They actually sell 100% cotton jersey, and I was really happy with it in my maternity tee last year, so I got some more to try out with Oliver. The sleeve fabric is from an upcycled tee- yay for using existing hems!

RaglanTeeGreen Shorts5

The shorts are my third pair of Dana’s Kid Shorts this week. This time I used some green denim I found in the remnant bin at Joann. There was a 1/2 yard bundle, and it was exactly what I needed to make these shorts. Flat front/elastic back again. I wanted to make some cargo pockets so I took the box pleat pocket piece from Rae’s Parsley pants pattern and sewed it to the bottom of the shorts. The denim was thicker than I had anticipated, so it was a bit tricky sewing all those layers of pleats in the pockets, but I’m really happy with how they turned out. Oliver is at the age where he loves pockets, and it’s fun to give him some to put his treasures in.

RaglanTeeGreen Shorts4So that’s it for day 4. I have a fun photoshoot planned for tomorrow afternoon for my mini-me entry. If all goes well, you’ll get to see both boys and their daddy in some pictures. Fingers crossed for good naps and happy pictures!RaglanTeeGreen Shorts3

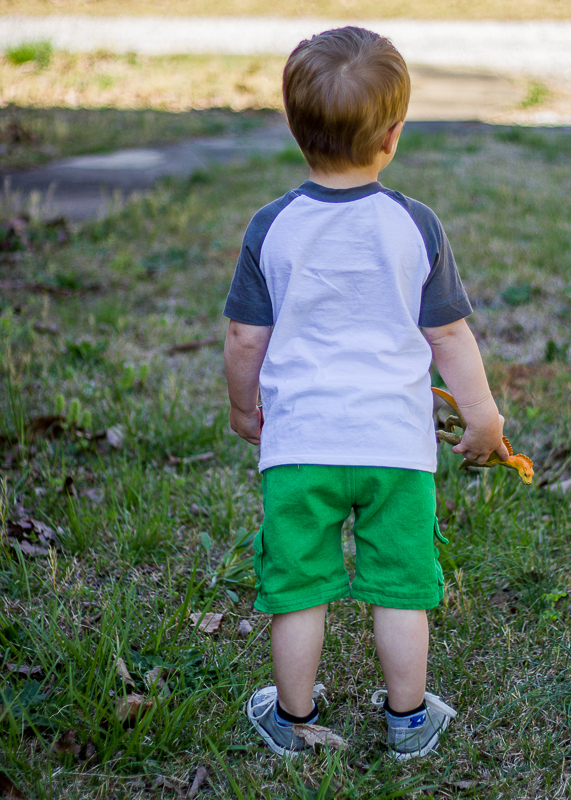
What about you? How is your list going this week? Are you burnt out yet from sewing like crazy? I’m trying to pace myself so I’m not an exhausted, cranky mess by Sunday night! Oh and by the way, yesterday’s outfit is featured on the KCW blog today so go check it out and see all the other cool boy outfits she rounded up!

kcw feature button


spring kcw: raglan tee and color-blocked shorts

RaglanTee and Shorts8After a recent trip to the mall, I have been itching to re-create some color-blocked shorts that I saw for O.Β  Also this week is Project Run and Play’s design your own fabric challenge so I decided to kill two birds with one stone and make a PRP look during KCW. (enough acronyms anyone? πŸ˜‰ ) I really loved these khaki and green ones, but since I already made green shorts (blog post yet to come), I needed another color. The lower short fabric started out as hot pink capris from my sister’s goodwill pile. I rescued them and dyed them with some brown RIT dye. They ended up this nice maroon color. I could have dyed them again to get them more brown but ended up liking this color and decided to keep it. The khaki fabric is from an old pair of hubby’s pants in the upcycle bin.

FBTee and Shorts5


I took Dana’s flat front short pattern, marked where I wanted the color block to be, and cut out both fabrics using 3/8″ overlap where they would join for seam allowance. Then I sewed them together, serged the seam, topstitched, and used the resulting piece as the regular pattern piece.

Oliver's showing off his belly button so you can get a close-up of the top-stitching.

Oliver’s showing off his belly button so you can get a close-up of the top-stitching.

I wanted these shorts to look store-bought so I broke out my topstitching thread and used it for all the seams. I even created a faux fly and some faux pocket stitching. Fancy, huh? I thought so. These shorts were definitely a labor of love. I had to break out the jeans needle and stitch very slowly to get all the thick seams sewn up. In the end, totally worth it to have a pair of quality-made shorts. These babies won’t be falling apart anytime soon!

FBTee and Shorts9

The tee is the (not-so) Raw Edged Raglan from Sewing for Boys. I used my serger for all the seams and my stretch thread for all the topstitching- So loving that! I also love my current table set-up because I have my serger and sewing machine set up next to each other, and I can easily go back and forth as I am sewing. The gray and white stripe is a jersey knit I picked up at the Fabric Fairy using a gift card, and the sleeves are part of an old tee (the rest of which you will see tomorrow in another shirt!)

FBTee and Shorts3

The shirt is my first attempt at freezer paper stenciling- so fun! The hardest part was agonizing over what stencil I wanted to do- something cool but not too cheesy. In the end I remembered a free stencil pdf I found on Pinterest and used that. It was so fun to peel off the freezer paper and see the words underneath! Definitely going to be doing more of that in the future.

FBTee and Shorts7

I am pretty jealous of this shirt and my nod to the mini-me theme is that I actually wish I had one of these in my size! Maybe after all this is finished, I’ll try to make one for myself, and we can really be matching. πŸ˜‰ Not in the exact same colors of course but the same general idea. I know it’s cheesy but gotta do some matchy-matchy while he thinks it’s cool, right?

FBTee and Shorts6

Because sometimes the outtakes are too funny not to share.

Because sometimes the outtakes are too funny not to share.

kid's clothes week


KCW Spring 2014 Day 1: A Mini-Me- The husband version

kid's clothes week

Ok y’all I am getting really pumped about this Spring’s KCW because I am having so much fun coming up with ideas for O’s summer wardrobe. Today I tried out Dana’s shorts pattern and give it two thumbs up. Seriously, it makes short-making a breeze. I love a good basic pattern with multiple variations where you can make quite a few pairs and they will all look different. Also I am using my serger on clothing for the first time this week, and it has changed my life! Why did I wait so long to learn how to use it? The first thing I did when husband came home was show him the inside of O’s shorts because they look so stinking profesh! I must say he was suitably impressed- or pretended to be at least to make me happy. πŸ˜‰KCW Spring 2014For the shorts, I used an orange seersucker from Joann. I made Oliver a 3T (without measuring him- living dangerously, I know) and ended up cutting off about 1/2″ off the bottom. Other than that, they fit perfectly. This pair is made with a flat front and lined patch pockets cut on the bias. They really are the cutest shorts. My husband wasn’t so hot on the fabric when I brought it home, but he gave the completed shorts two thumbs up. I’m just pumped you can’t tell they are handmade. These were so easy to make that I may never buy another pair of kid shorts again! It’s gonna be #makealltheshorts.KCW Spring 2014

KCW Spring 2014
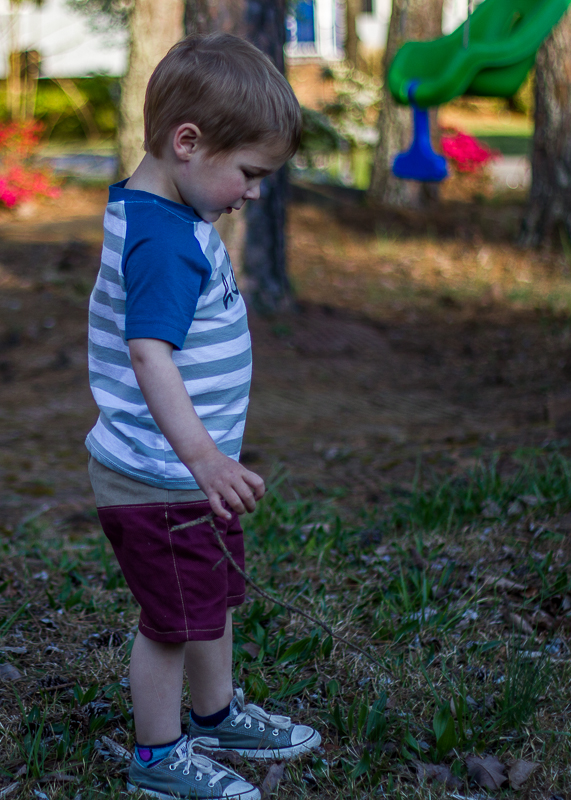
In keeping with our mini-me theme, the shirt is an old t-shirt of Ian’s that had gotten too small for him after many washings. Mini-me in my case will most likely equal mini-husband (that’s ok, right?). I sized up my trusty Flashback Tee pattern into a 4T because this fabric does not have much stretch in it. It definitely gives him some room to grow, but that’s good since I want this to fit all summer. However if I use some stretchier knit for his next shirt, I think I will go back down to the 3T. In addition to using my serger to finish off the seams, I also took Rae’s advice and bought some stretch thread for the hems. It was very easy to use, and I love the look of the straight stitch on the neckline instead of the stretch stitch that I’ve used before.KCW Spring 2014KCW Spring 2014

I really wanted to get some pics of Ian and Oliver together with their coordinating converse tennies and graphic tees to cement the mini-me theme, but, alas, tax season is finishing strong over here, and I doubt he’ll have time to get in on any photo shoots. 😦 I’ve got a few more mini-me items up my sleeve though so I’m hoping for at least one group shot of all my boys before the week is out!KCW Spring 2014
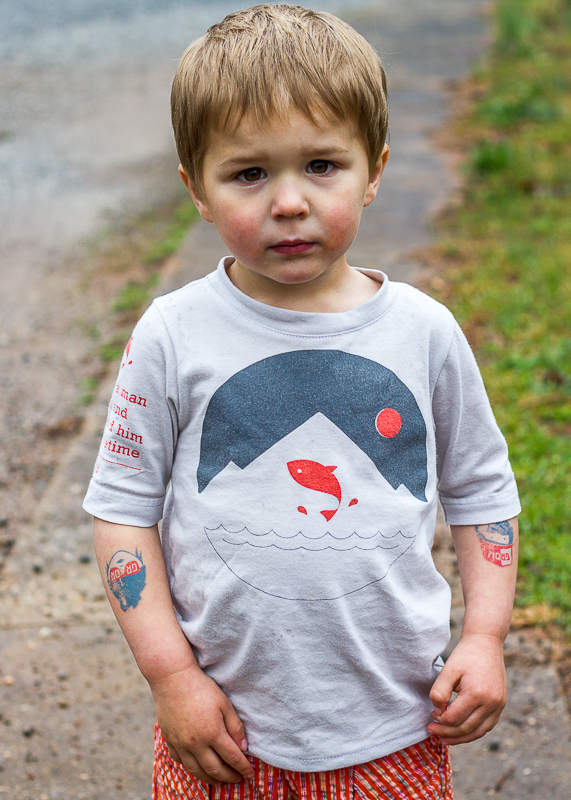
How about you? How has your week begun? Any completed projects to show or still tracing patterns and cutting out fabric? Can’t wait to finish up this post and go peruse the KCW site and IG pool!KCW Spring 2014


A Bianca Dress for Easter


double gauze bianca dress
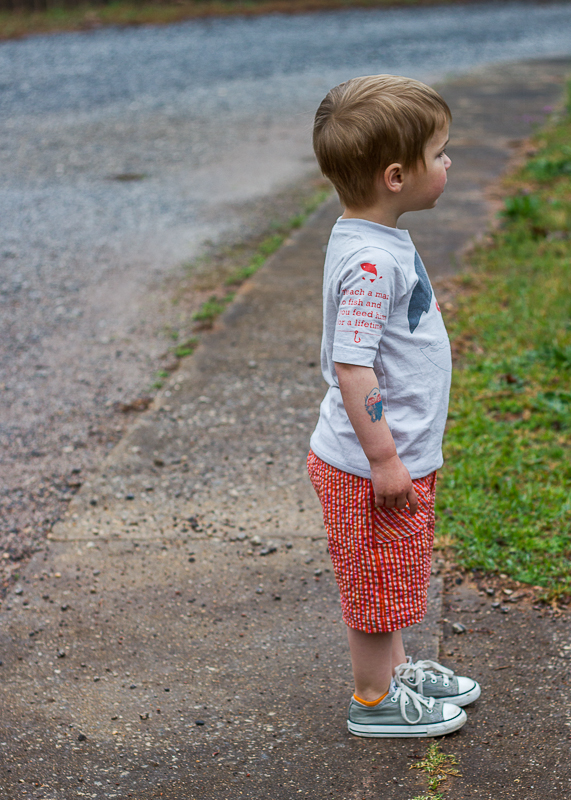
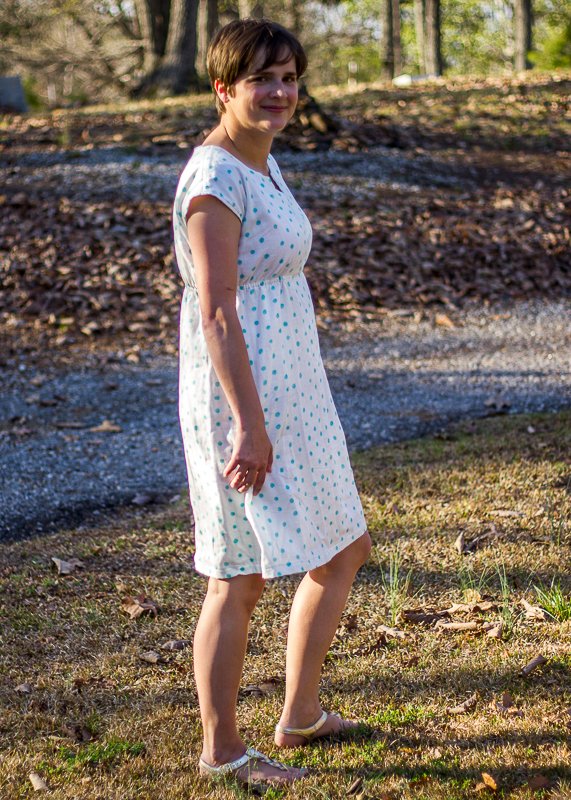
Well, it’s done folks. My lovely Bianca dress is all finished and oh so beautiful! I think it’s my favorite handmade item so far. Part of that has to do with this great pattern from Rae and the other part of it is due to this amazing fabric- double gauze from miss matatabi fabrics in Japan. I have seen fellow bloggers use double gauze for a while and wanted to try it, but the price tag has always deterred me. Enter one middle-of-the-night nursing session with Eliot, an awesome sale posted on IG, sleep deprivation, and I just HAD to buy some of this fabric. The next morning I had a bit of a scare wondering what I had bought in the middle of the night and put myself on restriction from etsy browsing during night-time feedings. But it was worth it when I got this lovely fabric in the mail. And really, the sale price was so good that even with shipping from Japan, this dress (not including lining) only cost me $27! Not bad for a custom-made Easter dress, I’d say.

double gauze bianca dress

Only problem now is that I want to buy all the double gauze! It is so heavenly to wear. Okay enough rambling about fabric purchases; on to the dress details…

double gauze bianca dress

Pattern: Upcoming Bianca Dress/Top from Made by Rae

Pattern Mods:

  • Followed directions to lower front facing 7/8″ based on my measurements (very important to check because it totally changes the fit!)
  • Added 4 inches to original length (what I believe would be 2 inches to the final version of the pattern) to make it knee length.
  • Added a white batiste lining: Now let me pause here for just a moment. I added a lining after the fact when I realized my double gauze was completely see-through (oops). The lining would have been fairly easy to add if I had done it while I was making the dress, but it was kind of a pain to do after the fact. I attached the skirt and bodice separately. The skirt is just a rectangle sewn down one side to make a tube, serged at the top and bottom hems, and then hand-sewn to the elastic casing. Bodice is machine-stitched at shoulder and arms seams but hand-stitched on all other seams- i.e. lots of hand stitching! It’s not the best stitching job (and that’s putting it nicely), but you can’t see it once the dress is on, and I figure this will be a hand-wash only dress so I don’t need to worry about the lining fraying or coming apart in the wash. For future reference though- check your garment for opacity before construction!

Fabric: As previously mentioned, Nano Iro double gauze from the Miss Matatabi etsy shop. (FYI I managed to squeak it out of 2 yards of fabric even with the added length)

double gauze bianca dress

Now that’s enough selfish sewing. I’m tired of editing pictures of myself- gets a bit awkward after a while. Plus, I have a lofty goal that all 4 of us will be in something handmade for Easter, so next week it’s KCW and clothes for the boys and then after that another Negroni shirt for the husband- fingers crossed for good naps and productive sewing!

double gauze bianca dress


WIP Wednesday: A dress, a quilt, and some fabric piles for inspiration

So the sickies hit our house this week and the kids and I have been down for the count. I’m going to apologize in advance that all my pictures are IG pics. Just the way life is sometimes. So many projects brewing in my mind, and so little time to get them done! I am *almost* finished with my second Bianca– this one is going to be my Easter dress! I just have a teensy bit left on it and hope to finish that and get some pics for you by this weekend. Here’s a sneak peek from my IG feed (@oliversfancy). I took the plunge and cut into my Nano Iro double gauze! And its gonna be awesome!

I am also hoping to finish the binding on Oliver’s quilt this week so I can finally cross that project off my list! Can’t wait to show you the finished product. Btw did you know that quilt and myself made it into our local paper? Yep, I am now famous. πŸ™‚ A reporter came to check out our quilt guild at the March meeting and ended up using my picture for the front of the article. Pretty cool. I ran out and got the last copy of the paper at a gas station and think I shall frame it in my craft room. Hey, my first time in print has to be special, right? Here’s a link to the article if you want to read it.

my attempt at a picture of the actual newspaper article.

Don’t forget, next week is Kid’s Clothes Week! I’ve been making all kinds of plans in my head and am getting antsy to begin. My goal is to have all my patterns prepped and fabric cut out by Monday morning so I can spent next week sewing. Here’s my IG capture of my new knits purchase…got some pretties from Girl Charlee in preparation for KCW. I also took the plunge and bought Dana’s shorts pattern since it came highly recommended from my sources. And last, but not least, I bought some stretch thread after Rae recommended it so highly. I’ll be sure to let you know how these all work out for me.

As I was writing this post, it unintentionally morphed into a WIP post…funny how blog posts take on a life of their own, huh? So I’m linking up over with WIP Wednesday at freshly pieced for the first time today.

Bianca Top

bianca top

This past week I was able to test an upcoming Made-By-Rae pattern- the Bianca. You guys, I may sound like a broken record sometimes, but this Rae, she really knows her stuff. I really, really love this top. In fact I love it so much that I cut into my hoarded double gauze to make myself an Easter dress version of this pattern. It has some really nice customization options to make it the most flattering fit on every body style. The pattern was set to be released very soon, but Rae’s adorable little baby boy made an early appearance so she’s busy snuggling up a little newborn, and I’m not too sure what the release date is now. I’m sure it won’t be too long; she has a great team that is continuing to keep things running. I will update this post and let y’all know when you can go and get it! In the meantime have a look at mine and enjoy brainstorming what fabric you could use for this. I think it’s the perfect style for a comfy summer dress… and that makes me long for summer and warm weather to finally be here! The calendar says it’s officially spring, but we’ve had some pretty cold, nasty days this week.

bianca top

If you recognize the fabric used in this top, it’s because I got a bolt of this Joel Dewberry voile on clearance a while back so I use it for all of my samples and testing before I cut into the good stuff. I now have about 4 tops that use this fabric in some way. I’m not sure what I’ll use for testing when my bolt is gone! Oh and I have a bit of bragging to do. My mom and sister came over when I had this top on for picture-taking, and they both commented on how cute it was. That’s pretty high praise because they’re not so much into the whole sewing-thing. They’d rather buy something at the store than make it, so I do a little happy dance when they think something I made looks like it could come from the store (but better because it’s perfectly adjusted to my measurements!). I can’t wait to see everyone else’s version of this top/dress once the pattern is released!

bianca top

Knitting 101

If you follow me on Instagram, you noticed back in February that I attended a knitting class hosted by the Indie Craft Parade. I have picked up knitting on and off again but never made anything of importance. After seeing all the cool things Kristen and Anna have been knitting this winter, I was motivated to try again. I decided to take the classΒ  so I could learn the basics (again) from someone who knows her stuff. Plus it was at a tea shop so I couldn’t pass that up. πŸ™‚ Deb, who taught the class, was so nice. She runs a farm where she raises sheep, shears the sheep, spins and dyes the wool, and then sells that wool. I love supporting local people like this! In the class we made a coffee cup cozy with some of her handspun yarn. She also provided us with these cool wooden needles that I just love!

I so enjoyed myself that while I was at the class, I bought of skein of her yarn. I wanted to make a cowl with it and wasn’t sure I had quite enough but decided to go ahead and give it a try. I used the moss stitch (knit 1, purl 1 with an odd number off cast-on stitches), cast on 19 stitches, and began knitting. I enjoyed working with this yarn. It was so softΒ  and squishy to knit with. It was also the perfect project to work on at night after the kids went to bed and I wanted some down time to relax and maybe watch a little tv. I have such texture issues that I can’t stand knitting with cheap acrylic yarn, but my sensitive skin breaks out when I come near really itchy 100% wool yarn so this merino wool yarn was a very happy medium.

knit cowl

We have had some beautiful weather recently, so I was afraid that I wouldn’t get to wear this cowl until next winter, but I finished it just in time to wear it yesterday during our rainy, yucky, cold day. At least wearing a cute cowl and my rain boots made the day seem a little brighter! The cowl finished up at a good length. It only wraps around once but I like how it lays nice and bulky against my neck. Of course my boys also liked it and were pulling on it so now it’s a bit stretched out. I really should try blocking it, but I’ve never done that before. Any words of wisdom on how to block and what to use?

knit cowl

I’m probably done knitting until next winter but I am glad I actually finished a project for once. Also now that I know I can do something that looks good, I might attempt a harder project next time. Maybe I’ll try to learn circular needles so I can make some cute hats for the boys. I love these that Anna made from the Purl Bee’s free tutorial.

knit cowl

Spring 2014 KCW Plans

KCW logo

Did I mention that I am a contributing blogger for this Spring’s KCW? Well I am, and I’m very excited to be there! Today I’m over on the blog talking about my plans for April’s challenge week. Yeah, I know April seems like forever away, but in reality, the next KCW is only a few weeks away! I discovered that I like the push to plan inΒ  advance this time because it takes me a while to think through what patterns I have and what clothes my kids need. Now I’ve done all the hard work of pre-planning and can just have fun sewing during the challenge week!

raw edge raglan

If you are interested to see my sewing list head over here to the KCW blog to check it out…plus you get to see this adorable picture of Oliver that I had forgotten about. Funny story behind this picture- I was searching google for a pattern picture of the raglan tee from Sewing for Boys and my own picture turned up in the search results. Why I guess I could use my own picture, couldn’t I? πŸ™‚ FYI this picture is from Fall 2012’s Project Run and Play sewalong…you can read all about it here if you’re interested.

Pincushion Swap

pincushion

Last Saturday at our March meeting of the Greenville Modern Quilt Guild we had a pincushion swap. There were no rules or regulations as long as it was a functional pincushion. For February’s meeting I taught a little demo on the quilt as you go (QAYG) technique, and I really enjoyed it so I decided to make a little mini QAYG log cabin pincushion for my swap entry.

pincushion

I bought some crushed walnut shells from a quilt show several years back and have always meant to make a pincushion but never got around to it. We all have those kind of projects sitting around right? I was glad to have the push of the guild swap to force me to make one. Like I said, I did the QAYG method with a loose version of the log cabin block. Also I stuffed it 1/3 of the way with the crushed shells and then finished it off with fiberfill to give it a nice cushy filling. Now that I realize how easy it was to make the pincushion, I want to make another one for myself!

pincushion

Here’s a picture of all the pincushions entered. We didn’t have as many participants as we were hoping because it was a low month attendance-wise, but it was still a fun swap. And check out what I got to bring home. That lovely one in the middle with the bonnie and camille half dresden…yeah that’s mine. Made by my lovely friend Cheryl. So happy that I got hers in the random draw.

pincushion

Weekend Getaway Blouse

For the Maker’s Summit this past weekend I felt the need to make myself an outfit. What is a conference for makers without something handmade, right? I really wanted to play around with some of my chambray and make a tunic but ran out of time and needed something quick and easy. This Liesl + Co pattern seemed to fit the bill. I bought this pattern and the Everyday Skirt several months ago when they were having an online sale, but had yet to actually make them. Still waiting to make the skirt, but as the weather warms up I’m sure I’ll get the urge to try it out. Side note: Editing polka dot pictures does crazy stuff to the eyes!weekend getaway blouse

This shirt was a very simple, straightforward pattern. I didn’t have the time or willpower to make a muslin so I decided to just go for it and make a size I thought would fit based on my upper bust measurements. (Gasp…lazy sewing!) Liesl recommends doing a FBA (full bust adjustment) if you are a C cup or larger, but even though I am (at the moment- thanks to nursing it changes on a monthly basis- LOL) a C, I couldn’t be bothered. In retrospect I probably should have because my bust darts are way off, but everything else worked out great. This was one of those situations where everything could have gone terribly awry and I end up trashing the end result, but I am so happy to report thatΒ  I got lucky and ended up with a shirt I will actually wear!

weekend getaway blouse

Pattern:Β  Liesl + Co Weekend Getaway Blouse

Pattern mods/future changes:

  • I did go back and change the side seam allowances from 1/2″ to 3/8″ to give myself a little more wiggle room.
  • Next time I would add some more length to the top because I like my shirts a bit longer
  • As mentioned previously, bust darts were off (super high) but with the silkiness of the fabric and loose-fitting pattern, it’s not very noticeable
  • I left out the pockets because I didn’t want to spend the time on them and didn’t think they were really necessary with the type of fabric I used.
weekend getaway blouse

I really like the little inverted pleat at the top there…it’s a fun detail.

Fabric used: An unknown silky-ish fabric picked up when I got to hang out with Deborah at a fabric store in Atlanta last fall. There is no selvedge info so I’m really not sure of the fiber content. This was one of my first times sewing with such slippery fabric, and it made things a bit tricky but not super unmanageable. I’d like to make this pattern again in a chambray or similar fabric and see how the sewing goes.

weekend getaway blouse

And just for fun I had to throw in this gem of my little photographer’s assistant directing the shoot from his wagon. πŸ˜‰ What a sweetie, huh?

eliot