All About Boys: Coming soon to a blog near you…

AAB logoA few weeks ago a few IG friends and I were chatting about how sad it was that there were all these cute, adorable things for girls and sometimes boys get left out in the cold. If you’ve been around here for any length of time you’ve probably heard me rant about that sometime or other. 🙂 But really, it does seem like girls get a lot of the fun. So we decided to change that up a bit. We are starting a little series called All About Boys- where we take a week and showcase some extra cool boy projects. This time we decided to place an emphasis on free patterns because many people want to sew for their kids but don’t know where to begin. Free patterns are a great way to get your feet wet without breaking the bank. We will be using Continue reading

Advertisement

Vintage May

vintage may logo

I have followed along with Kristin and Jess’s Vintage May series since its inception so I was so pumped when Kristin emailed me and asked if I wanted to be a participant this year. Um, yeah! I had so many ideas floating around my head that I had a hard time pinning down just what I wanted. Then I stumbled across this pinterest picture and knew I had found my lightbulb moment- a 1950s inspired rockabilly outfit. The fact that it would involve several patterns I wanted to try- Bonus!

Vintage May Redo (4 of 10)

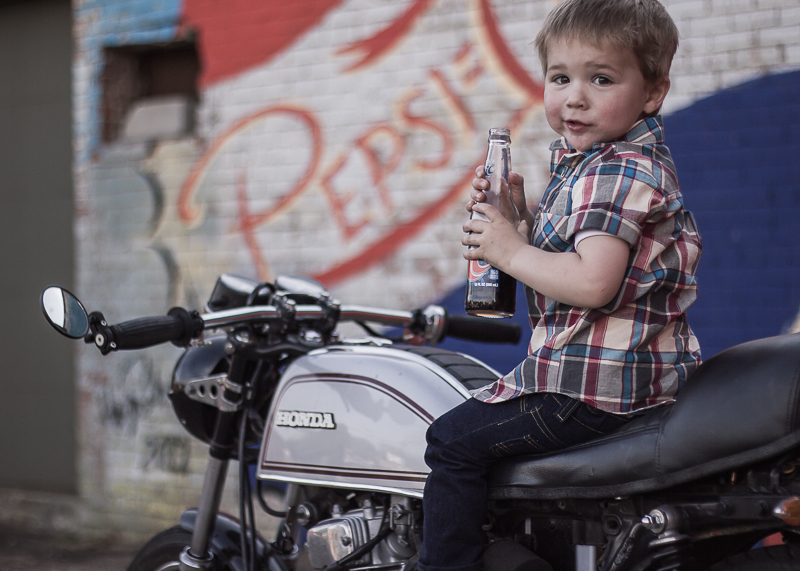
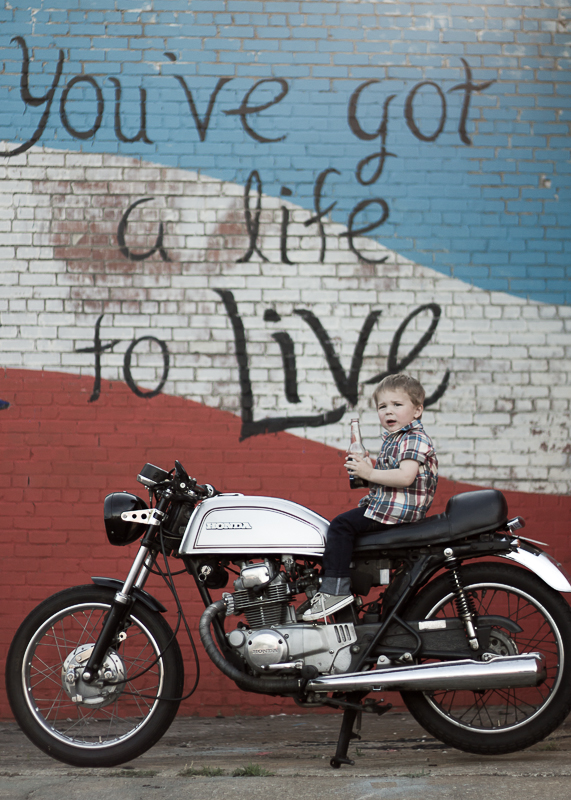
Without further ado, here is Oliver in his 1950’s outfit: cuffed straight-leg jeans, white tee, and a plaid button down. I de-saturated the pictures a bit to give them a vintage feel. Not sure I was totally successful but I’m kinda digging the effect. He totally owned this photoshoot too- might be because we actually let him drink the photo prop. (please no judging- good pics were a must!) For any fact sticklers, I’m well aware that hubby’s bike is actually a 1975 cafe racer but it’s still vintage so it counts in my mind even if it’s not the exact era we were going for.Vintage May Redo (8 of 10)

My imaginary back story is that Oliver has brought his new motorcycle down to the local hang-out spot and is waiting for his friends to arrive so they can admire his new ride and take it for a spin. Meantime, he’s enjoying a refreshing RC Cola and chilling (like a villian- 😉 )

Vintage May Redo (11 of 3)

Now for a little run-down of the patterns I used for O’s outfit:

Pants: Small Fry Skinny Jeans size 2T with 3T+ length. I knew that I wanted to copy Kristin’s idea of the big cuffs so I added several inches to the length. I bought some dark denim at Joann’s then had a moment’s freak-out when I got home because the pattern calls for stretch denim and mine did not have any stretch. I could have sized up to a 3T but I had already cut out the 2T pattern pieces and time was of the essence so I decided to just go for it. Glad I did because these fit great! Actually the waist is even a bit big now that O is potty trained because the 2T allows extra room for diaper bums. Vintage May Redo (10 of 10)

Like all the other reviews of these pants- they are definitely not a quick sew. But they’re not that hard either- her directions are excellent and walk you through each step so beautifully! The only really difficult section was the belt-loops. All those layers of denim almost didn’t fit under my machine foot. And soo much to sew thru! I was afraid I was going to break my machine. One broken needle later and we made it…whew! Note- I switched from a jeans needle to a top-stitching needle and that made a huge difference. When I finished these my husband commented that they looked like designer jeans and he wanted a pair- high five to me! (But I’m not planning on making him a pair anytime soon in case you were wondering 🙂 )

Vintage May Redo (7 of 10)

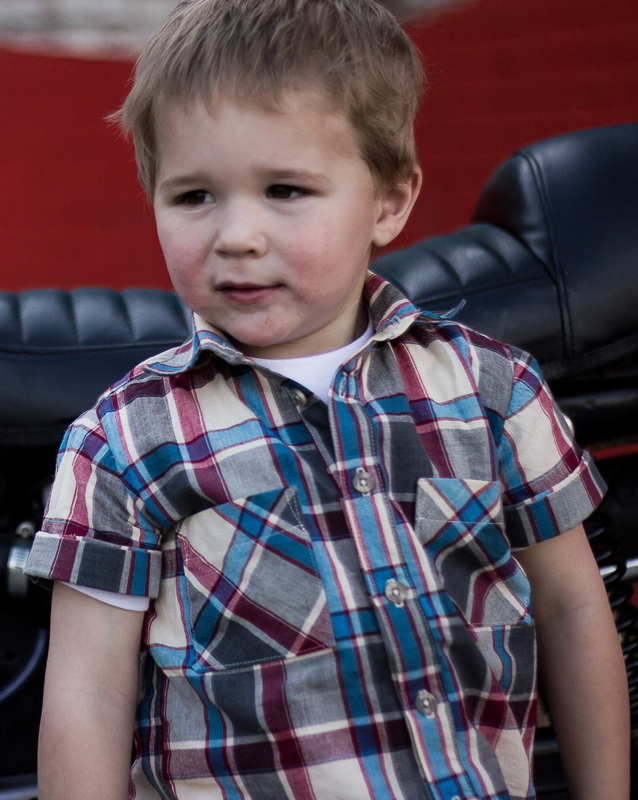
Button-down: Oliver+S Sketchbook Shirt. I have been wanting to make this for O before he grows out of the size range that I bought it in! I went on a search for just the right plaid and found this great madras fabric at Hancock. Apparently I have been missing out because Hancock has a great selection of apparel fabrics. I am definitely going to be making a trip back there soon! This shirt reminded my of my grandfathers- one of which passed away when I was a pre-teen so it was a happy nostalgic time making this for Oliver. I hadn’t really thought of the fact that I was making something from their (my grandfather’s) generation until I was in the middle of this shirt construction but I’m so glad it worked out that way. Feels like a bit of a nod to my grandpa to have my son wearing something that he would have worn in his day.

Vintage May Redo (6 of 10)

I used the 2T size because I had traced it back in the fall and never used it. Oliver really fits in the 3T size now but when I compared the sizes, it looked like I just needed to add some length to make it work. I added two inches to the length of the arms hem so that I could retro it up a bit and roll up the sleeves and also added an inch to the bottom hem. The neck is a bit small but I’m not planning on buttoning the collar so that’s no big deal. A very professional finish with this pattern- like all O+S patterns.

Vintage May Redo (12 of 3)

T-shirt- I knew O needed a white tee to complete his outfit but wanted to add a little bit of fun to it so I added this motorcycle transfer (image found via google). I had been given some iron-on transfer paper a while back but actually didn’t pay attention to it until I was cleaning out my sewing room a few weeks ago and found it. Why have I not been using this? It’s so easy! And Oliver loves the motorcycle tee! I think it will become a summer fave. Pattern is the flashback skinny tee made in a 3T size with extra length added to arm and shirt hems. I wanted to be able to roll the sleeves up to add to the vintage feel of the shirt.

Vintage May Redo (5 of 10)

Vintage May Redo (9 of 10)
Hope you enjoyed your trip back to the 1950s. I know I did! Make sure to check out all the other great Vintage May stuff happening on Jess and Kristin’s blogs over the next few weeks.

Vintage May Redo (3 of 10)

Weekend Getaway Blouse

For the Maker’s Summit this past weekend I felt the need to make myself an outfit. What is a conference for makers without something handmade, right? I really wanted to play around with some of my chambray and make a tunic but ran out of time and needed something quick and easy. This Liesl + Co pattern seemed to fit the bill. I bought this pattern and the Everyday Skirt several months ago when they were having an online sale, but had yet to actually make them. Still waiting to make the skirt, but as the weather warms up I’m sure I’ll get the urge to try it out. Side note: Editing polka dot pictures does crazy stuff to the eyes!weekend getaway blouse

This shirt was a very simple, straightforward pattern. I didn’t have the time or willpower to make a muslin so I decided to just go for it and make a size I thought would fit based on my upper bust measurements. (Gasp…lazy sewing!) Liesl recommends doing a FBA (full bust adjustment) if you are a C cup or larger, but even though I am (at the moment- thanks to nursing it changes on a monthly basis- LOL) a C, I couldn’t be bothered. In retrospect I probably should have because my bust darts are way off, but everything else worked out great. This was one of those situations where everything could have gone terribly awry and I end up trashing the end result, but I am so happy to report that  I got lucky and ended up with a shirt I will actually wear!

weekend getaway blouse

Pattern:  Liesl + Co Weekend Getaway Blouse

Pattern mods/future changes:

  • I did go back and change the side seam allowances from 1/2″ to 3/8″ to give myself a little more wiggle room.
  • Next time I would add some more length to the top because I like my shirts a bit longer
  • As mentioned previously, bust darts were off (super high) but with the silkiness of the fabric and loose-fitting pattern, it’s not very noticeable
  • I left out the pockets because I didn’t want to spend the time on them and didn’t think they were really necessary with the type of fabric I used.
weekend getaway blouse

I really like the little inverted pleat at the top there…it’s a fun detail.

Fabric used: An unknown silky-ish fabric picked up when I got to hang out with Deborah at a fabric store in Atlanta last fall. There is no selvedge info so I’m really not sure of the fiber content. This was one of my first times sewing with such slippery fabric, and it made things a bit tricky but not super unmanageable. I’d like to make this pattern again in a chambray or similar fabric and see how the sewing goes.

weekend getaway blouse

And just for fun I had to throw in this gem of my little photographer’s assistant directing the shoot from his wagon. 😉 What a sweetie, huh?

eliot

Kids Clothes Week Fall 2013

kid's clothes week
This past week was Kid’s Clothes Week, and while I am late reporting in on my productivity, I did get a few things finished (or mostly finished) last week. When taking inventory of the boys’ clothes, I realized they could both use some more church clothes. Perfect time for me to try out the Oliver + S Sketchbook Shirt pattern that I picked up during their end of summer inventory sale.

Sketchbook shirt

I have been saving Ian’s old button down shirts for this very purpose and got one out to perform surgery on for this pattern. I started out with one for Eliot. Let me tell you, I have decided that from now on, all button down shirts I make for the boys will be short sleeved! Although the little tiny cuffs and button plackets are so adorable, they require way too much time and work! Much easier to make a simple short sleeve and then wear a long sleeve shirt underneath if need be! I actually ran out of time to put the buttons on the shirt so you will see Mr. E wearing safety pins to hold himself together! Sketchbook shirt


The shirt turned out really well but a little big. He’s growing quickly though so I anticipate him getting quite a bit of use out of this shirt before winter is over.


Now as far as my other KCW project, it involved Oliver’s Halloween outfit and I haven’t been able to get good pics of him wearing it yet so expect that post to come up sometime on Friday, after our trick or treating experience. Let me just say that I think it’s pretty adorable even if it is very simple and practical. I’ll leave you with an IG picture as a hint. 😉